Schedule dashboard notifications
Add and edit dashboard e-mails
Do the following:
-
In the toolbar, click your username.
A drop-down menu appears.
-
Select Administration.
The Administration page appears, displaying the Options tab.
-
Click the Scheduler tab.
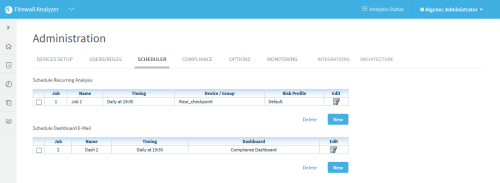
The Scheduler Setup page appears with a list of scheduled analysis and dashboard e-mail jobs.
-
Do one of the following:
- To schedule a new dashboard email job, in the Schedule Dashboard E-mail area, click New.
- To edit an existing dashboard email job, click on the Edit icon next to the desired job.
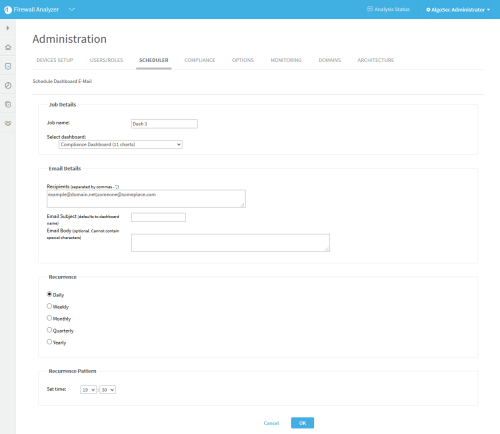
New fields appear.
-
In the Job name field, type a name for the job.
-
In the Select dashboard drop-down list, choose a dashboard.
-
In the Recipients field, type an email address or a comma seperated list of multiple email addresses to which to send the notifications.
-
(Optional) In the Email Subject field, type a subject for the email notifications.
The default subject is the dashboard's name.
-
(Optional) In the Email Body field, type a message to include in the body of the email notifications.
-
In the Recurrence area, specify how often the analysis job should run.
You can select either a daily, weekly, monthly, quarterly, or yearly analysis, or configure the analysis to occur when a policy is installed on the device(s).
The fields in the Recurrence Pattern area change according to your selection.
-
In the Recurrence Pattern area, configure the desired pattern of recurrence.
-
Click OK.
Deleting Scheduled Jobs
Use this procedure to delete a scheduled analysis or dashboard email.
Do the following:
-
In the toolbar, click your username.
A drop-down menu appears.
-
Select Administration.
The Administration page appears, displaying the Options tab.
-
Click the Scheduler tab.
The Scheduler Setup tab is appears with a list of scheduled analysis and dashboard e-mail jobs.
-
Select the check box next to the desired job.
-
Click Delete.
A confirmation message appears.
-
Click Yes.
The job is deleted.


