Welcome to Algo
AlgoSec Algo is your personal security policy management assistant. Algo provides quick and easy access to core ASMS functionality from the comfort of your organization's existing chat platforms, including Desktop, Web, or Mobile options. Algo is supported on Slack, Microsoft Teams, and Cisco Webex.

Chat with Algo
Chat with Algo to run traffic simulations, submit change requests, analyze application impact, and more!
-
Use Algo commands to get information about:
-
The status of a change request
-
The connectivity status of an application
-
Owners of an application
-
Associated applications
Or do actions like:
-
Make a change request
-
Perform a traffic check
-
-
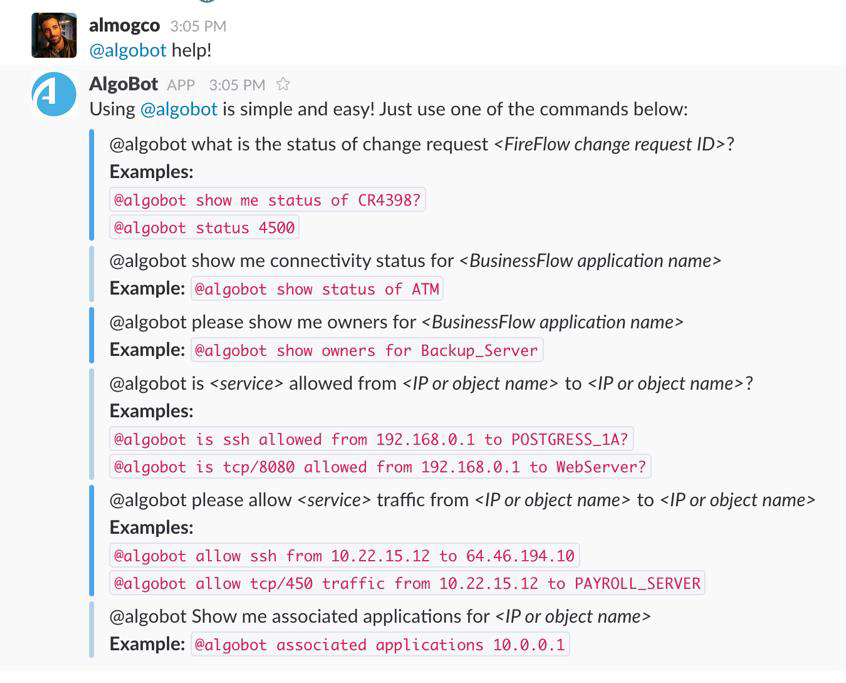
Enter @algobot help to view a full list of available commands and requests.
Tip: You can edit the set of available Algo commands by following the instructions in this KB article: How to customize the set of available Algobot commands.
- Send direct messages to Algo from your chat platform. If there are more than the two of you in the chat, use the @algobot prefix so that Algo knows you're talking to it.
-
Language support: If you’re typing in English, German, French, or Portuguese, Algo will attempt to recognize the language and reply in kind. By default, Algo replies in English. See on this page Select the Algo default Language: English, German, French or Portuguese.
- Invite Algo to any of your Slack channels. Once invited, Algo listens to all commands you send to @algobot.
Note: Make sure that you have run an analysis in AFA before using Algo. Algo needs AFA data to be able to help you!
Here are some examples using Algo:
Deploy Algo
To deploy Algo, first install Algo on your chat platform, and then configure it on your ASMS server.
Algo prerequisites and deployment configurations
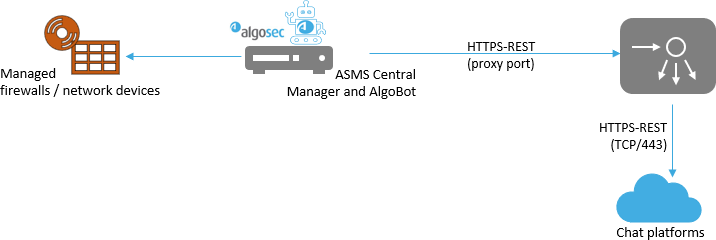
As a Chat Bot, Algo has to be notified of any new messages that the users may send over one of the supported chat platforms. To integrate Algo with your organization's chat platforms, your system must meet the following prerequisites:
| Internet access |
The ASMS server must be able to access the internet and the chat platform servers. Verify also that you have the following connectivity: Important: The following list is based on Microsoft recommendations at time of publishing this web page. Since Microsoft regularly adjusts their list of URLs for connectivity, we recommend you consult their list if a problem occurs. To access the most comprehensive list, refer to the following URL provided by Microsoft.
Unauthenticated proxies are supported if needed. For details, see the diagrams below: Algo with no proxy | Algo with a proxy |
| Permissions | You must have administrator privileges and access to authorize Algo on your chat platform. |
| DNS | The ASMS Central Manager must be configured with DNS. See Configure DNS Server. |

Install Algo on your chat platform
Follow these instructions to install Algo on your chat platform.
Install Algo on your Slack workspace to chat with Algo on Slack. You must be a Slack Administrator to perform this procedure.
Note: Before starting, make sure you have permissions for the following required scopes in Slack:
-
chat:write
-
chat:write:user
-
chat:write:bot
Do the following:
-
Click this link to Slack or navigate to https://e4u3ndk8m6.execute-api.us-east-1.amazonaws.com/production to install Algo on Slack.
-
Click Add to Slack. You are prompted to authorize the AlgoSec Slack App.
- If your are not already signed in to your workspace on Slack, do so now. Otherwise continue to the next step.
-
Click Allow to give Algo permission to access the your Slack workspace.
Algo is authorized on Slack, and the following keys and values are displayed:
- BOT_TOKEN
- BOT_ID
- Click Export to CSV to download these values and save them for later use.
Continue on this page with Configure AlgoBot on the ASMS server.
-
In Microsoft Teams, Algo must use webhooks to be notified about new messages.
Use either ngrok or TunnelRelay to configure Algo to accept webhook tunnels from the internet:
 Install and configure ngrok
ngrok is a useful tool to create secure tunnels to locally hosted applications using a reverse proxy. Microsoft recommends ngrok in their documentation.
- Requirements: ngrok subscription Enterprise level*.
*ngrok Subscription Enterprise level provides a stable custom endpoint. For example, during ASMS upgrades and reboots, Teams will maintain endpoint settings. The Enterprise level is recommended for a production environment.
- Pricing: See ngrok pricing
 (for Enterprise level).
Install and configure ngrok for use with Algo
-
Download the TGZ file (x86-64) from ngrok for Linux from the ngrok download
page to your ASMS machine /home/afa folder. -
Run the command:
sudo tar -xvzf /home/afa/ngrok-v3-stable-linux-amd64.tgz -C /usr/local/bin
-
On the ngrok website ngrok.com
, log in to your ngrok subscription. -
On the Authentication tab, select Your Authtoken sub-tab.
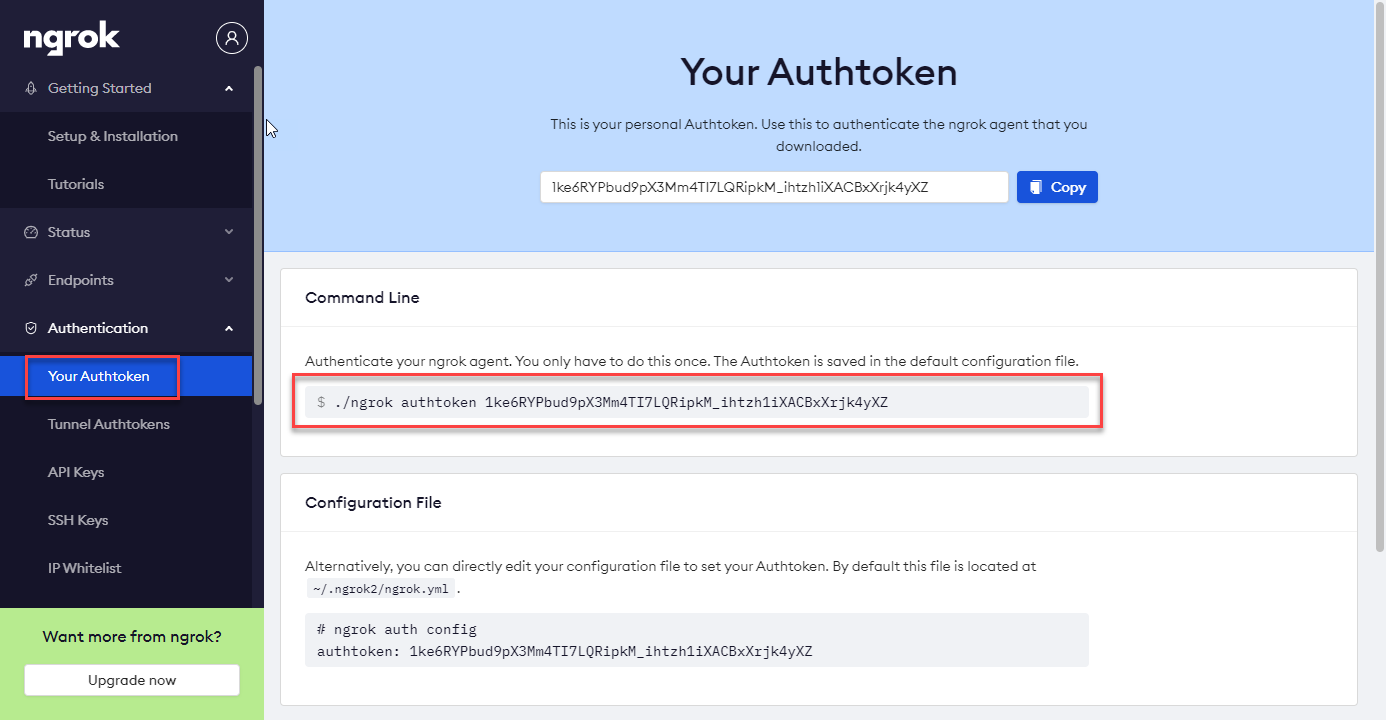
Copy the Authtoken script from the Command Line section:
ngrok config add-authtoken <Your Authtoken>
Paste to the command line on the ASMS machine, and run the command.
-
-
For Enterprise level subscription, in /usr/lib/systemd/system/ngrok.service, modify the following line by adding the unique name:
ExecStart=/usr/local/bin/ngrok http --subdomain=<unique name> 5000 --> Modify the <unique name>
For example:
ExecStart=/usr/local/bin/ngrok http --subdomain=algobot.companyName 5000
-
For Free level subscription, in /usr/lib/systemd/system/ngrok.service, modify the following line by removing the string "--subdomain=<unique name>"):
ExecStart=/usr/local/bin/ngrok http 5000
-
-
Enable the service:
systemctl enable --now ngrok.service
-
The https or http endpoint provided by ngrok is output when the subscription command is run. Note, and save the ngrok https or http endpoint for later.
Install and configure TunnelRelay
TunnelRelay is a Microsoft OpenSource project to allow bots running from internal networks to respond to messages from Microsoft Teams.
- Requirements: Admin access to a Microsoft Azure subscription.
- Pricing: Volume-based pricing by Azure. For more details, see the TunnelRelay README .
Install and configure TunnelRelay for use with Algo.
- In Azure:
- Create a new relay and give it a logical name. Select any region available for your new relay.
- In the Relay screen, click +Hybrid Connection.
- Give the hybrid connection a Name.
- Make sure the Requires Client Authorization check box is NOT selected.
- Make a note of the Relay name, and the Hybrid Connection name.
- On the left side menu click Shared access policies. Make a note of the Policy name.
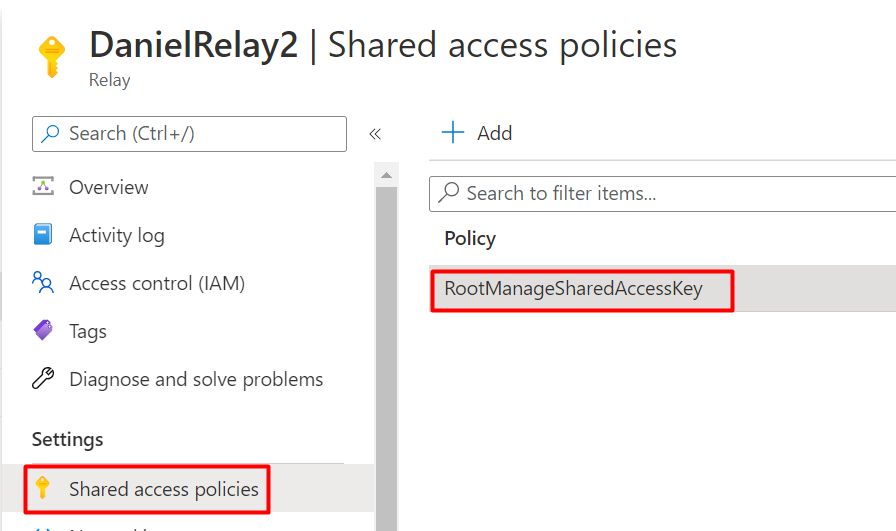
In this example, RootManageSharedAccessKey.
-
Click the Policy. An information screen opens to the right.
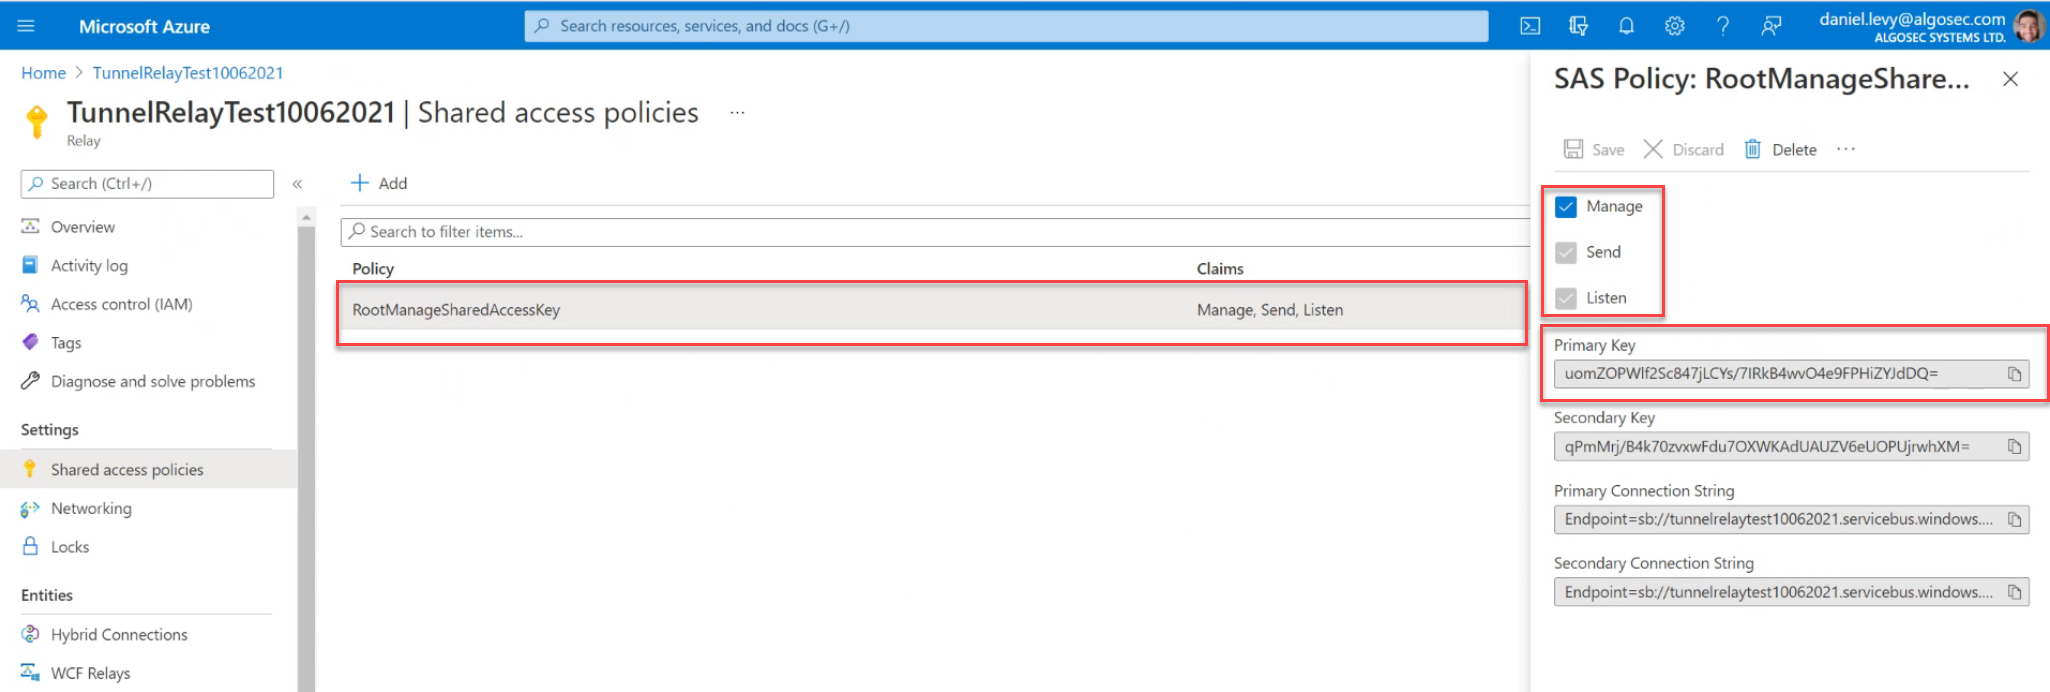
-
Select Manage, Send and Listen permissions.
-
Make a note of the Primary Key.
- Open a CLI session to ASMS, and download the latest TunnelRelay.Console v2 binary file for Linux from GitHub to the folder /data/ms-algobot/relay.
- Run the script:
/usr/share/algobot/tunnel_relay_config_creation.sh
- Configure the TunnelRelay, when prompted enter the information that you made note of above:
- Azure Relay Key: The shared access key.
- Relay name: the name of the relay.
- Hybrid Connection Name: the unique hybrid connection name.
- Shared Policy Name: name of the Policy.
-
Run the TunnelRelay.Console executable from the /data/ms-algobot/relay folder.
- Note the webhook endpoint provided by TunnelRelay, and save it for later.
Continue with step 2.
- Requirements: ngrok subscription Enterprise level*.
-
Copy the microsoft-teams-manifest.zip (located in /usr/share/algobot on the ASMS server) to a local directory on the machine you are configuring Teams.
-
If you haven’t yet added the Developer Portal app to Teams, do it now.

-
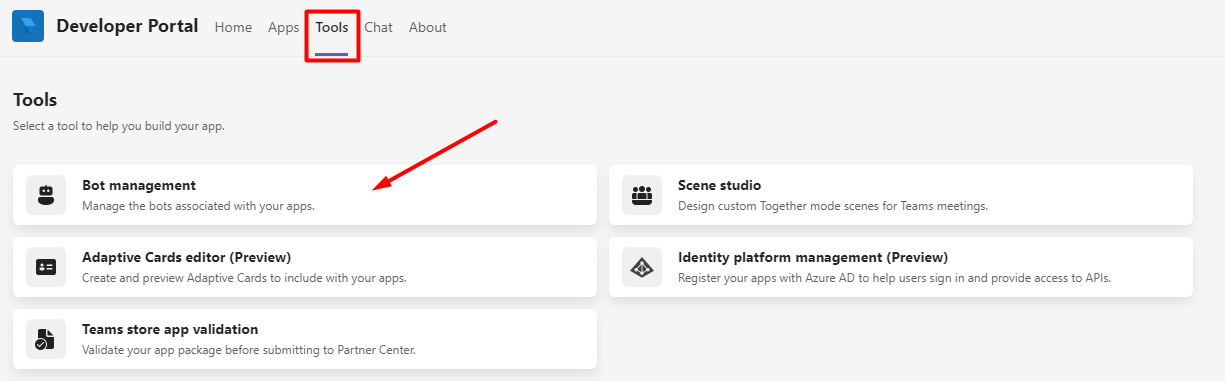
In the Developer Portal:
-
Select the Tools tab. Click Bot management.
-
Click + New Bot. Name the bot: Algo. Click Add. The Bot page opens.
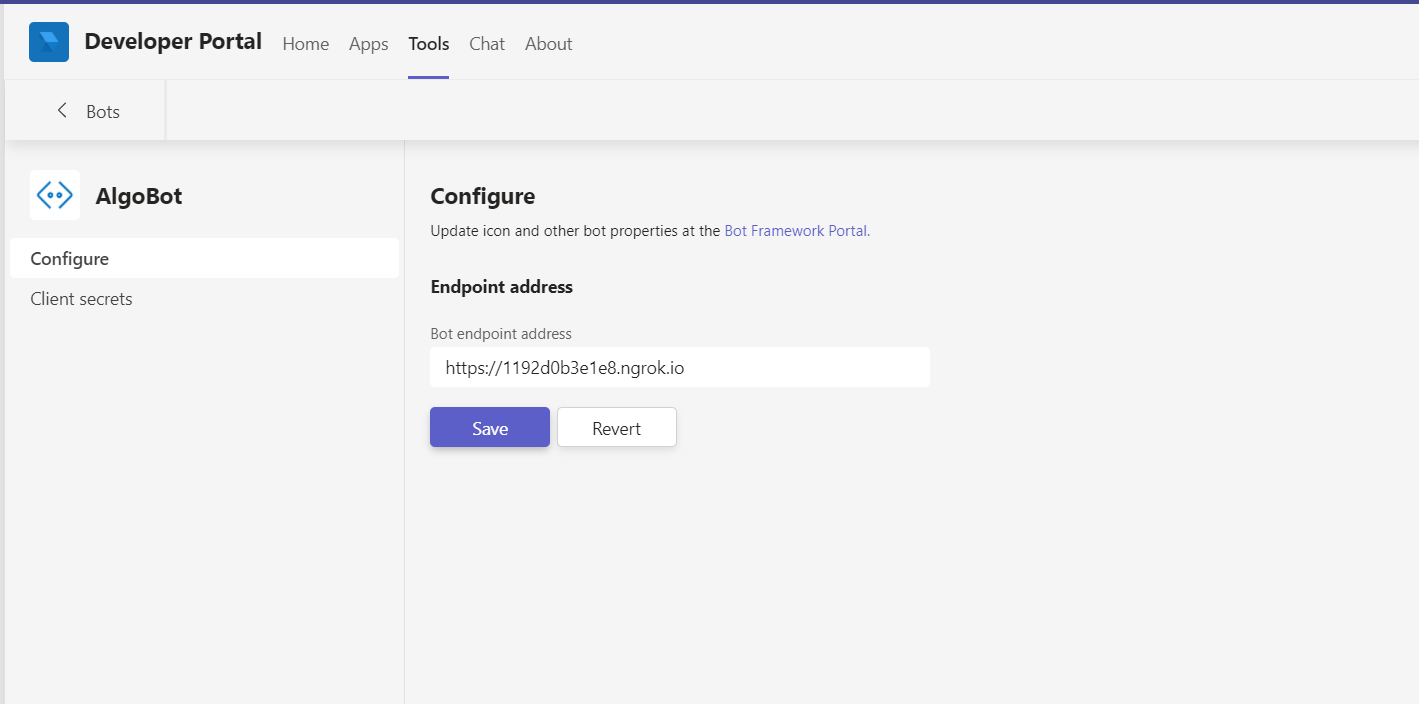
-
Add Bot endpoint address if available (you can always add it later), and click Save.
-
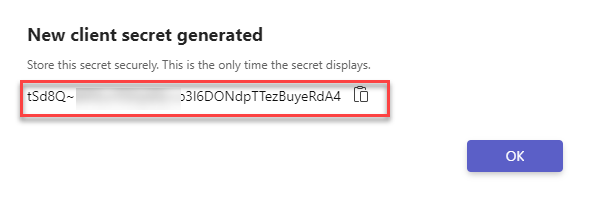
Click Client secrets. Click Add a client secret for your bot.
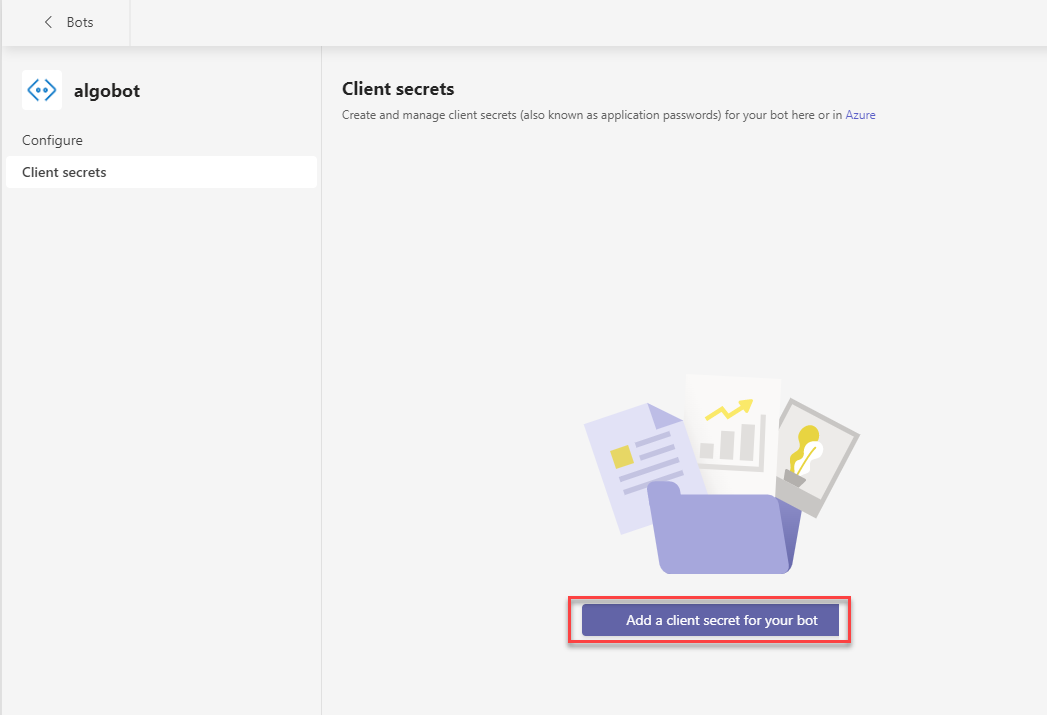
Note: Client secret is also known as App Password
The new client secret is generated. Copy and save it for later.
-
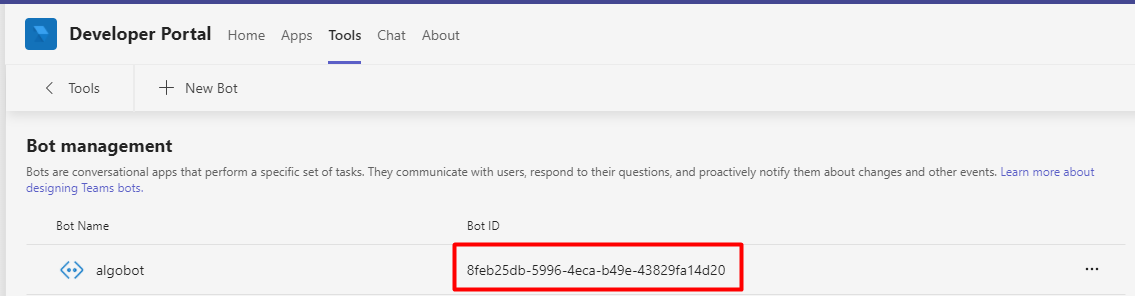
Click < Bots to return to the Bot Management page In Tools tab . Copy the BotID to use later.
-
Click the Teams Apps tab, select Import app. Browse for the microsoft-teams-manifest.zip file. The AlgoBot app page appears.
-
Select App features from the left menu. Click Bot.
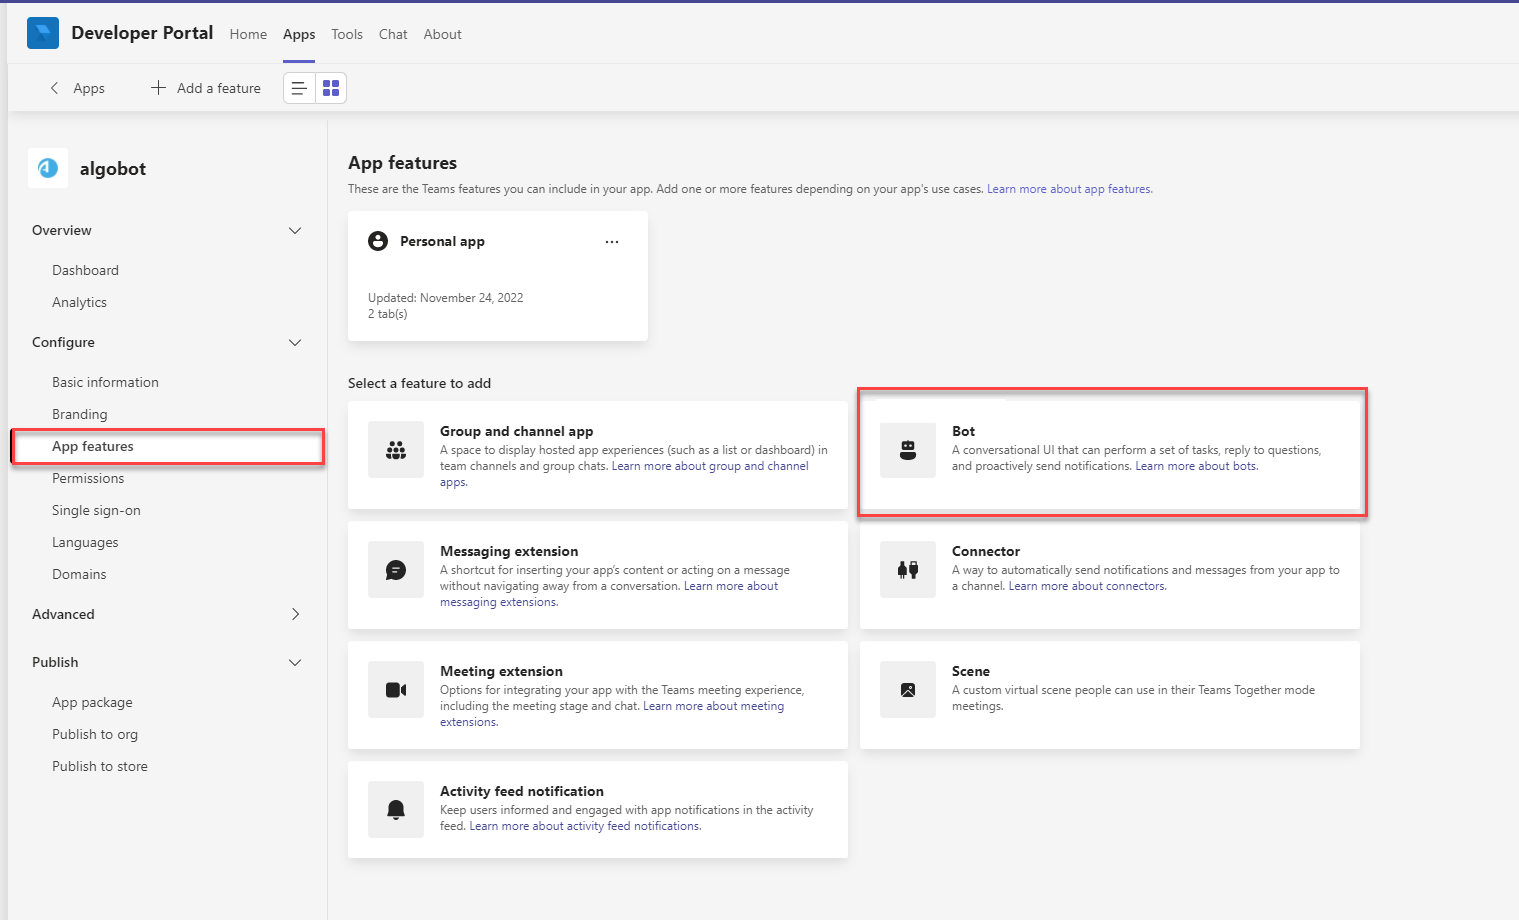
The Bot Page appears.
-
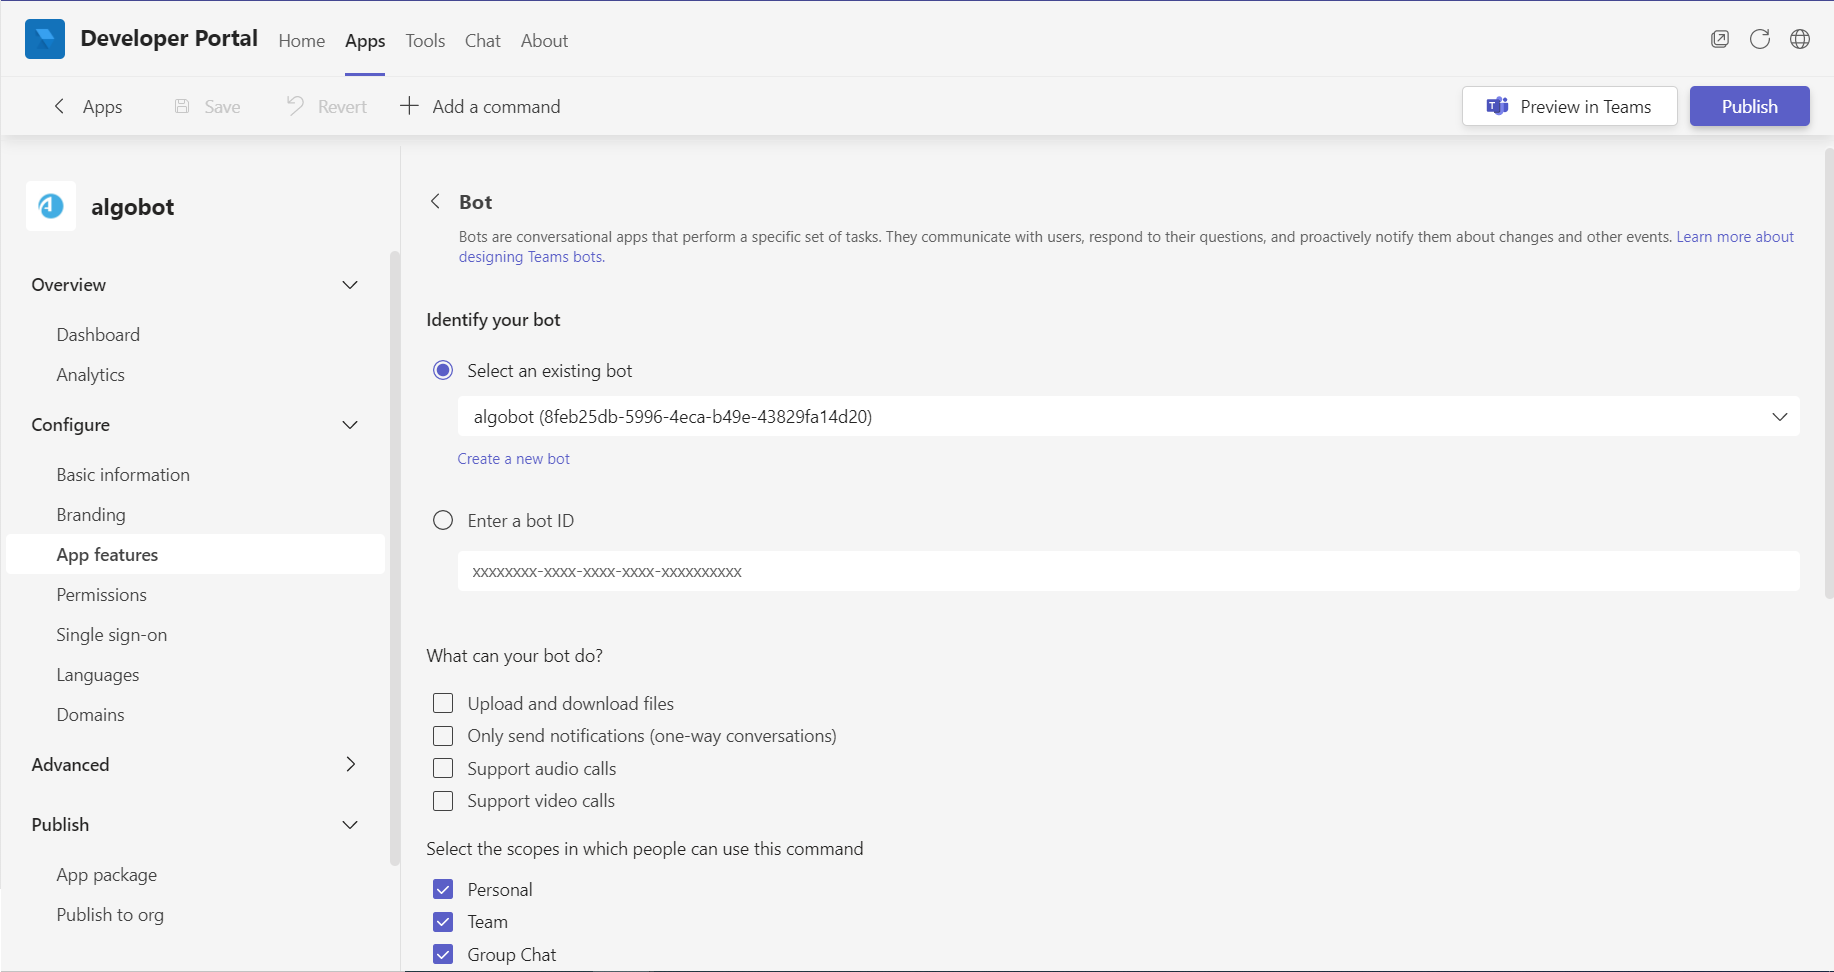
Click Select an existing bot and choose the newly created algobot (alternatively you can manually enter theBot ID).
Select all 3 scopes in which people can use the command: Personal, Team, Group chat. Click Save.
-
Click Publish.
-
-
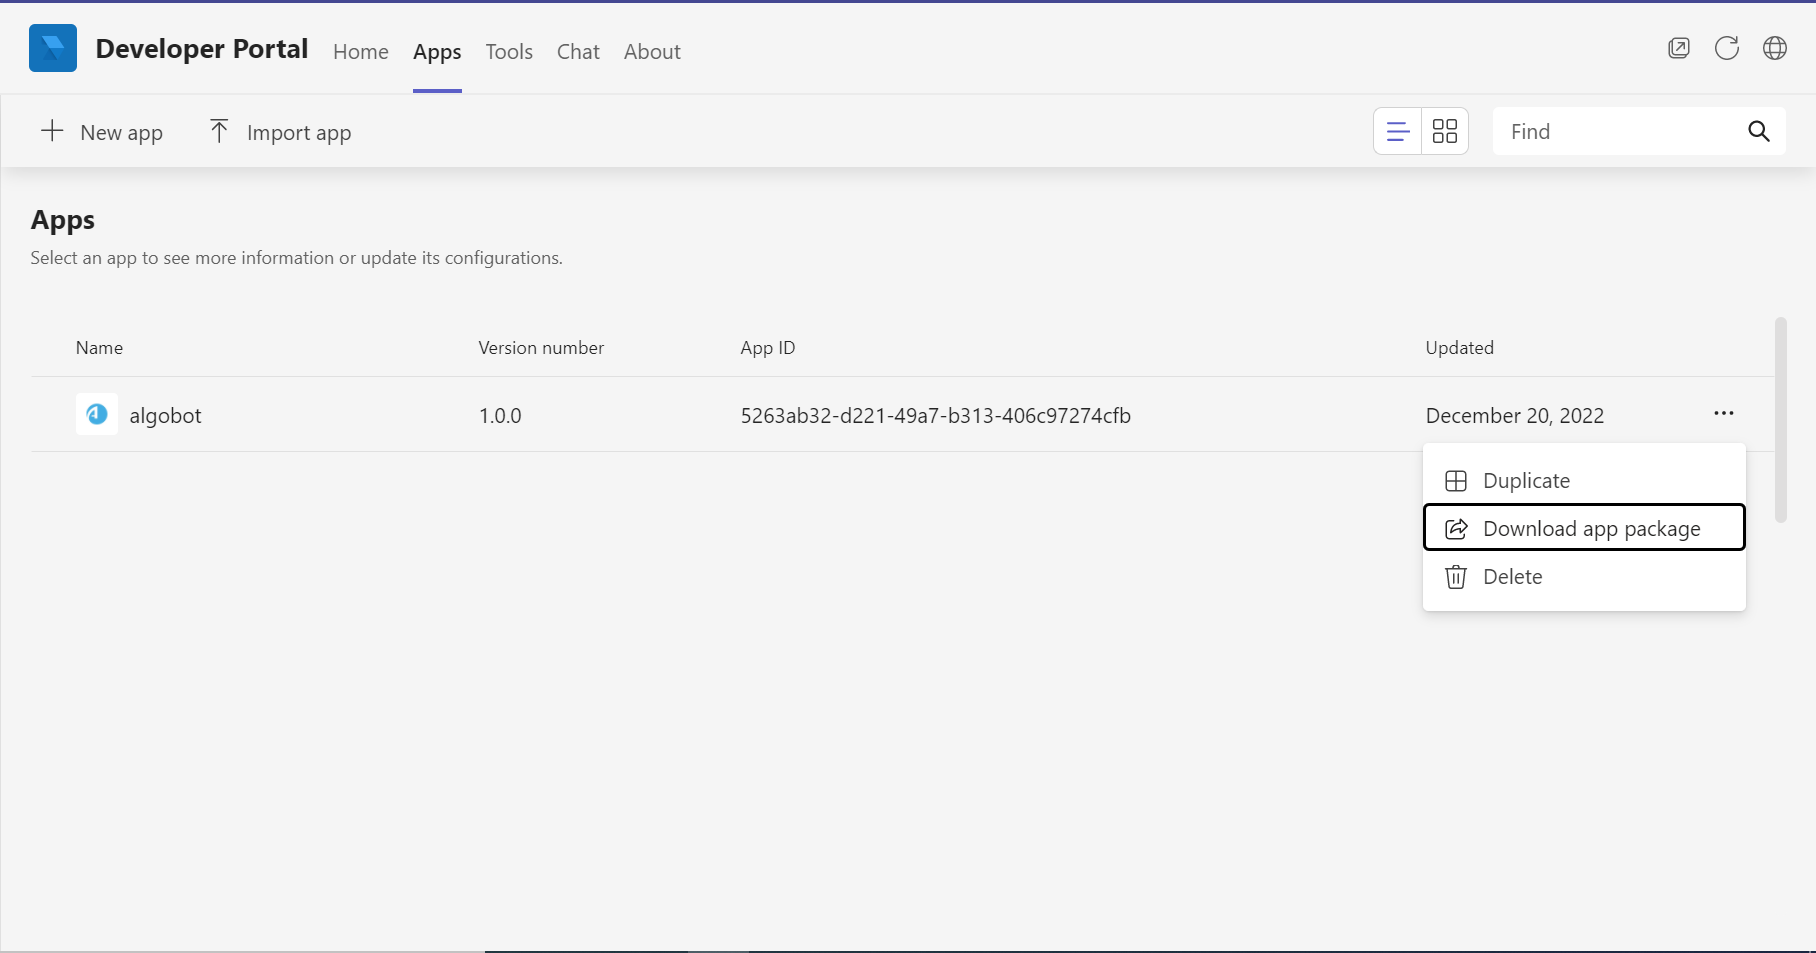
In the Developer Portal go to the Apps tab. Click the ellipsis (...) and select Download the app package from the AlgoBot app.
-
In Microsoft Teams, on the left side menu, click on Apps-> Manage your apps -> Upload an app. The Upload an App window opens.
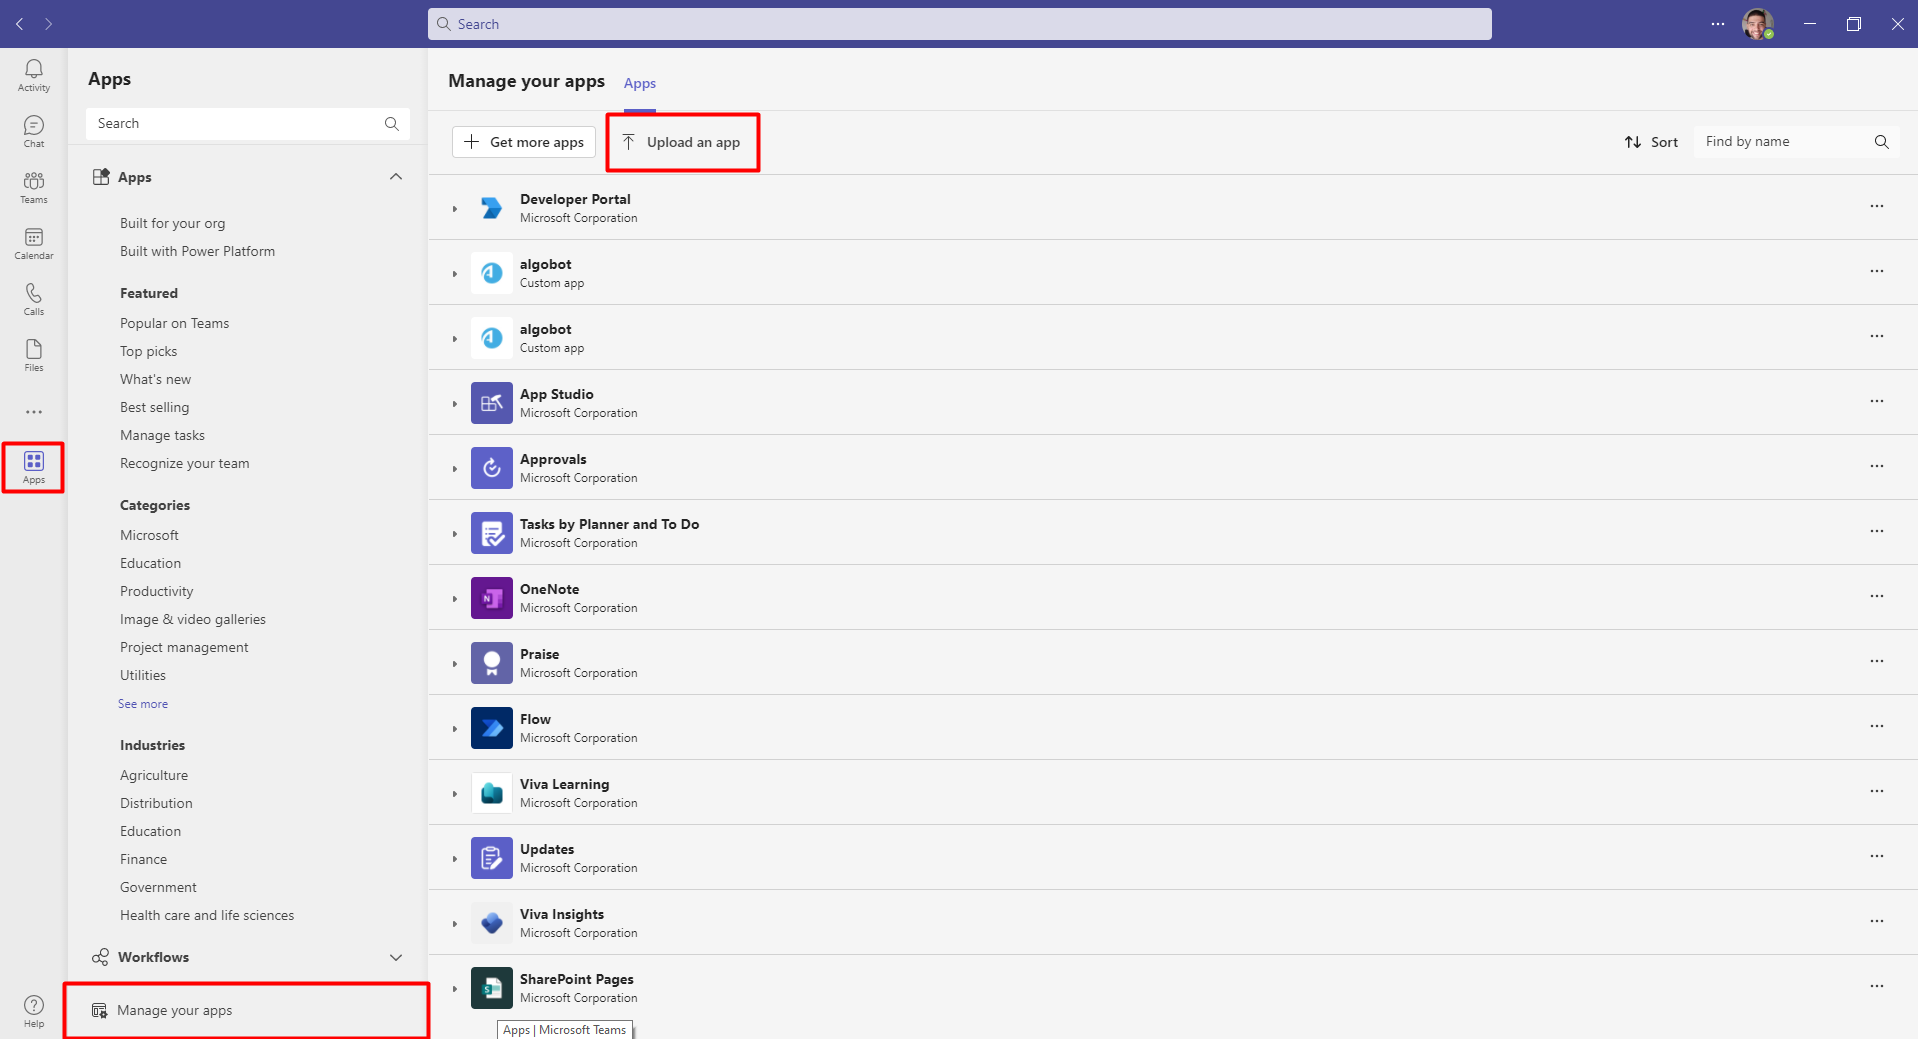
-
Click Upload a custom app. Browse for the algobot.zip file (downloaded in step 4). The Algo page appears.
-
click Add.
Continue on this page with Configure AlgoBot on the ASMS server.
Do the following:
-
On Cisco Webex, Algo must use webhooks to be notified about new messages. Use ngrok to configure Algo to accept webhook tunnels from the internet:
Install and configure ngrok
ngrok is a useful tool to create secure tunnels to locally hosted applications using a reverse proxy. Microsoft recommends ngrok in their documentation.
- Requirements: ngrok subscription Enterprise level*.
*ngrok Subscription Enterprise level provides a stable custom endpoint. For example, during ASMS upgrades and reboots, Teams will maintain endpoint settings. The Enterprise level is recommended for a production environment.
- Pricing: See ngrok pricing (for Enterprise level).
Install and configure ngrok for use with Algo
-
Download the TGZ file (x86-64) from ngrok for Linux from the ngrok download
page to your ASMS machine /home/afa folder. -
Run the command:
sudo tar -xvzf /home/afa/ngrok-v3-stable-linux-amd64.tgz -C /usr/local/bin
-
On the ngrok website ngrok.com
, log in to your ngrok subscription. -
On the Authentication tab, select Your Authtoken sub-tab.
Copy the Authtoken script from the Command Line section:
ngrok config add-authtoken <Your Authtoken>
Paste to the command line on the ASMS machine, and run the command.
-
-
For Enterprise level subscription, in /usr/lib/systemd/system/ngrok.service, modify the following line by adding the unique name:
ExecStart=/usr/local/bin/ngrok http -subdomain=<unique name> 5000 --> Modify the <unique name>
For example:
ExecStart=/usr/local/bin/ngrok http -subdomain=algobot.companyName 5000
-
For Free level subscription, in /usr/lib/systemd/system/ngrok.service, modify the following line by removing the string "-subdomain=<unique name>"):
ExecStart=/usr/local/bin/ngrok http 5000
-
-
Enable the service:
systemctl enable --now ngrok-service
-
The https or http endpoint provided by ngrok is output when the subscription command is run. Note, and save the ngrok https or http endpoint for later.
- Requirements: ngrok subscription Enterprise level*.
-
Use the Cisco Developer Tool to install Algo on Cisco Webex. To create an new account, see https://developer.webex.com
 .
. -
Connect to Cisco Developer Tool
. -
Click Create a New App.
-
Click Create a Bot. The New Bot page opens.
-
Enter the following:
Field Input details Bot name Algo Bot username <unique user name> (for example: algobot1234)
Note: Do not use the name AlgoBot
Icon 
Download this icon to your computer and upload to the Bot page Icon field.
Description The following is an example description: AlgoBot, is an intelligent chatbot that handles network security policy management tasks for you. AlgoBot answers your questions, submitted in plain English, and personally assists with security policy change management processes – without requiring manual inputs or additional research.\n\nWith AlgoBot you can: \n- Offload day-to-day tasks from firewall and network administrators to provide faster and more intuitive service to internal customers\n- Reduce ticket resolution time by giving the Support team the tools to ask – and get immediate answers – to security connectivity questions\n- Respond to security incidents faster and more effectively\n- Give application owners visibility into their application’s network security connectivity\n- Improve the quality and speed of application deployments by allowing DevOps to incorporate security management directly into their processes.\n\nYou can communicate with AlgoBot in English, German, French or Portuguese from the comfort of a chat room or a mobile app.
-
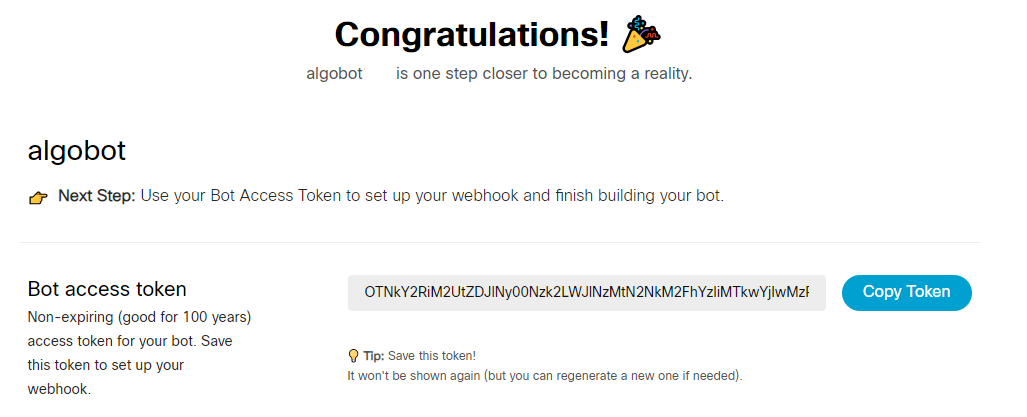
Click Add Bot. The Congratulations message appears.
-
In Cisco Webex, in your company Webex Space, click the People tab.
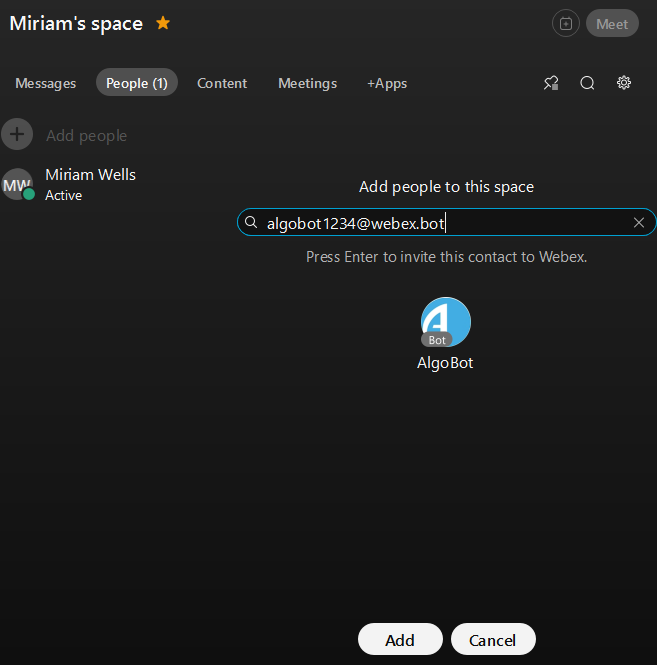
-
Enter the username (In our example, [email protected]) and click Add.
Continue on this page with Configure AlgoBot on the ASMS server.
Configure AlgoBot on the ASMS server
After installing Algo on your chat platform, configure Algo on your ASMS server.
You can configure Algo either using the ASMS user interface or using the algosec_conf menu.
Do the following:
-
In ASMS, click your username at the top-right to access the AFA Administration area.
-
Click the INTEGRATIONS tab to access AlgoConfiguration.
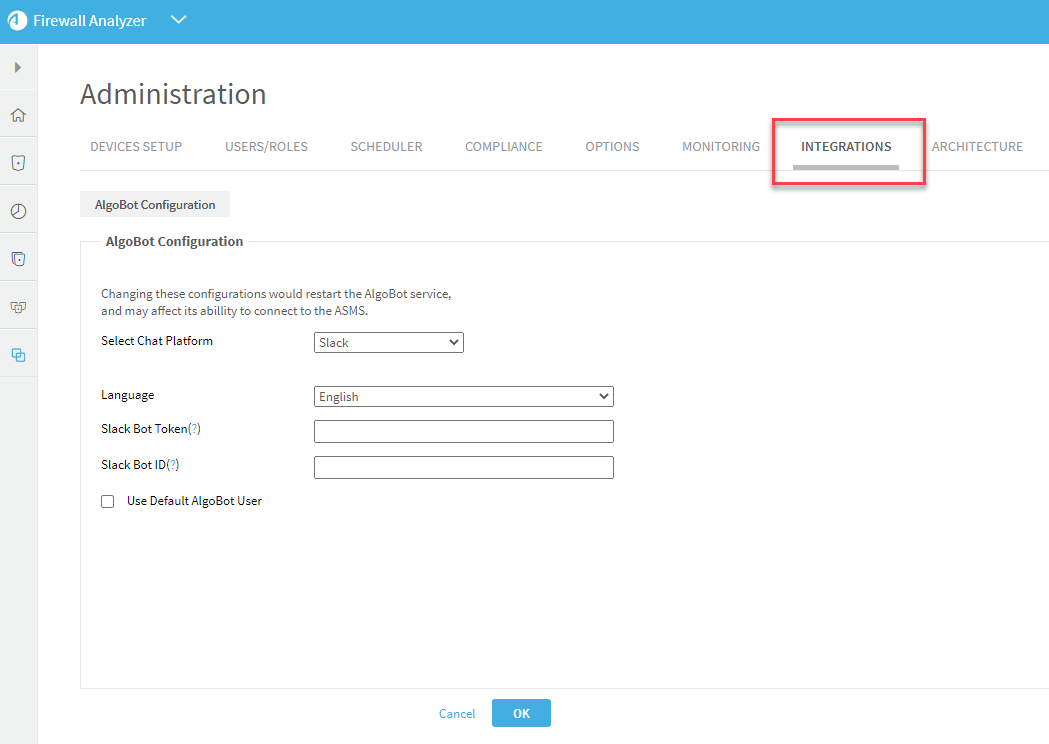
-
Select the Chat Platform: Slack, Microsoft Teams, or Cisco Webex.
-
Select the Algo default Language: English, German, French or Portuguese.
Note: Even though the default language is set to a specific language, Algo will still understand other languages as well.
-
Enter the following information:
For Slack
Slack Bot Token The serial number generated by your Slack workspace. Slack Bot ID The ID generated by your Slack workspace. For Microsoft Teams
Microsoft Teams Bot ID The ID generated in the Bot tab in Microsoft Teams Developer Portal, during the Algo setup. Microsoft Teams Client Secret The Client Secret generated in the Bot tab in Microsoft Teams Developer Portal, during the Algo setup. For Cisco Webex
Webex Bot token The token generated by the Cisco Developer Tool when you added AlgoBot. Webex Messaging Endpoint The ngrok http or https endpoint you saved above. Webex Teams URL (optional) Base URL used to connect to Webex. If left blank, uses the default URL https://webexapis.com/v1/ . -
Check Use Default Algo User to enable a Default Algo User.
Note: By defining a default Algo user, you are enabling non- ASMS users to to use permitted Algo commands.
Algo uses ASMS permissions in the Algo session. For non-ASMS users, you can create a default Algo user and give it the permissions you want.
Any user who chats with Algo, if they are not recognized by ASMS, will receive the permissions of the default user.
-
Enter the default Algo user username and password:
Note : The password is internal (for connection with ASMS). Users of Algo won't need to know it.

- Define the default Algo user in ASMS and assign it the permissions you want. See Manage users and roles in AFA.
-
Connect to the Administration Interface as user root. . For details, see Connect to and Utilize the Administration Interface.
- In the administration interface main menu, run option 14 - Product and cloud configuration
Run option 4 - Algo configuration. Choose the chat platform.
-
Follow the on-screen instructions and enter the details as needed.
You saved some of these details when you performed the procedures above:
-
For Slack
Slack Bot Token The serial number generated by your Slack workspace. Slack Bot ID The ID generated by your Slack workspace. -
For Microsoft Teams
Microsoft Teams Bot ID The ID generated in the Bot tab in Microsoft Teams Developer Portal, during the Algo setup. Microsoft Teams Client Secret The Client Secret generated in the Bot tab in Microsoft Teams Developer Portal, during the Algo setup.
-
For Cisco Webex
Webex Bot token The token generated by the Cisco Developer Tool when you added AlgoBot. Webex Messaging Endpoint The ngrok http or https endpoint you saved when you configured ngrok.
Note: Some values have defaults already configured. To use the default value, press ENTER when relevant.
Some steps will prompt you for optional configurations, see on this page Configure a default Algo user (for non-ASMS users)
Algo is now configured on your ASMS server and connected to your chat platform.
-
Configure a default Algo user (for non-ASMS users)
Note: By defining a default Algo user, you are enabling non- ASMS users to access Algo.
Algo uses ASMS permissions in the Algo session. For non-ASMS users, you can create a default Algo user and give it the permissions you want.
Any user who chats with Algo, if they are not recognized by ASMS, will receive the permissions of the default user.
Do the following:
-
When prompted to configure a default Algo user, enter Y:
Would you like to configure a default Algo user? [Y/n]: y
-
Enter the default Algo user username and password:
Note : The password is internal (for connection with ASMS). Users of Algo won't need to know it.
Default Algo user []:
Default Algo password []:
- Define the user in ASMS and assign it the permissions you want. See Manage users and roles in AFA.
Change Algo's default language
Note: Even though the default language is set to a specific language, Algo will still understand other languages as well.
Do the following:
- Connect to the ASMS Administration interface (algosec_conf). For details, see Connect to and Utilize the Administration Interface.
- In the administration interface main menu, run option 14 - Product and cloud configuration.
- Run option 4 - Algo configuration.
- Choose the chat platform you want to set the language for.
-
When prompted, enter the default_language (supported options are "en" (english ), "de" (german), "fr" (french) , "pt" (portuguese)).
Algo Logs and configuration files
Algo log files are created in /data/ms-algobot/logs.
A set of log and configuration files are saved for each chat platform, with the platform name, for example slack, as part of the filename.
Each set includes the following files:
| algobot-<platform>.conf | The configuration data generated as part of the installation and configuration process. |
| algobot-<platform>.log |
General logs, commands, and errors. If you need to contact AlgoSec support in reference to Algo, support may request this file. |
| utilization-<platform>.log | A synthesized, clear log of the commands used in Algo for analytics purposes. |
