
Manage Single Sign-On (SSO)
This topic provides detailed steps for enabling and configuring SSO for streamlined authentication.
Access the SSO Setup tab
Do the following:
-
Hover over the Settings
 icon at the lower left of your screen. Settings options are displayed.
 -
Click on Access Management.
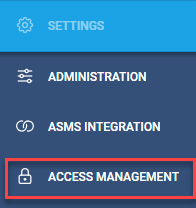
The Access Management page is displayed.
-
Select the SSO Setup tab.
Manage Single Sign-On (SSO)
Single Sign-On (SSO) allows users to log in using their existing credentials from an Identity Provider (IDP), streamlining access and enhancing security. This section provides details on configuring and managing SSO in ACE.
Note: AlgoSec SaaS applications officially support Microsoft Entra ID (formerly Azure Active Directory) and Okta as SSO providers. Other SAML2 SSO providers may also work. Try to enable following the instructions below. If you encounter difficulties contact AlgoSec support for assistance.
Note: When SSO is enabled, users appear in the Access Management page USERS tab only after first login. They are assigned a default system role User, which can be edited later.
Important: Users must have a valid email address, surname (last name), given name (first name), and name identifier in the relevant fields of the Identity Provider.
Set SAML attributes as specified by your identity provider.
-
For Entra ID, use:
-
Attribute Name= http://schemas.xmlsoap.org/ws/2005/05/identity/claims/emailaddress Value=user.email
-
Attribute Name=http://schemas.xmlsoap.org/ws/2005/05/identity/claims/surname and Value= user.surname
-
Attribute Name=http://schemas.xmlsoap.org/ws/2005/05/identity/claims/givenname and Value= user.givenname
-
Attribute Name=http://schemas.xmlsoap.org/ws/2005/05/identity/claims/name and Value= user.principalname
-
(optional) Attribute Name=http://schemas.microsoft.com/ws/2008/06/identity/claims/groups and Value= user.groups [Application.Group]
Note: If you are working with user groups, make sure to set the Source Attribute to sAMAccountName or Cloud-only group display names.
-
-
Similarly for Okta, use recommended attribute statements:
-
Name=http://schemas.xmlsoap.org/ws/2005/05/identity/claims/emailaddress and Name Format=URI reference format and Value=user.email)
-
Name=http://schemas.xmlsoap.org/ws/2005/05/identity/claims/surname and Name Format=URI reference format and Value= user.lastName
-
Name=http://schemas.xmlsoap.org/ws/2005/05/identity/claims/givenname and Name Format=URI reference format and Value= user.firstName
-
Attribute Name=http://schemas.xmlsoap.org/ws/2005/05/identity/claims/nameidentifier and Name Format=URI reference format and Value= user.login
-
(optional) Attribute Name=http://schemas.microsoft.com/ws/2008/06/identity/claims/groups and Name Format=URI reference format and Filter= Matches regex:.*
-
To configure SSO user authentication
-
In Access Management, click the SSO SETUP tab.

-
Enter the email of the IT admin associated with your account and click Send Parameters.
The application parameters are sent to that email address.
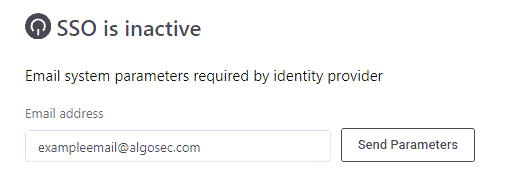
Note: Using the details sent by AppViz, the IT admin generates the XML metadata file needed for the next step.
Tip for IT department: For more information about Federation Metadata XML, refer to Identity provider documentation.
-
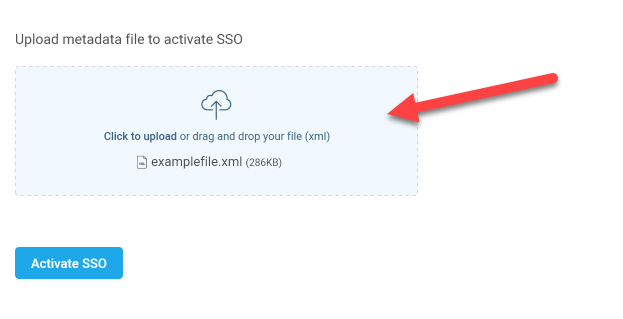
Upload the XML metadata file provided by the IT admin and then click Activate SSO.
Once activated, all users in the Users tab can log in with SSO.
Note:
-
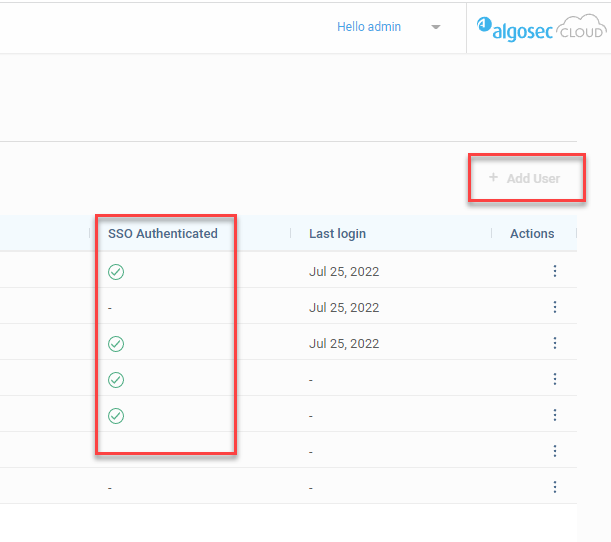
A check appears on the Users tab in the SSO Authenticated column after a user logs in at least one time using SSO.
-
+Add User is disabled for SSO-enabled tenants. Contact your IT department to add additional users.
-
Assign AppViz Roles with SSO Groups
You can assign roles to users based on SSO groups in your IdP. SSO Group mapping gives you flexibility managing your users permissions. You can create groups of users based on their job roles, departments, or other criteria in your identity provider. Then in AppViz , you can associate these SSO Groups to user roles and set their permissions. This enhances security while reducing administrative overhead.
Note:
-
If you change a user's groups in your IdP, then the user's roles and permissions are automatically updated the next time they sign in.
-
Roles are assigned based only on SSO groups that are sent in the SAML assertion and added to your SSO Groups settings. If multiple groups are sent in the SAML assertion, then the user is assigned all relevant roles for all groups.
Do the following:
-
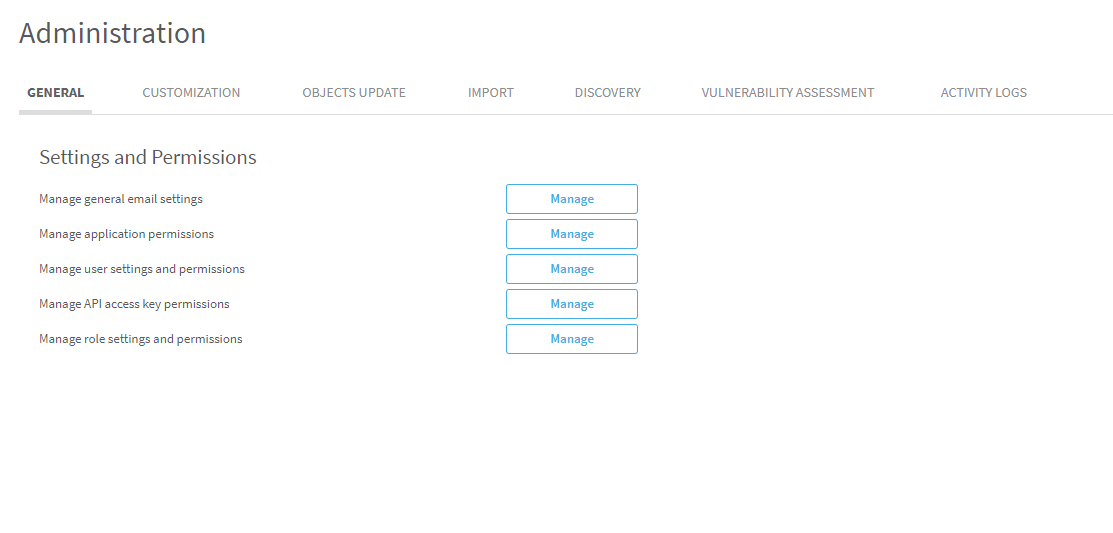
Navigate to the Administration area.
-
Hover over the
 SETTINGS icon at the bottom left of the screen. After the panel expands, click
  ADMINISTRATION.
The Administration area appears in the workspace.
-
-
In the Settings and Permissions area, next to Manage role settings and permissions, click Manage.
The Role Settings and Permissions page appears.
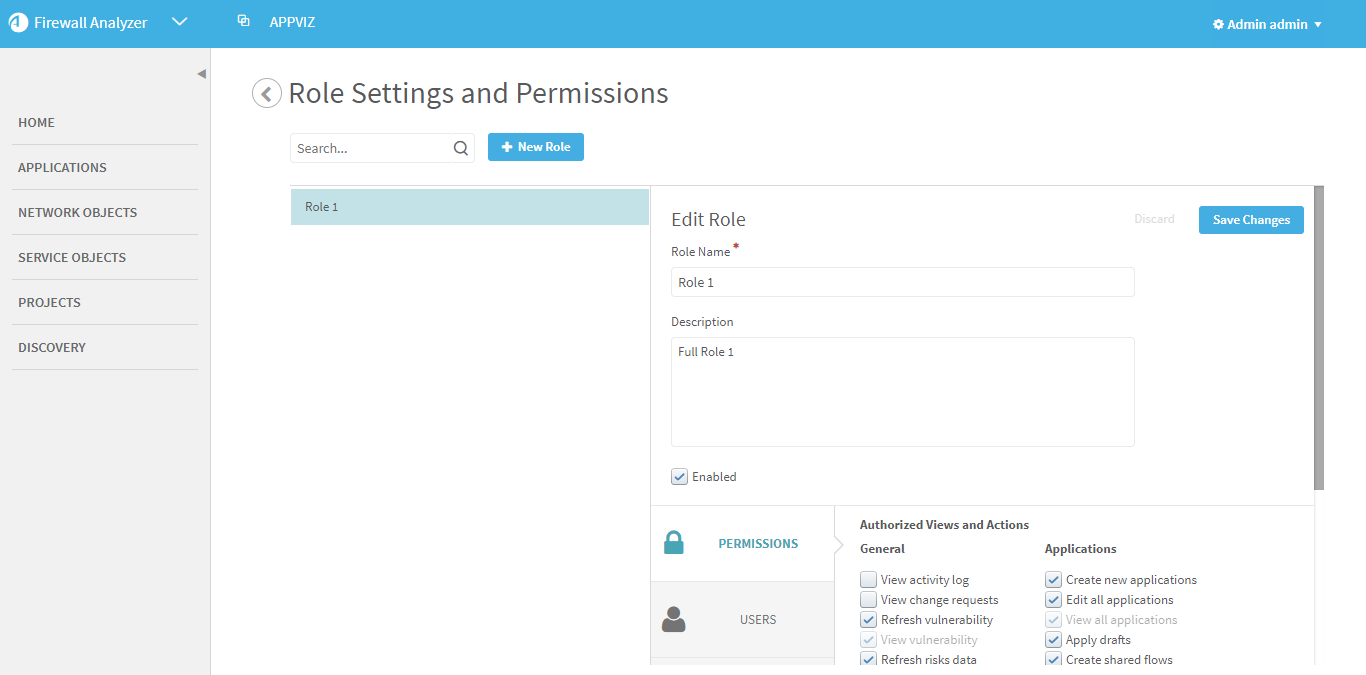
- Do one of the following:
Create a role. For details, see Create new roles.
Select a role from the list.
Search for a role by doing the following:
Type any part of the role's name in the search box, and click
 .
.The matching roles appear below the search box.
Select a role from the list.
The Edit Role area for the selected role appears on the right.
-
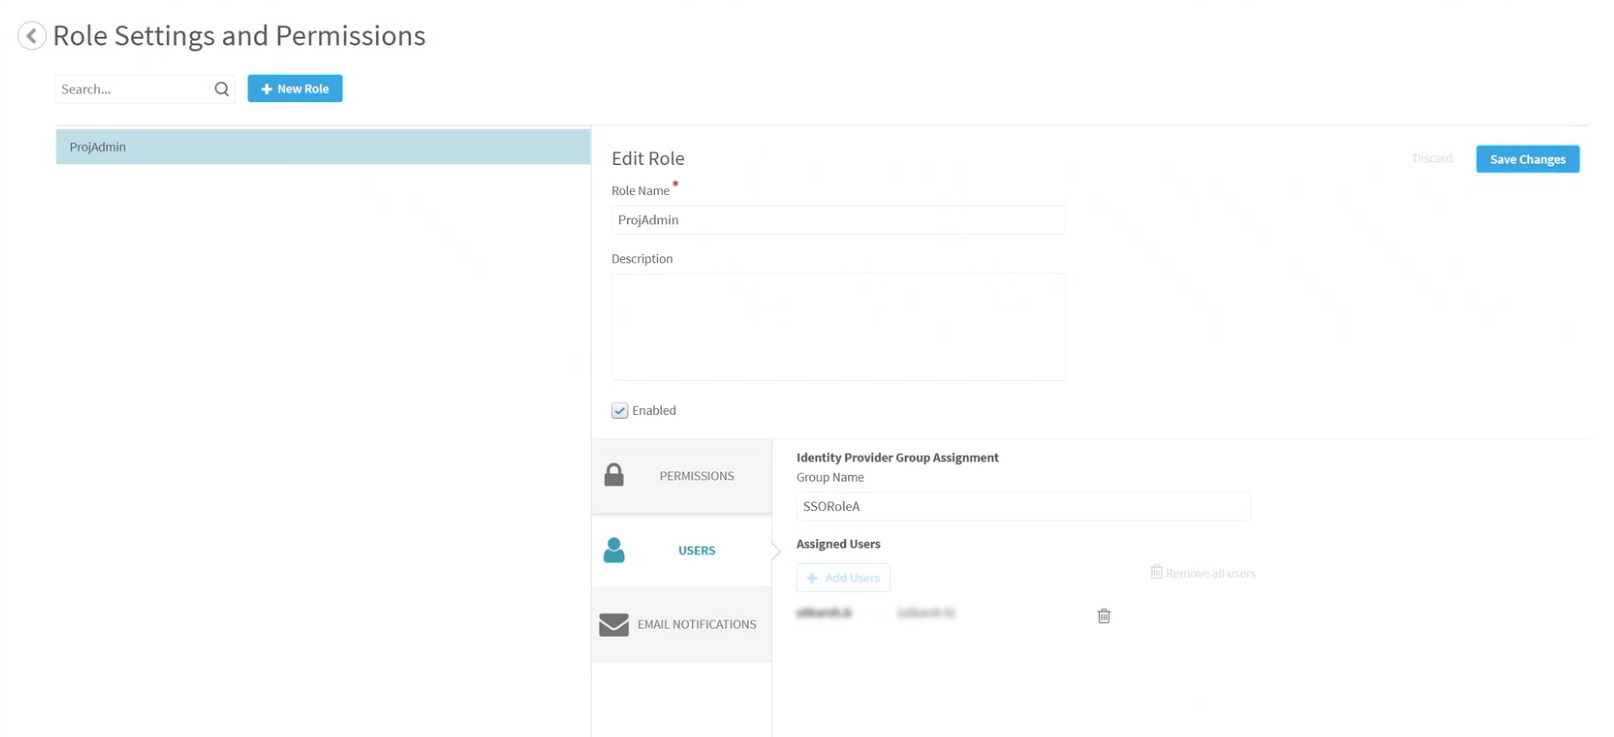
Click the Users tab.
The Users tab appears.
-
In the Group Name field, type the IdP group name you wish to map to the role.
-
Click Save Changes.
Deactivate / Reactivate SSO
To deactivate SSO: Administrators can deactivate SSO on a tenant by clicking Deactivate SSO.
To reactivate SSO: Administrators can reactivate SSO using the previously stored XML metadata file by clicking Reactivate SSO.
