Application flows
The application's FLOWS tab enables you to manage an application's traffic flows.
Flows describe traffic to and from servers, which are represented by network objects, via a specific service. Flows may also specify a user or network application, and include other fields, such as comments.
Flow types
AppViz applications include the following types:
| Application flows | Flows that are custom-built for a specific application. |
| Shared flows |
A semi-custom flow that can be relevant for many applications. Shared flows are templates with empty source and destination values, which are provided by a subscribing application. Note: For shared flows when user awareness is enabled, the User field will be treated the same way as the Source field. When the source is the place holder, the user will also be a place holder. |
| Subscribed flows | An instance of a shared flow that's customized for a specific application, with its source and destination fields provided by the application. |
FLOWS tab interface
The FLOWS tab displays all of your application's flows and details in a series of tables.

Do any of the following:
- Click a column heading to sort the table by that column, and click it again to reverse the sort order.
- Hover over a network object or service to display its contents.
- Click a network object to display further details, including its name, type, origin, and addresses.
For more details, see:
- Flow connectivity status
- Add flows to your application
- Edit an application's flows
- Remove flows from your application
- Export an application's flows
- Subscribe to another application's shared flows
- Verify flow connectivity
Note: Adding, removing, or editing an application's flows changes the application's revision to draft. The flow is not updated in the related network security policy until the draft revision is returned to active. For more details, see Application dashboard.
Tip: AppViz also enables you to import flows from a discovery server or a CSV file. Importing flows also matches, or updates matching details, with AppViz applications. For more details, see Discover applications.
Flow connectivity status
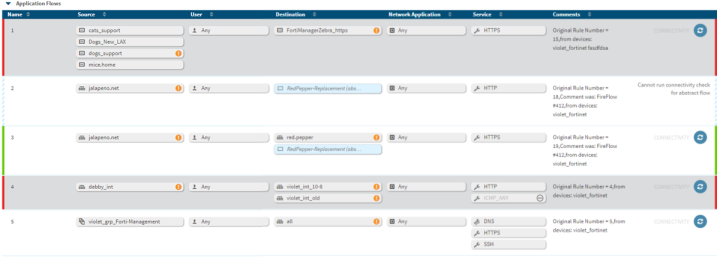
Every flow has a connectivity status. The traffic each flow represents may be allowed or blocked by the current network security policy. The flows tab indicates the connectivity status of each flow with colored strips on each side of the flow. Additionally, hovering over the strip reveals a tool tip with the connectivity status for the flow.
Note: The connectivity status of each flow contributes to the connectivity status of the application. For more details, see Business applications.
|
|
Allowed If AppViz is configured to differentiate between unprotected traffic and traffic that is explicitly allowed, the green strips for unprotected traffic are striped. For more details, see Configure advanced AppViz properties |
|
|
Blocked or Partially blocked. Note: You can determine whether the flow is blocked or only partially blocked by hovering over the strip. The tool tip which appears is specific. |
|
No strip |
No connectivity information |
Note: Abstract flows are indicated with pale blue stripes, but this is not a connectivity status for the flow. An abstract flow is a flow that does not represent any real traffic. Therefore, connectivity information is not relevant. For details, see View a network object.
Add flows to your application
This procedure describes how to add an application or shared flow to your application.
Tip: Alternately, subscribe to another application's shared flows. For more details, see Subscribe to another application's shared flows .
Do the following:
-
View the application for which you want to add a flow.
-
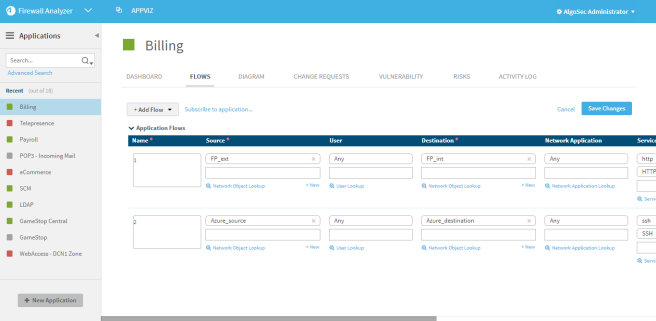
Click the FLOWS tab, and then click Edit Flows.
All the flows for the application appear in an editable format.
-
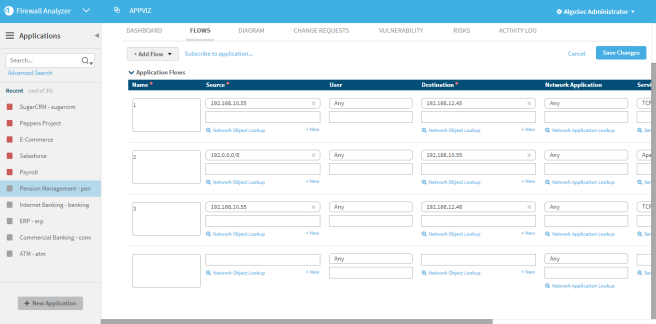
In the +Add Flow drop-down menu, select the flow type.
An empty flow appears at the bottom of the relevant list for the selected flow type.
-
To re-order flows, drag and drop the desired flows up or down.
-
For a shared flow, select the placeholder.
The placeholder is the field that is customizable for any application subscribing to it.
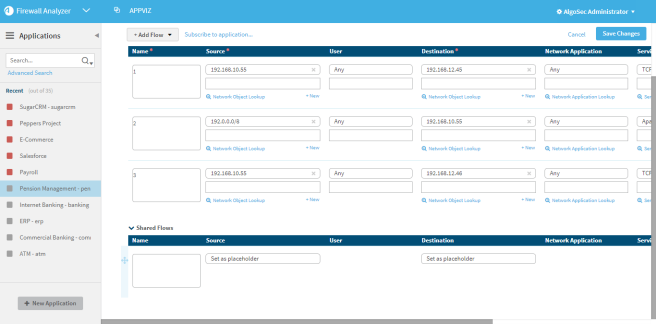
Note: When user awareness is enabled, the User field will be treated the same way as the Source field. When the source is the placeholder, the user will also be a placeholder.
-
Complete the fields as needed. For details, see Flow fields.
-
Click Save Changes.
The Save Changes window appears.

-
To save changes, click Save Changes.
The flow is updated, and this version of the application is saved as a draft revision.
- To save changes and apply the draft, do the following:
Click Save and Apply Draft.
The Apply Draft dialog box appears, describing the FireFlow change request that will be created to add or remove traffic flows for the application in the network security policy. If traffic flows have been removed from the application, but the traffic intersects the needs of another application, a FireFlow change request will not be created to remove the traffic.
Click OK.
The flows are updated and the draft is applied. This may take a few minutes.
-
Note: The Save and Apply Draft option is disabled when the application has a revision pending implementation.
Edit an application's flows
To edit a flow:
- View the application for which you want to edit a flow. For more details, see Business applications.
-
Click the Flows tab.
The Flows tab appears.
-
Click Edit Flows.
All the flows for the application appear in an editable format.

- To re-order flows, drag and drop the desired flows up or down.
- Complete the fields as needed. For details, see Flow fields.
-
Click Save Changes.
The Save Changes Dialog box appears.
-
To save changes, click Save Changes.
The flow is updated, and this version of the application is saved as a draft revision.
- To save changes and apply the draft, do the following:
Note: The Save and Apply Draft option is disabled when the application has a revision pending implementation.
Click Save and Apply Draft.
The Apply Draft dialog box appears, describing the FireFlow change request that will be created to add or remove traffic flows for the application in the network security policy. If traffic flows have been removed from the application, but the traffic intersects the needs of another application, a FireFlow change request will not be created to remove the traffic.
For more details, see Business applications.
Click OK.
The flows are updated and the draft is applied. This may take a few minutes.
-
Remove flows from your application
To remove a flow:
- View the application for which you want to remove a flow. For more details, see Business applications.
-
Click the Flows tab.
The Flows tab appears.
-
Click Edit Flows.
All the flows for the application appear in an editable format.
- Click
 on the row of the flow you want to remove.
 -
Click Save Changes.
The Save Changes Dialog box appears.
-
To save changes, click Save Changes.
The flow is updated, and this version of the application is saved as a draft revision.
- To save changes and apply the draft, do the following:
Note: The Save and Apply Draft option is disabled when the application has a revision pending implementation.
Click Save and Apply Draft.
The Apply Draft dialog box appears, describing the FireFlow change request that will be created to add or remove traffic flows for the application in the network security policy. If traffic flows have been removed from the application, but the traffic intersects the needs of another application, a FireFlow change request will not be created to remove the traffic.
For more details, see Business applications.
Click OK.
The flows are updated and the draft is applied. This may take a few minutes.
-
Subscribe to another application's shared flows
Applications can subscribe to another application's shared flows. The subscribing application specifies a custom value for the shared flow's placeholder/missing field. For more details, see Add flows to your application.
By default, the application containing the shared flow is responsible for all of the shared flow's subscriptions. If desired, you can configure AppViz to treat the applications subscribed to the shared flow as responsible for the traffic. For more details, see Configure advanced AppViz properties
To subscribe to an application:
-
View the application for which you want to add subscribed flows (the "subscriber" application). For more details, see Business applications.
-
Click the Flows tab.
The Flows tab appears.
-
Click Edit Flows.
All the flows for the application appear in an editable format.
-
Next to the Add Flow button, click the Subscribe to application... link.
The Add Subscribed Flows window appears.
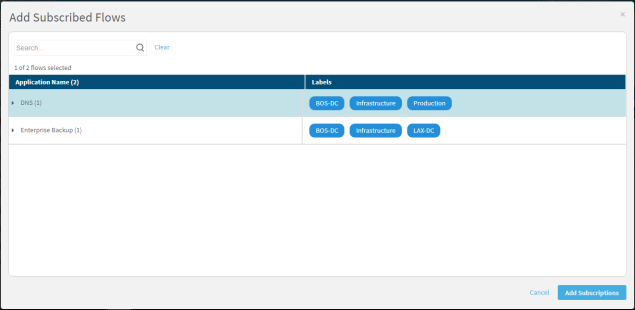
- To subscribe to an entire application (all of its shared flows), select the desired applications.
- To subscribe to individual flows, do the following:
Next to the desired application, click
 .
.The applications flows appear.
- Select the desired flows.
-
Click Add Subscriptions.
The subscribed flows appear in the application's Flows tab.

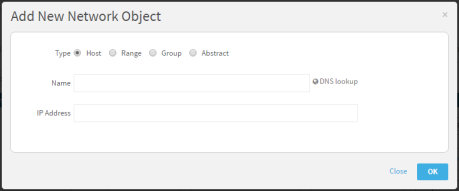
- Complete the required fields as needed. For details, see Add a new network object.
-
Click Save Changes.
A confirmation message appears.
- Click Save.
Verify flow connectivity
Verifying flow connectivity checks whether the network security policy allows the traffic that the flow specifies. It also contributes to creating and updating Business application visibility.
To verify flow connectivity:
- View the application which contains the flow for which you want to verify flow connectivity. For more details, see Business applications.
-
Click the Flows tab.
The Flows tab appears.
-
Click
 next to the flow.
AppViz checks whether the network security policy allows the traffic flow. This may take a few minutes, depending on the complexity of the flow and network policy.
If the flow is blocked, red stripes appear around the flow.
-
To view details regarding the flow's connectivity, click the Connectivity link.
A new window opens with details of the traffic simulation query from AlgoSec Firewall Analyzer.
Note: If the Connectivity link is not enabled for a flow, the last connectivity check failed or has expired. If you run a new check, the link will be re-enabled.
Export an application's flows
You can export an application's flows to a CSV file.
Note: If desired, you can configure all flow exports to include connectivity information. For more details, see Configure advanced AppViz properties
To export an application's flows:
- View the application for which you want to add a flow. For more details, see Business applications.
-
Click the Flows tab.
The Flows tab appears.
-
Click
 .
.The CSV file is exported.
Your browser will prompt you to open or save the file.


