Enable data collection for Check Point devices
Relevant for: AFA Administrators
Note: In addition the requirements listed below, ensure that the user that AFA is using to access the device has the required permissions. The minimum permission required in Read Only All. When the device is using ActiveChange, the minimum permission is Read Write All. For more details, see Required device permissions.
For more details, see Add Check Point devices.
Enable data collection via OPSEC
This procedure describes how to specify a certificate for OPSEC access to a Check Point device, which must be performed in the Check Point - Multi-Domain Security Management (Provider-1) - Step 1/3 or Check Point - SmartCenter or CMA - Step 1/2 page after selecting OPSEC as the connection method.
Do the following:
-
Create a certificate for your device. For more details, see:
-
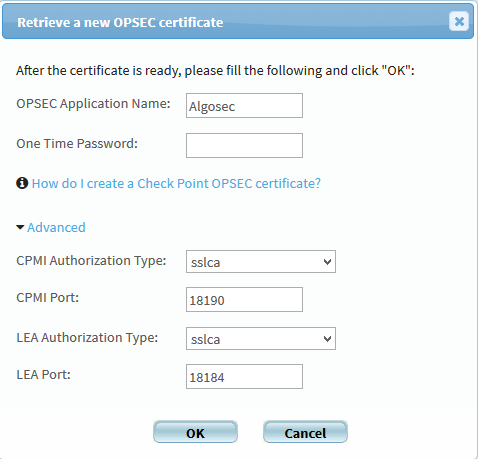
In AFA, in the OPSEC Setup area, click Certificate.
The Retrieve a new OPSEC certificate dialog is displayed.
-
Complete the fields as follows:
OPSEC Application Name
Type the OPSEC application name, as specified in the OPSEC certificate.
The default value is "AlgoSec".
One Time Password
Type the one-time password, as specified in the OPSEC certificate.
Advanced
Click to display advanced fields.
The CPMI Authorization Type, CPMI Port, LEA Authorization Type, and LEA Port fields appear.
CPMI Authorization Type
Select the CPMI authorization type.
CPMI Port
Type the CPMI port number.
The default value is 18190.
LEA Authorization Type
Select the LEA authorization type.
LEA Port
Type the LEA port number.
The default value is 18184.
-
Click OK to retrieve the certificate from the Check Point SmartCenter, CMA or MDSM server.
Once the certificate is installed, a confirmation window appears.
-
Click OK.
The OPSEC Setup area displays the certificate date and time of creation.
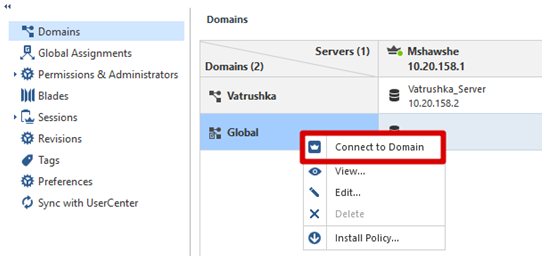
In order for AFA to collect data from a Check Point MDSM via OPSEC, a global certificate needs to be created for authentication and security purposes. The certificate is created using Check Point's SmartConsole for the PV-1.
Do the following:
-
Connect to the SmartConsole, selecting the MDS domain.
-
Right-click Global and select Connect to Domain.
-
Create a network object for the host that will run AFA
Note: If a network object for the host is already defined, you can skip this step.
Do the following:
-
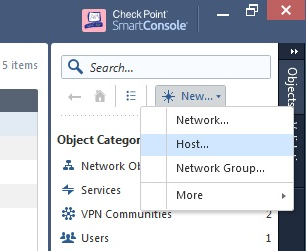
Click New, and then Host.
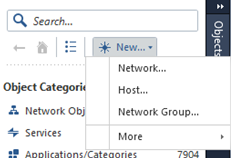
The New Host window appears.
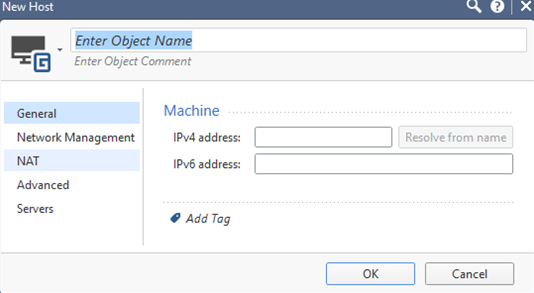
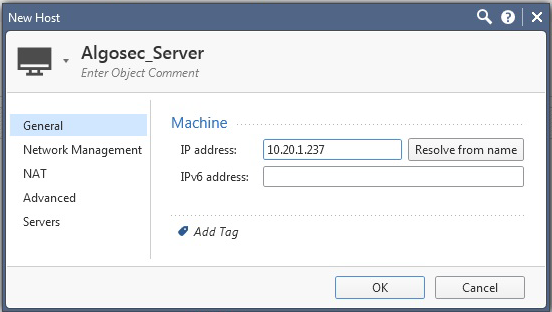
- Complete the Object Name and IPv4 Address fields with the name and address of the host that will run AFA.
- Click OK.
-
-
Create an OPSEC application object for this network object.
Note: If an OPSEC application object is already defined, you can skip this step.
Do the following:
-
In the Object Categories, under Servers, select OPSEC Applications > Application.
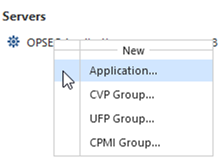
The OPSEC Application Properties dialog is displayed.
-
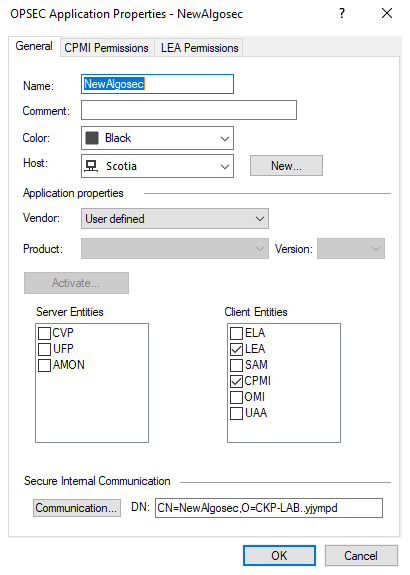
In the OPSEC Application Properties dialog, define the following:
Name Enter the OPSEC application name.
Note: Record the name you entered here. You'll need to specify this name in AFA when you retrieve the certificate.
Host Select the host to run AFA. Vendor Choose User defined. (Do not choose AlgoSec) Object Entities Select the LEA and CPMI items. The LEA Permissions and CPMI Permissions tabs appear.
-
In the CPMI Permissions tab, select Permissions Profile, and then do one of the following:
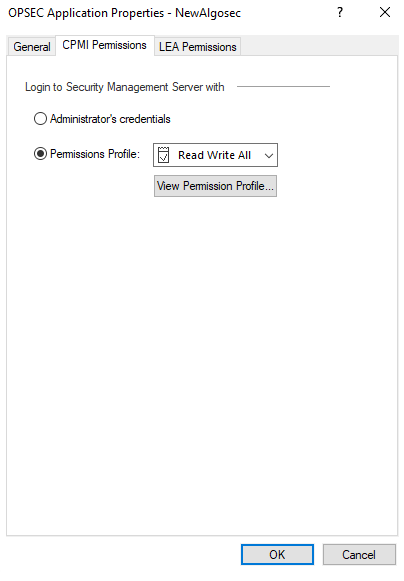
Important: Do not select Administrator's credentials.
-
Select the super profile in the list, or any other profile with the required minimum permissions.
-
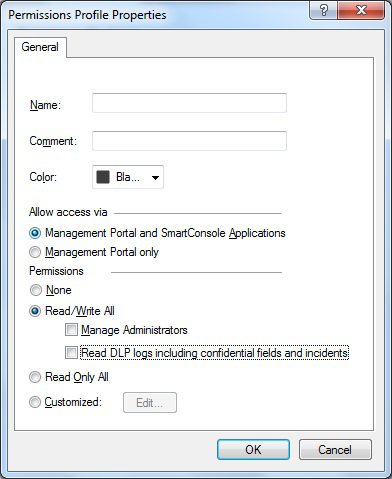
Create a new permission profile. To do this, click New. In the Permissions Profile Properties dialog, enter a name for your new profile and select the required permissions.
Minimum permissions required are Read Only All access. If you're using ActiveChange, you must have Read/Write All access.
For example:
-
-
In the LEA Permissions tab, select According to Permissions Profile, and then do one of the following:
- Select the super profile in the list, or any other profile with the required minimum permissions.
- Create a new permission profile. To do this, click New. In the Permissions Profile Properties dialog, enter a name for your new profile and select the required permissions.
Minimum permissions required are Read Only All access.
- Click OK. The General tab appears again, with additional options.
-
-
Create your certificate. Do the following:
-
Click Communication.
-
In the Communication dialog that appears, enter a one-time password , and then enter it again to confirm.
Note: Record the password you entered here. You'll need to specify this name in AFA when you retrieve the certificate.
-
Click Initialize.
The Trust state will change from Uninitialized to Initialized but trust not established. After the certificate is retrieved by AFA, the trust state will change to Trusted.
Tip: Create a new certificate if needed by clicking Reset and repeating this step.
-
- At the top of the screen, click Publish.
- Connect to the MDS (PV-1) console, and select Global Assignments.
-
Right-click Global and select Reassign on Domains.
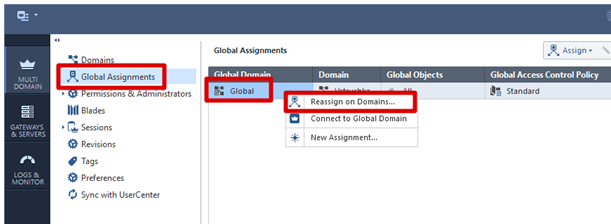
Continue with Enable data collection via OPSEC.
In order for AFA to collect data from a Check Point CMA or SMC via OPSEC, a local certificate needs to be created for authentication and security purposes. The certificate is created using Check Point's SmartConsole for the CMA/SMC.
Do the following:
-
Connect to the SmartConsole.
-
Create a network object for the host that will run AFA.
Note: If a network object for the host is already defined, you can skip this step.
Do the following:
-
In the right pane, click the New button and select Host.
-
In the New Host dialog, enter the Name and IP address of the host that will run AFA, and click OK.
-
-
Create an OPSEC application object for this network object.
Note: If an OPSEC application object is already defined, you can skip this step.
Do the following:
-
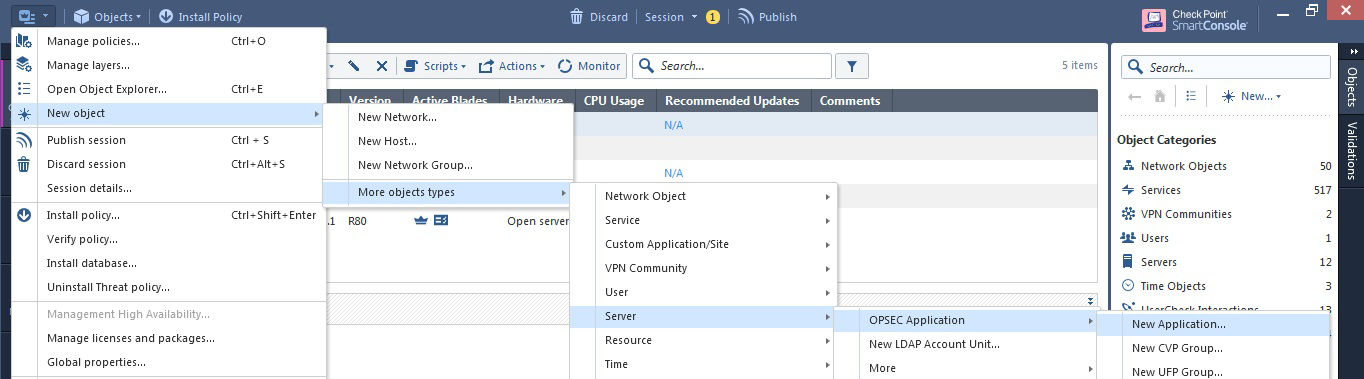
Click the
 icon at the top left of the screen and select:
New object > More object types > Server > OPSEC Application > New Application.
-
In the OPSEC Application Properties dialog, define the following:
Name Enter the OPSEC application name.
Note: Record the name you entered here. You'll need to specify this name in AFA when you retrieve the certificate.
Host Select the host to run AFA. Vendor Choose User defined. (Do not choose AlgoSec) Object Entities Select the LEA and CPMI items. -
In the CPMI Permissions tab, select Permissions Profile, and then do one of the following:
Important: Do not select Administrator's credentials.
- Select the super profile in the list, or any other profile with the required minimum permissions.
- Create a new permission profile. To do this, click New. In the Permissions Profile Properties dialog, enter a name for your new profile and select the required permissions.
Minimum permissions required are Read Only All access. If you're using ActiveChange, you must have Read/Write All access.
For example:
-
In the LEA Permissions tab, select According to Permissions Profile, and then do one of the following:
- Select the super profile in the list, or any other profile with the required minimum permissions.
- Create a new permission profile. To do this, click New. In the Permissions Profile Properties dialog, enter a name for your new profile and select the required permissions.
Minimum permissions required are Read Only All access.
-
Click OK. The General tab appears again, with additional options.
-
-
Create your certificate. Do the following:
-
Click Communication.
-
In the Communication dialog that appears, enter a one-time password , and then enter it again to confirm.
Note: Record the password you entered here. You'll need to specify this name in AFA when you retrieve the certificate.
-
Click Initialize.
The Trust state will change from Uninitialized to Initialized but trust not established. After the certificate is retrieved by AFA, the trust state will change to Trusted.
Tip: Create a new certificate if needed by clicking Reset and repeating this step.
-
-
Reinstall the Check Point database on all existing log servers, including CLMs or external log servers.
Do the following:
- At the top of the screen, click Publish.
- At the top left, click the
 icon, and select Install database.
 - In the Install database dialog, verify that your CMA is selected, and click Install.
Continue with Enable data collection via OPSEC above.
In order to collect the policy and routing table from a Check Point FireWall-1 module, AFA can use the OPSEC API. In order for this to happen a certificate needs to be created for authentication and security purposes.
The certificate is created on the SmartCenter server, using Check Point's SmartDashboard utility, or on the MDSM server, using Check Point's Global SmartDashboard utility.
Do the following:
-
Create a network object for the host.
Note: If a network object for the host running AFA is already defined, you can skip this step.
Do the following:
-
In the main SmartDashboard menu panel, select Manage > Network Objects.

-
Click New > Node > Host.
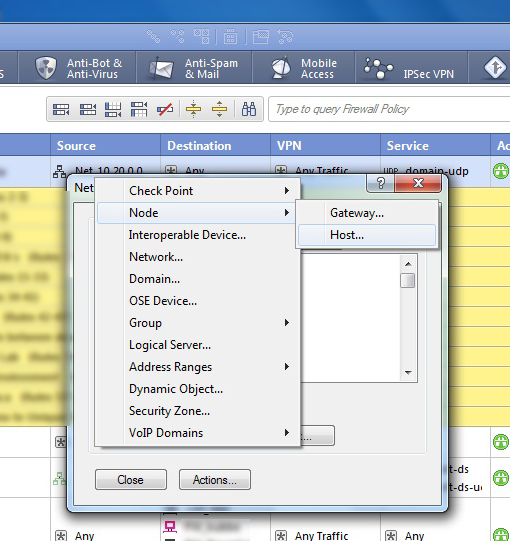
-
In the Host Node dialog, enter the Name and IP address of the host that will run AFA, and then click OK.
-
-
Create an OPSEC application object for this network object.
Note: If an OPSEC application object is already defined, you can skip this step.
Do the following:
-
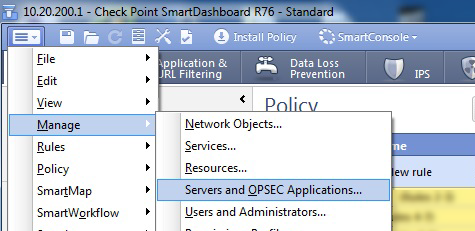
In the SmartDashboard main menu, select Manage and then Servers and OPSEC Applications.
-
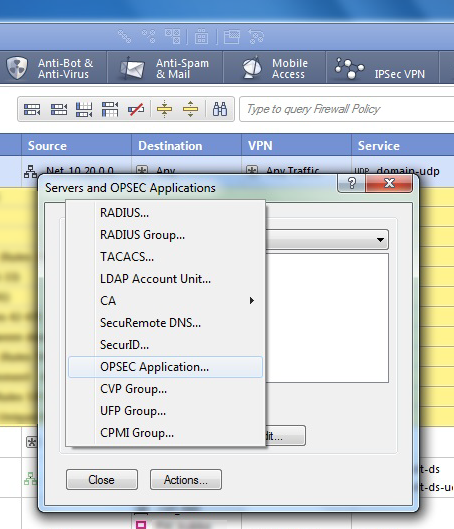
In the Servers and OPSEC Applications dialog box, click New > OPSEC Application.
-
In the OPSEC Application Properties dialog, define the following:
Name Enter the OPSEC application name.
Note: Record the name you entered here. You'll need to specify this name in AFA when you retrieve the certificate.
Host Select the host to run AFA. Vendor Choose User defined. (Do not choose AlgoSec) Object Entities Select the LEA and CPMI items. -
In the CPMI Permissions tab, select Permissions Profile, and then do one of the following:
Important: Do not select Administrator's credentials.
- Select the super profile in the list, or any other profile with the required minimum permissions.
- Create a new permission profile. To do this, click New. In the Permissions Profile Properties dialog, enter a name for your new profile and select the required permissions.
Minimum permissions required are Read Only All access. If you're using ActiveChange, you must have Read/Write All access.
For example:
-
For Check Point version R76 or above, in the LEA Permissions tab, select According to Permissions Profile.
Then do one of the following:
- Select the super profile in the list, or any other profile with the required minimum permissions.
- Create a new permission profile. To do this, click New. In the Permissions Profile Properties dialog, enter a name for your new profile and select the required permissions.
Minimum permissions required are Read Only All access.
-
Click OK. The General tab appears again, with additional options.
-
-
Create your certificate. Do the following:
-
Click Communication.
-
In the Communication dialog that appears, enter a one-time activation key, and then enter it again to confirm.
Note: Record the key you entered here. You'll need to specify this name in AFA when you retrieve the certificate.
-
Click Initialize.
The Trust state will change from Uninitialized to Initialized but trust not established. After the certificate is retrieved by AFA, the trust state will change to Trusted.
Tip: Create a new certificate if needed by clicking Reset and repeating this step.
-
- Reinstall the Check Point database on all existing log servers, including CLMs or external log servers. Click Save, and then selecting Policy and Install Database from the main menu.
Continue with Enable data collection via OPSEC above.
Enable data collection via REST
This procedure describes how to enable REST calls to the Security Management Server.
Note: For versions R80 and above, AFA collects data via REST, along with either SSH or OPSEC. In addition to enabling REST, you must also enable SSH or OPSEC as needed.
For details, see Enable data collection for Check Point devices and Enable data collection via OPSEC.
Do the following:
-
Open a SmartConsole.
-
In the left pane, navigate to Manage & Settings > Blades > Management API > Advanced Settings.
The Management API Settings window appears.
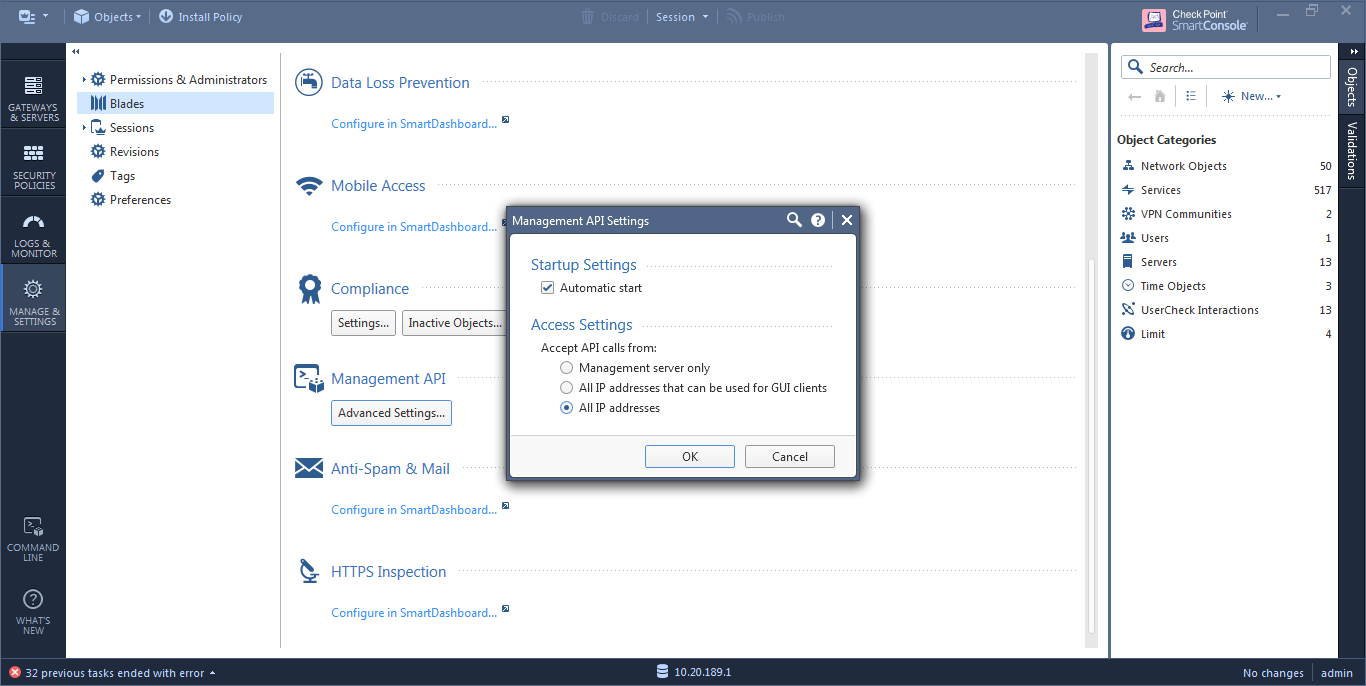
- To automatically start the API server at Security Management Server startup, select the Automatic Start check box.
-
Select which IP addresses from which the API server accepts requests:
All IP addresses that can be used for GUI clients API server will accept scripts and web service requests from the same devices that are allowed access to the Security Management Server. Make sure the AFA server is in this list. All IP addresses The API server will accept scripts and web-service requests from any device -
Click OK.
In the Management API restart message that appears, click OK.
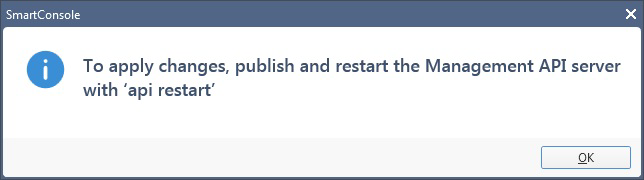
- At the top, click Publish.
- In the Management Check Point Server CLI, run the api restart command, and then exit.
