View policy data
Viewing policies
To view a policy:
-
View the desired device, group, or matrix. For details, see View AFA device data, View AFA group data, and View AFA matrix data.
-
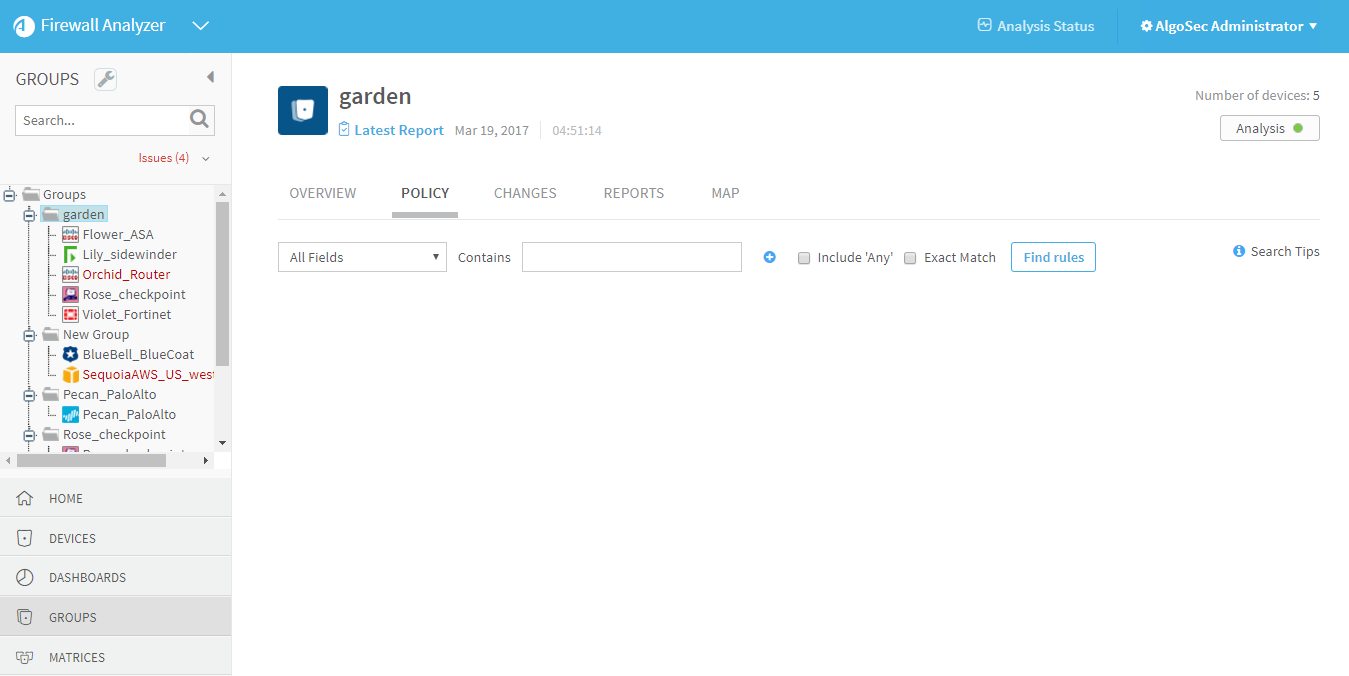
Click the Policy tab.
The Policy tab appears in the workspace.
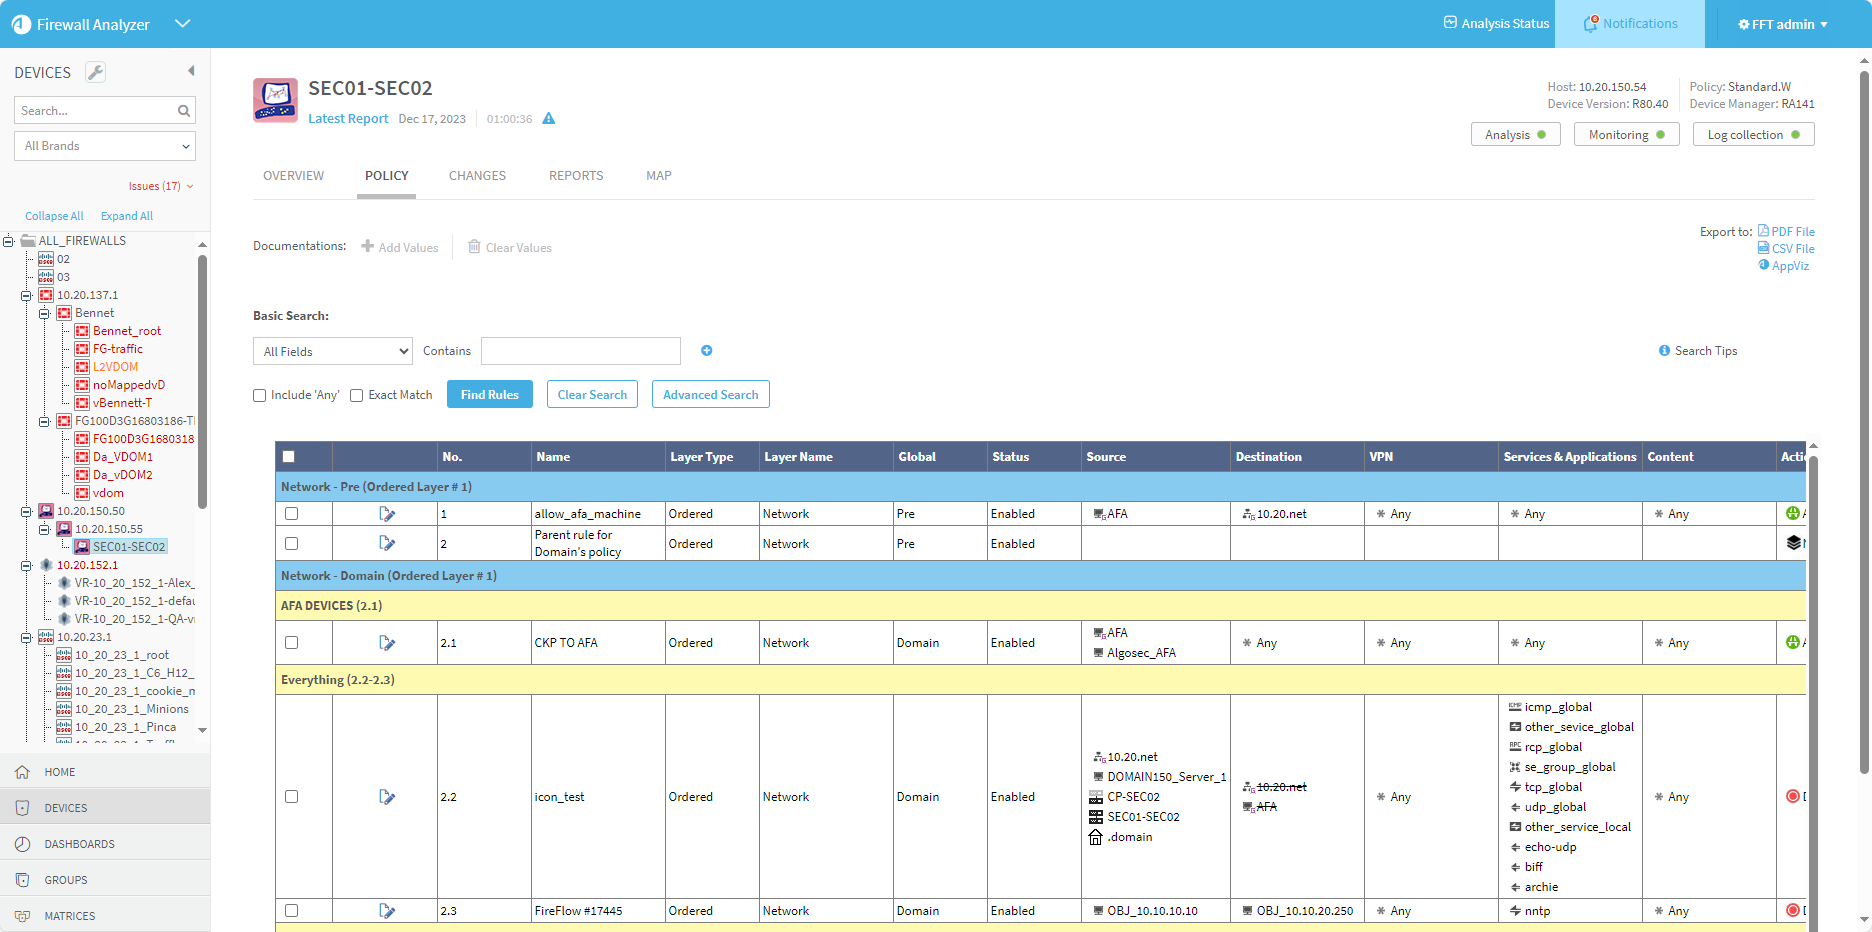
The policy tab columns are specific for each device brand.
Notes:
-
Since NAT rules do not appear in the Policy tab:
-
To locate NAT rules, see Locate objects.
-
To locate objects in NAT rules, use the Locate Object feature's Find in Rules option to locate objects in NAT rules. For details, see Locate rules that use specific objects.
-
-
For devices that support individual and global users, the Users column is empty when the user value is any.
-
When AppViz is licensed:
-
Application flow information is automatically synchronized from AppViz and made visible in the Firewall Analyzer Policy tab, see AppViz Application Flows and Rule Associations
-
You can export rules from the policy as flows to AppViz. For more details, see Export rules as flows to AppViz.
-
-
- To search the policy for rules and objects, see Policy Search.
AppViz Application Flows and Rule Associations
When AppViz is licensed, business information is displayed in the Policy tab, detailing how policy rules are associated with application flows. This information is automatically synchronized from AppViz to Firewall Analyzer.
For AppViz , you can also view flow recertification information for policy rules.
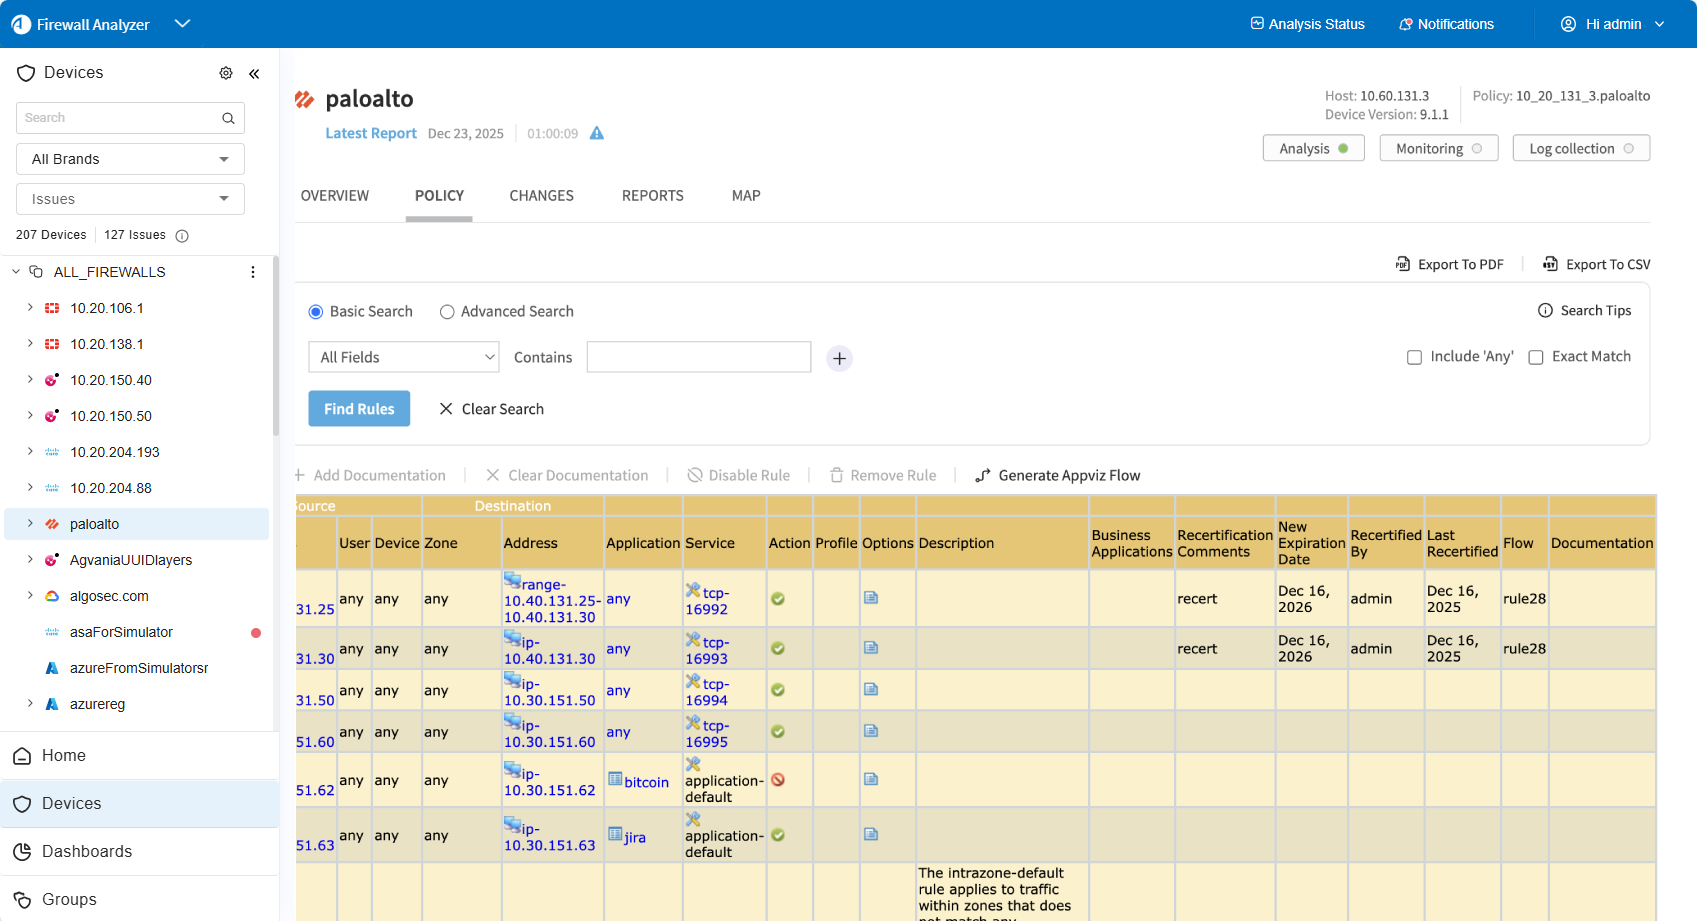
To display this data, you must configure the Policy tab to show the relevant columns by adding the following documentation fields:
Do the following:
- Open a terminal and log in with the afa user and its password.
- Run the following commands:
update_document_fields ADD "Recertification Comments" "Text" ""
update_document_fields ADD "Recertified By" "Text" ""
update_document_fields ADD "Last Recertified" "Text" ""
update_document_fields ADD "New Expiration Date" "Text" ""
update_document_fields ADD "Flow" "Text" ""
Policy Search
Policy search allows you to locate rules within a single device or a group of devices. For example, you can locate all device rules that use a specific object—whether the rules include the object explicitly or include an object containing the object—in any device, group, or matrix, or in any type of report. This is useful when planning to update or remove an object, since it enables you to find all the rules that will be affected by the change.
AFA provides the following tools for locating rules on policies:
-
Define a search that compares selected fields with specified content.
-
Define a complex search using OR and NOT operators in the query string.
Notes:
-
For policy searches, the service definition 'https' is not supported.
-
To represent HTTPS traffic, use tcp/443.
-
Custom ports should always be specified with tcp/<port>.
-
-
For Check Point devices, the results show one device to represent each policy. Multiple devices with the same policy will not appear in the search results.
-
NAT rules do not appear in the Policy tab. To locate NAT rules, see Locate rules that use specific objects.
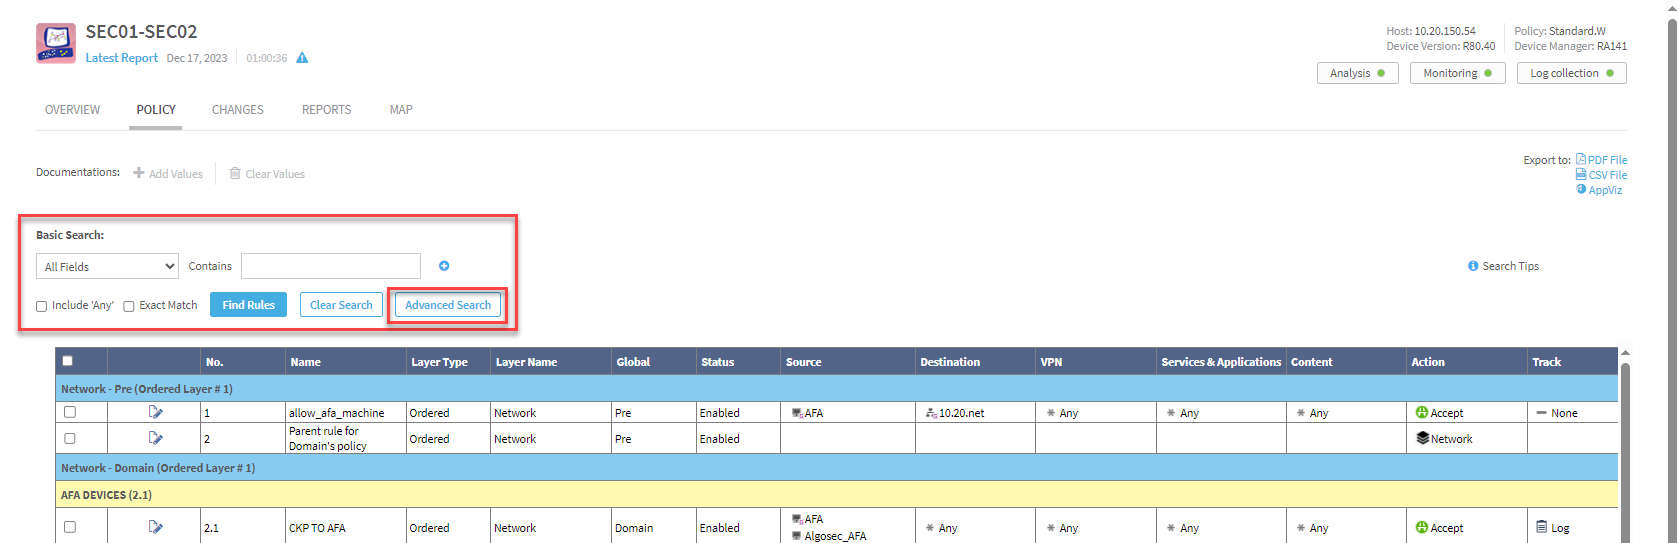
Basic Policy Search
To perform the Basic Policy Search:
- View the policy you want to search. For details, see Viewing policies.
- On the Policy tab for the selected device, from the All Fields dropdown list, select a field whose value should be compared with the contains value.
- In the Contains field, type a string, IP address, IP range, service, range of services (eg., "TCP/20-50" or "All TCP"), individual user, global user, or object name for which you want to search the policy. To search specifically for rules with specific empty fields, type [EMPTY] in the Contains field for that field.
- To add another search criteria, click the plus button to the right of current search criteria and then complete the fields in the manner previously described.
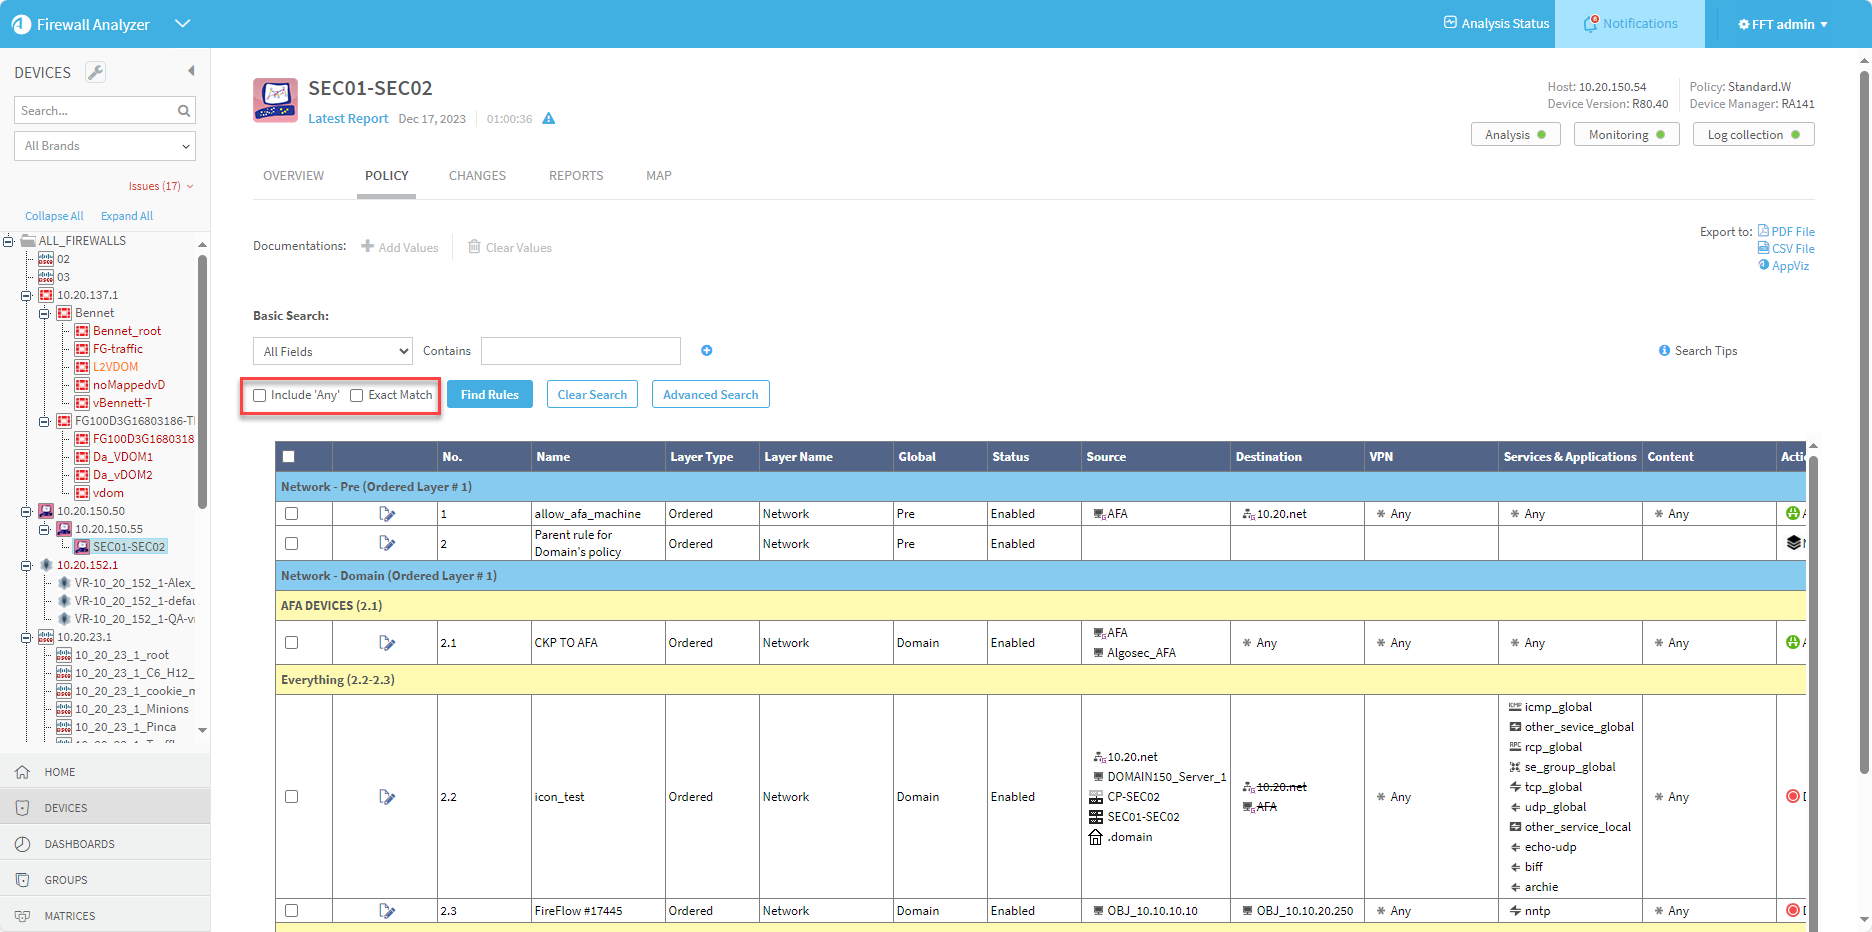
- Optional: Use the checkboxes to further define your search as follows:
- To include results that contain objects which contain only/exactly the IP address(es) or service(s) you searched for, select Exact Match.
- To include results which contain the searched IP address(es) or service(s) only because they contain "any", "all", or "*", select Include 'ANY'.
-
Click Find rules.
-
The policy is filtered according to the specified parameters.
-
Objects that contain what was searched will be highlighted in the search results.
-
If the Users column is empty then all users have access to that policy.
-
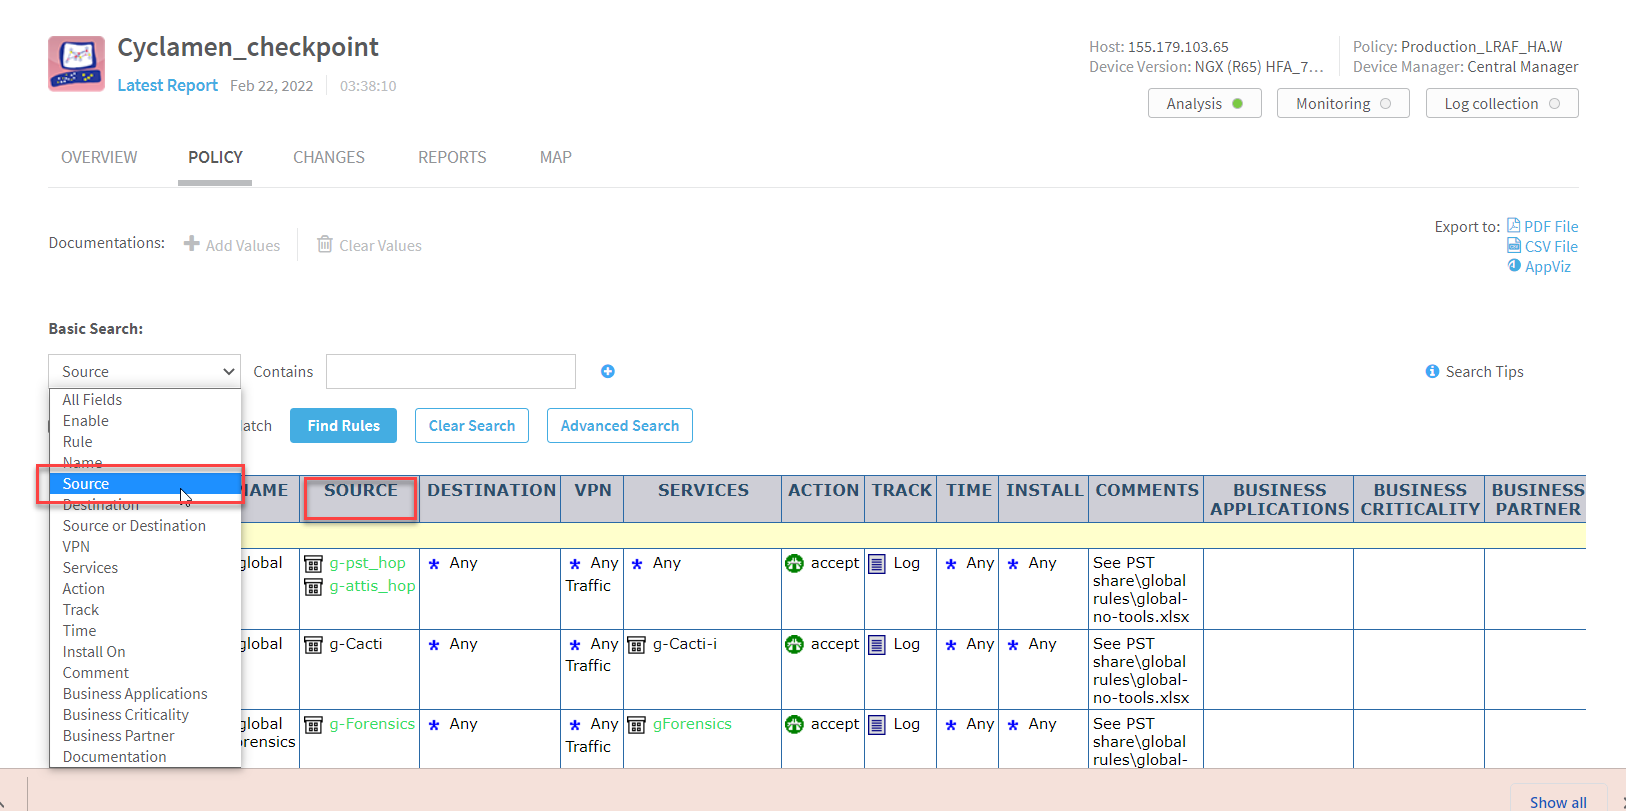
The dropdown options are specific for each device brand. If you select the Source, Destination, Source or Destination, Services or All Fields options in the dropdown list, the search will also return rules with objects that contain the specified IP address(es) or services. For all other fields, a textual search for the Contains field user input is performed.
Note: You can use Locate Object feature to search for objects that contain specific IP addresses. For details, see Locate objects.
Advanced Policy Search
Note: For parameters relevant to the Advanced Policy Search, see ADV_SEARCH_MAX_RESULTS ADV_SEARCH_MAX_COMPARISONS, and ADV_SEARCH_TIMEOUT_SECONDS. Exceeding defined parameter values will cause the search to abort and an error message to be displayed.
The query for this search must be written in the following format:
The format for a simple query is:
[column name][Basic Operator][value]
You can make complex queries by combining Basic queries separated by a Composite Operator:
[Basic Query][Composite Operator][Basic Query]
Tips:
-
To search across all fields, use ALL_FIELDS as the rule column name.
-
To search for empty fields, use [EMPTY] as Rule column value.
-
Brackets are optional.
-
You can use wild cards (*) except for contained objects (object/ IP Address definition of object content).
-
< and > symbols are not supported. Use the wild card (*) (except for contained objects).
-
For internal quotation marks, use \" instead of ".
-
Entered search string must be an exact match.
You can use the following operators:
| Basic Operators | Composite Operators | ||
| == | Equal To | and | Logical AND |
| != | Not Equal To | or | Logical OR |
For example:
Source ==1.2.3.4 or "Service object" !="tcp udp"
Equals to:
(Source equals to "1.2.3.4") or (Service object not equal to "tcp udp" )
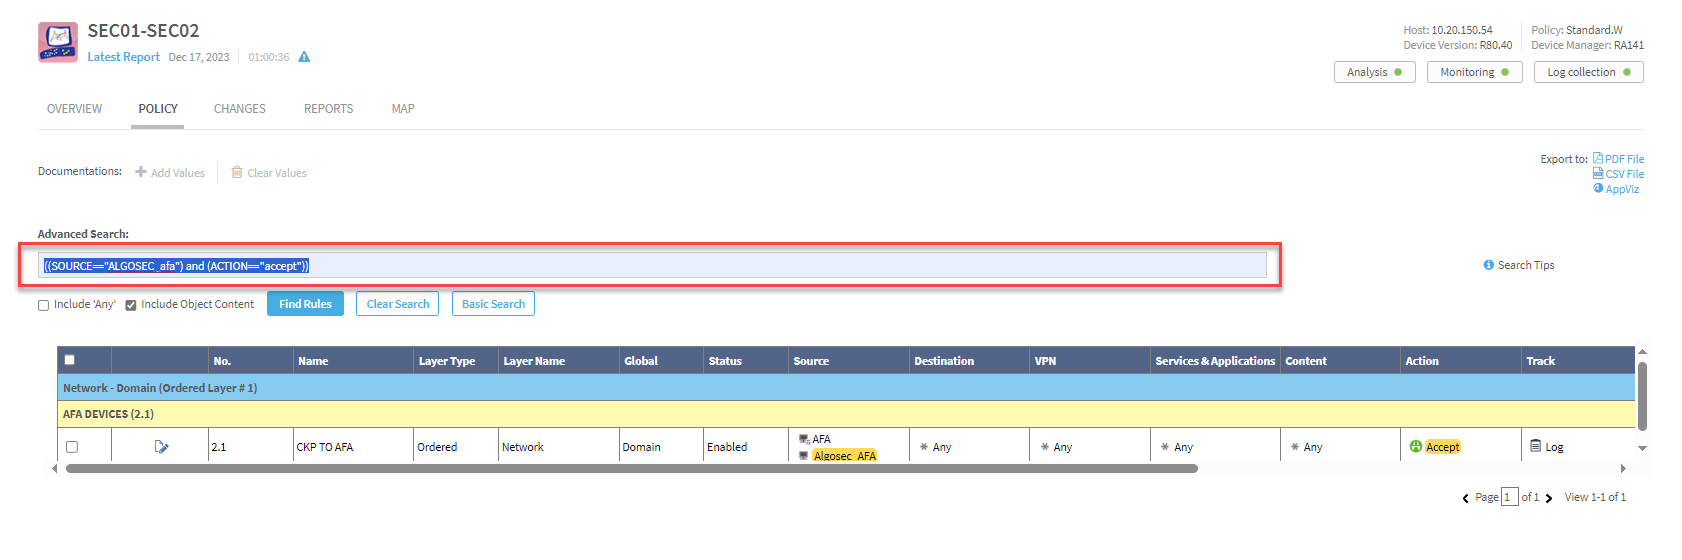
To perform the Advanced Policy Search:
- View the policy you want to search. For details, see Viewing policies.
In the Basic Search section, click Advanced Search.
-
Enter a relational expression of any complexity as the search criteria in the Advanced Search field.
For example:(SOURCE=="g-Cacti") and (ACTION=="accept")
 Additional relational expression examples
source==any_eu and Destination==1.2.3.4
"From Zone"==Inside or Name==test_afa or User==ValidateGroup
Documentation != [EMPTY]
(source==Mapat* or action==deny) and Comment==Fireflow* and destination!=any
action==deny
ALL_FIELDS==10.10.6.27
ALL_FIELDS==*http*
Comment==[EMPTY]
(action==accept) or (service==icmp6)
(ALL_FIELDS==untrust) and (service==ssh)
source==10.10.6.27 and destination==10.34.56.78
source!=10.20.6.99 or service==tcp*
service==SSH
service==*USA* or service!=all and "To Zone"==DMZ or SOURCE==cato*
ALL_FIELDS != *
ALL_FIELDS == [EMPTY]
- Optional: To further define your search:
Select the Include 'ANY' checkbox: To include results which contain the searched IP address(es) or service(s) only because they contain "any", "all", or "*.
Select the Include Object Content checkbox: To extend the search to include IPs and sub objects within an object.
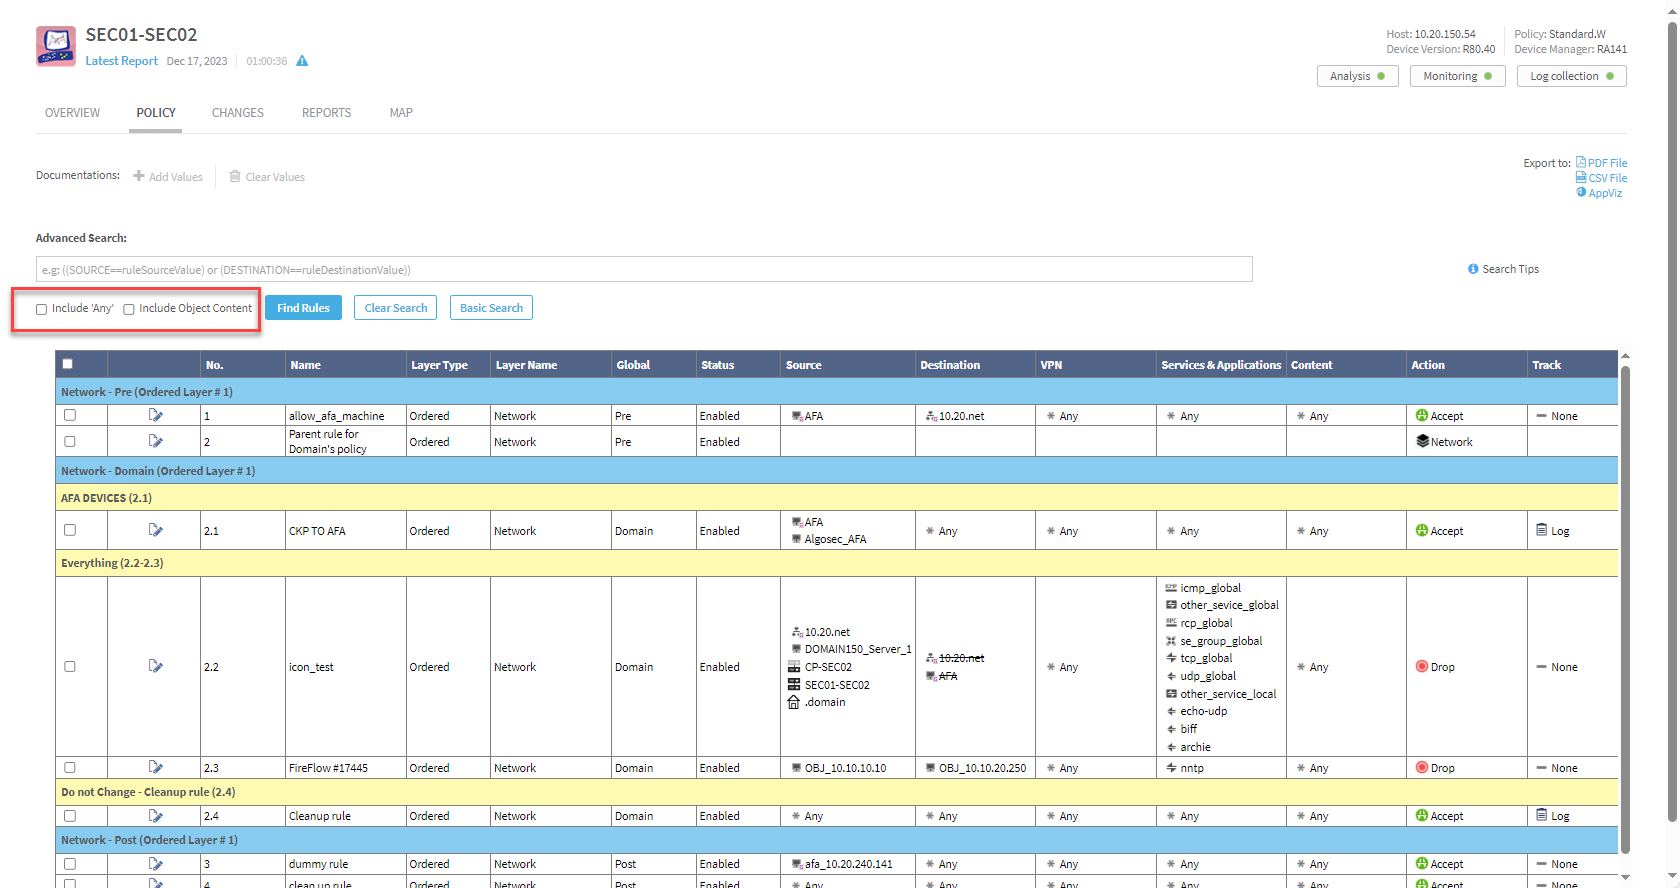
-
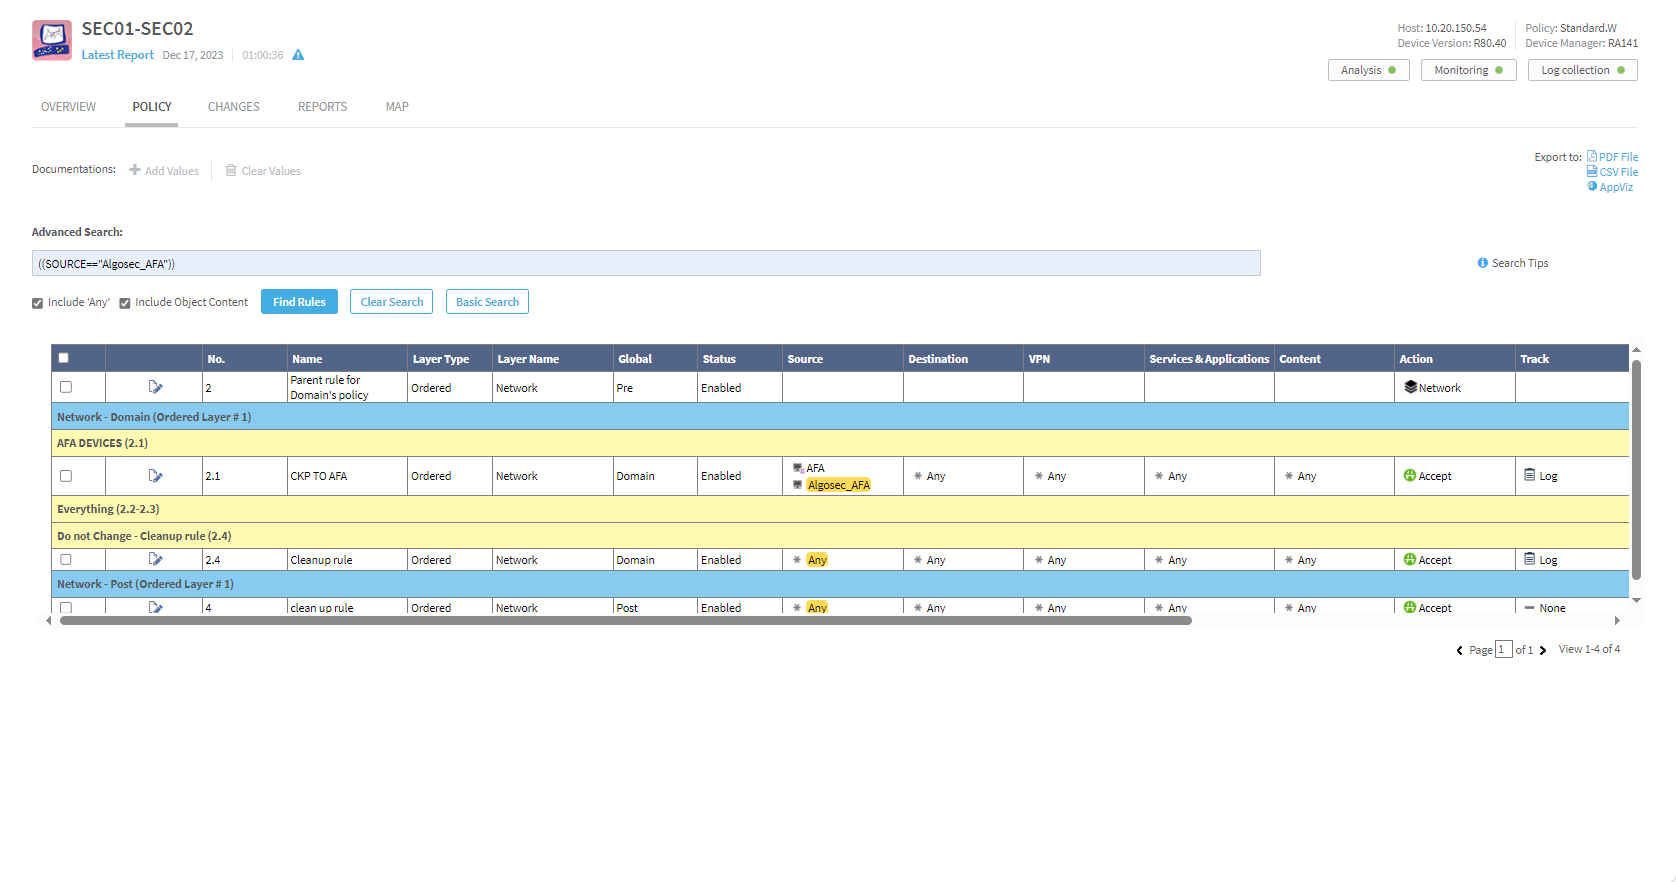
Click Find Rules.
The policy is filtered according to the specified search criteria.
Note: When the results contain matches due to Include Object Content or Include 'Any' being selected, the relevant objects and 'Any', etc. indications are highlighted.
Tip: You can save search criteria offline rather than defining searches from scratch every time. This means you can perform similar edited searches quickly and easily on a variety of devices, groups, matrices, etc.
Add/edit/remove AFA rule comments
Each rule includes a built-in documentation field (called Documentation), and you can also create additional custom documentation fields as needed. This section shows you how to add, edit, and remove comments in both types of fields.
Notes:
-
Rule comments are only visible in AFA, not on the devices themselves.
-
Only AFA administrators can add custom documentation fields.
-
AFA administators can disable or enable the Documentation field and/or custom documentation fields.
Add comments to rules:
You can add a comment to an individual rule, or apply the same comment to multiple rules at once. If a rule already has comments, the new input is appended to the existing comments, preserving the original content.
Do the following:
- View the device/group/matrix policy, and locate the rules you want to add comments to. For details, see Policy Search.
- Select the check box(es) to the left of the rule(s).
-
Click Add Values.
The Add Documentation dialog appears. (Note: In this example, three extra fields were added.)
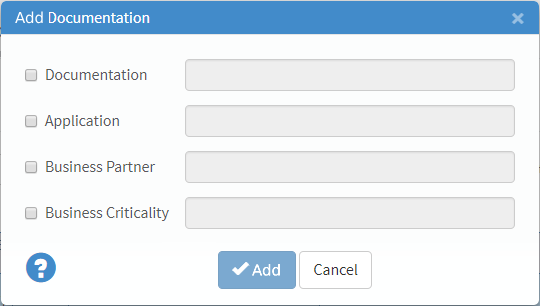
Note: Existing comments are not shown in the Add Documentation dialog.
-
Select the check box(es) next to the field(s) you want to add comments to.
-
Type your comments in the field(s).
Tip: If you enable the parameter CONVERT_ANCHOR_TO_LINK_CUSTOM_FIELD, you can include clickable URLs in the fields. A link must be a proper html tag. For example <a target="_blank" href="/FireFlow/Ticket/Display.html?id=6">Click here to go to the page.</a>. See CONVERT_ANCHOR_TO_LINK_CUSTOM_FIELD.
-
Click Add.
The comments are added to all the selected rules.
Edit rule comments:
You can edit comments for a specific rule. Changes overwrite the existing field values.
Do the following:
-
View the device/group/matrix policy, and locate the rule you want to edit. For details, see Policy Search.
-
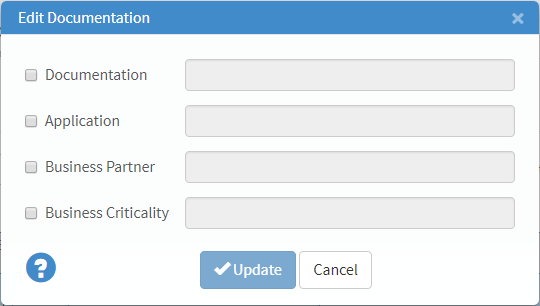
In the row of the rule to edit, click
 .
.The Edit Documentation dialog appears.
-
Select the check box(es) next to the field(s) you want to edit.
-
Type your comments in the field(s).
Note: A blank field will overwrite any existing information in that field, leaving the comment for that rule empty.
Tip: If you enable the parameter CONVERT_ANCHOR_TO_LINK_CUSTOM_FIELD, you can include clickable URLs in the fields. A link must be a proper html tag. For example <a target="_blank" href="/FireFlow/Ticket/Display.html?id=6">Click here to go to the page.</a>. See CONVERT_ANCHOR_TO_LINK_CUSTOM_FIELD.
-
Click Update.
The comments are added/removed.
Remove comments from rules:
You can remove all comment field values from one or more rules at once.
Do the following:
- View the device/group/matrix policy, and locate the rule with comments you want to remove. For details, see Policy Search.
- Select the check box(es) next to the rules whose comments you want to remove.
-
Click Clear Values.
-
When the confirmation dialog appears, click Continue.
The comments are removed from all comment fields of the selected rules.
Locate objects
You can locate all objects which contain a specific IP address or range in a device, group, matrix, or in a specific report.
To locate an object:
-
Do any of the following, as described in View AFA device data, View AFA group data, and View AFA matrix data:
- To search a device for an object, view the desired device.
- To search a group for an object, view the desired group.
- To search a matrix for an object, view the desired matrix.
- To search a single device report for an object, view the desired device, click the Reports tab, and then select the check box next to the report in which you want to locate the object.
- To search all device reports for an object, view the ALL_FIREWALL group, then click the Reports tab, and then select the check box next to the report in which you want to locate the object.
- To search a group report for an object, view the desired group, click the Reports tab, and then select the check box next to the report in which you want to locate the object.
- To search a matrix report for an object, view the desired matrix, click the Reports tab, and then select the check box next to the report in which you want to locate the object.
-
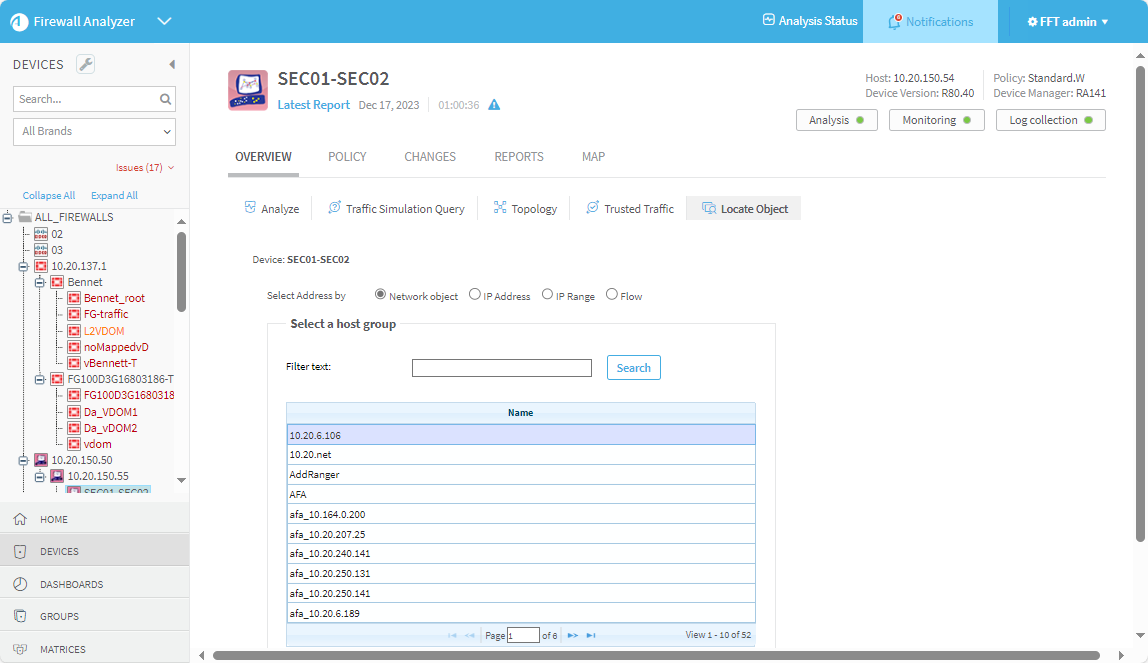
Click Locate Object.
The Locate Object page appears.
-
Specify the object you want to locate.
You can select an individual IP address, a range of IP addresses, or a host group that is defined on the device(s). If you wish to select a host group, you can search the defined names alphabetically, or by using the search filter.
-
Click Find in Objects.
A new window opens displaying a list of objects with the specified IP address, range, or host group, in the specified devices and/or matrices.
- To export the results to PDF format, click
 . For more details, see Export AFA screens to PDF.
Locate rules that use specific objects
You can locate all device rules that use a specific object—whether the rules include the object explicitly or include an object containing the specific object—in any given device, group, or matrix, or in any type of report. The procedure below should be used when searching for NAT rules.
Otherwise, the recommended method to locate rules is through the Policy tab. For more information, see Policy Search. NAT rules do not appear in the Policy tab.
To locate rules that use a specific object:
-
Do any of the following, as described in View AFA device data, View AFA group data, and View AFA matrix data:
- To search a device for an object, view the desired device.
- To search a group for an object, view the desired group.
- To search a matrix for an object, view the desired matrix.
- To search a single device report for an object, view the desired device, click the Reports tab, and then select the check box next to the report in which you want to locate the rules.
- To search all device reports for an object, view the ALL_FIREWALL group, then click the Reports tab, and then select the check box next to the report in which you want to locate the rules.
- To search a group report for an object, view the desired group, click the Reports tab, and then select the check box next to the report in which you want to locate the rules.
- To search a matrix report for an object, view the desired matrix, click the Reports tab, and then select the check box next to the report in which you want to locate the rules.
-
Click Locate Object.
The Locate Object page is displayed.
- Specify the object you want to locate, by doing one of the following:
- To select a host group that is defined on the device(s):
- In the Select Address by area, choose Host group.
- Select the host group you wish to locate. You can search the defined names alphabetically, or by using the search filter.
- To select an individual IP address:
- In the Select Address by area, choose IP Address.
- Type the IP address you wish to locate.
- To locate rules with objects that contain only the specified IP address, select the Exact match check box.
- To select a range of IP addresses:
- In the Select Address by area, choose IP Range.
- Type the starting and ending IP addresses for the IP range you wish to locate.
- To locate rules with objects that contain only the specified IP range, select the Exact match check box.
- To select a specific traffic flow:
- In the Select Address by area, choose Flow.
Specify the source and destination by selecting or typing an individual IP address, a range of IP addresses, or a host group. If you wish to select a host group, you can search the defined names alphabetically, or by using the search filter.
If you type a host group that has an IP address as its name, put it in quotations (for example "10.20.1.1").
- To locate rules with objects that contain only the IP addresses specified in source and destination, select the Exact match check box.
Note: For Cisco devices, locating rules with the exact match feature will not return results where the IP address was added directly to the rule (not within a network object).
- To select a host group that is defined on the device(s):
-
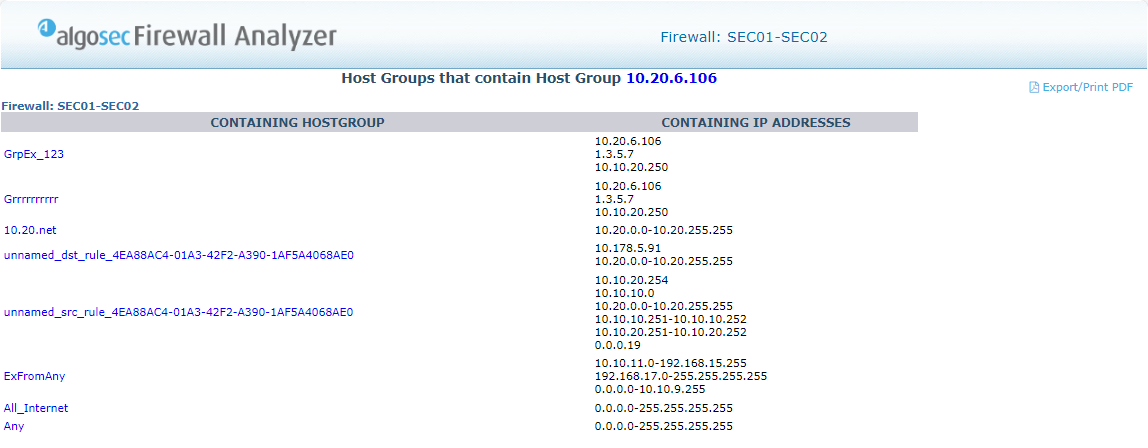
Click Find in Rules.
A new window opens displaying a list of rules containing the specified object, in the specified devices and/or matrices.

The yellow highlighting indicates which IP address, range of IP addresses, or host groups contain the object you want to locate.
- To see a host group's definition, click on the host group.
-
To export the results to PDF format, in the top-right corner of the report, click
. For more details, see Export AFA screens to PDF.Tables at the end of each device display relevant network and service object definitions. Clicking on the object in a rule will bring you to its definition in these tables.
- To export the results to CSV format, in the top-right corner of the report, click
 . Follow your browser prompts to open the file.
You can select rules from a device's policy in AFA, and export them as application flows in AppViz. Either transfer the flows directly to AppViz, or download a CSV file to analyze or edit and then import into AppViz.
Do the following:
-
Switch to AFA. For details, see Logins and other basics.
-
View the desired device, group, or matrix.
-
Click the Policy tab.
The Policy tab appears in the right pane, displaying the device policy.
-
Select the rules you want to export as flows by selecting their check box in the left column.
Selecting the check box in the header row selects all the rules on the page you are viewing, not all of the rules on all pages.
You can filter the displayed traffic flows.
-
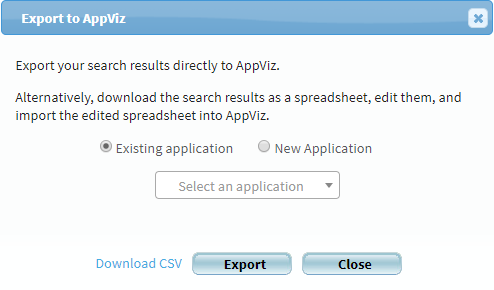
In the Export To area, click AppViz.
The Export to AppViz dialog is displayed.
-
Select the target application:
-
Existing application: From the drop-down menu, select the application where you want to export the rules.
-
New application: Click New application, and type a name for the application in the field.
-
-
Choose how to export the rules:
Export rules directly to AppViz Click Export.
The rules are transferred to the specified application in AppViz, and a success message appears.
To view the updated application, click Open application, and then click OK.
Note: Not all rule types can be exported directly to AppViz. For a list of rules, see Rules that are not imported automatically to AppViz.
Download rules as a CSV for import to AppViz Click Download CSV.
The CSV file defining the rules is downloaded to your computer.
For details how to import the CSV to AppViz, see Update data via CSV files.
Rules that are not imported automatically to AppViz
The following types of rules are not imported automatically to AppViz:
- Disabled rules
- Deny rules
- Rules with drop actions
- Rules that already exist in AppViz
You can use the Download as CSV method to import these types of rules into AppViz. For more details, see Download rules as a CSV for import to AppViz.
