Manage onboarded accounts
This topic describes how you manage onboarded Azure subscriptions, AWS accounts, and Google Cloud projects in Cloud Network Security.
Access the ONBOARDING MANAGEMENT page
In AppViz, hover over the  SETTINGS icon at the bottom left of the screen. After the panel expands, click
 ![]() ONBOARDING.
ONBOARDING.
The ONBOARDING MANAGEMENT page is displayed, with a table showing details for each account defined in AppViz.
Note: Click on a column heading to alphabetically sort the table by that column.
Data displayed per resource
| Column Name | Description |
|---|---|
| Account Name |
Name of the account/subscription/project. To edit the name, see Edit account details. Note (for AWS):
|
| Account ID | ID assigned to the account / subscription / project. |
| Vendor | Name of the vendor. |
| Type |
Type of vendor resource:
|
| Status |
Displays the account status:
|
| Onboarding Date |
The date the account was onboarded to AppViz. Note: Accounts onboarded before this column was introduced will show N/A. |
| Last Successful Update |
The date-time that the last data collection completed successfully. Note:
|
 : Last data collection finished successfully
 : An error occurred during the last data collection or permissions are missing
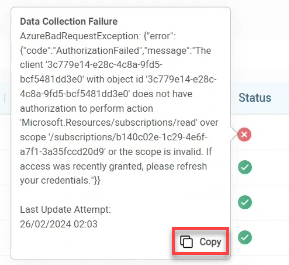
 : Data collection is in process
Search and filter accounts
Use the search and filter fields to see a targeted selection of accounts.

| Search | Search accounts using partial or whole account names or vendor IDs. |
| Vendor | Filter by vendor type(s) (AWS, Azure, Google Cloud). |
| Status | Filter by account onboard status(es) (Active, In progress, Failure). |
Edit account details
Note: You can edit the name of all account types, but only credentials for Azure subscriptions can be modified.
Do the following:
-
In the Name column, click the account name you want to edit.
An account / subscription/ project window appears, based on the vendor selected.
-
Edit the account / subscription/ project name.
-
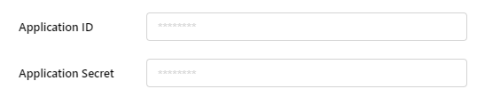
For Azure only: Update Application ID and Application Secret.
-
Click Save to save the changes.

