Onboard Azure Subscriptions
This topic describes how to onboard Azure subscriptions to ACE.
ASMS Integration Note
-
For ASMS A33.20+: When ACE is connected to ASMS, and Azure Subscriptions are added to ACE, they are automatically onboarded to ASMS. For more details, refer to our ASMS tech docs Simultaneously Onboard Azure Subscriptions into ACE and ASMS.
-
An early availability feature in ASMS A33.10 is the ability to onboard Azure Subscriptions to both ACE and ASMS simultaneously. This capability streamlines your onboarding process. Once accounts are added to ACE, they are automatically onboarded to ASMS. For more details, refer to our ASMS tech docs Simultaneously onboard Azure subscriptions into ACE and ASMS.
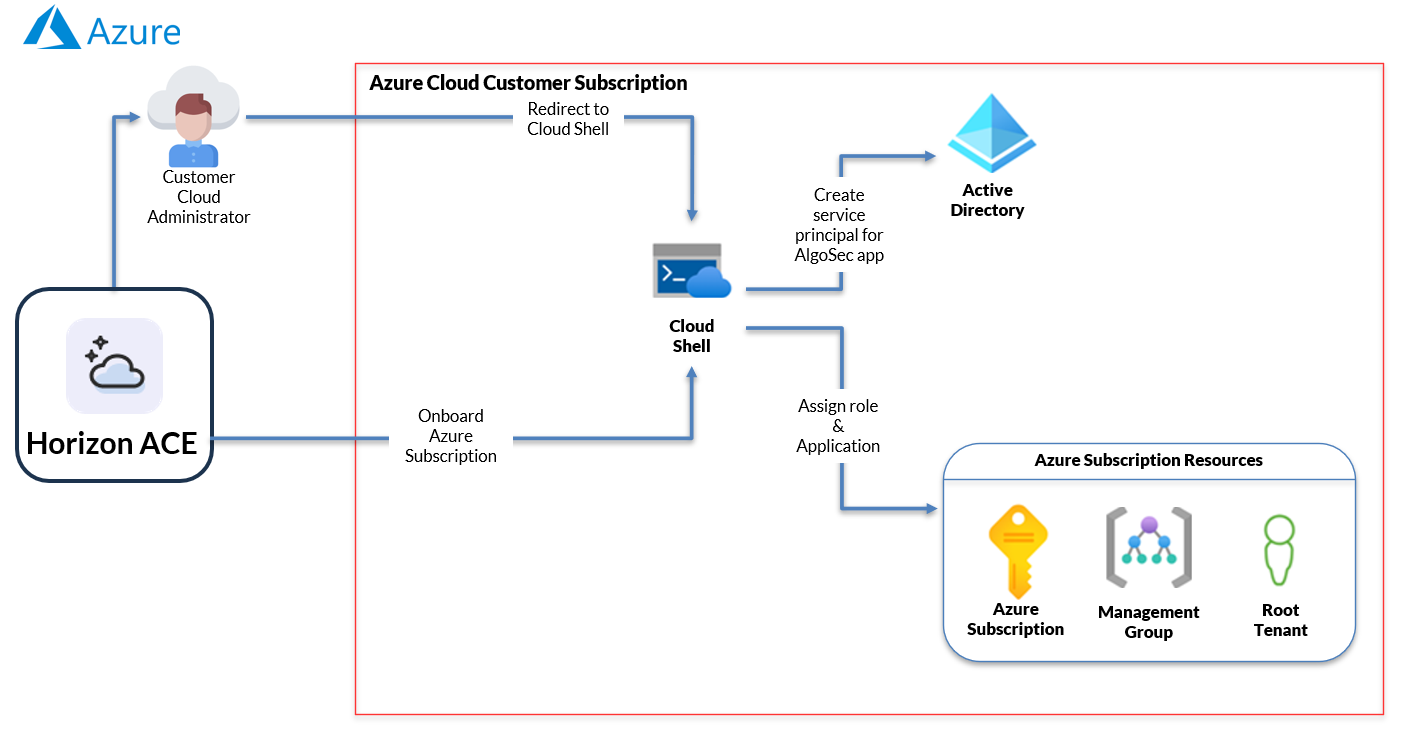
How Azure Onboarding Works
ACE connects to Azure using a secure, role-based access model.
During onboarding, an Azure administrator grants AlgoSec the permissions required to read Azure networking and security configuration. Depending on the onboarding method, this is done by running an Azure Cloud Shell script, deploying Terraform configuration, following the no-script workflow, or using the REST API.
After onboarding is complete, ACE can discover Azure resources such as:
-
Virtual Networks (VNets)
-
Subnets
-
Network Interfaces (NICs)
-
Network Security Groups (NSGs)
-
Azure Firewall
-
Route Tables
-
VPN Gateways and VPN Connections
-
ExpressRoute resources
Depending on the onboarding method you choose, AlgoSec can also automatically discover and synchronize changes made to your Azure environment after onboarding.
ACE uses Azure RBAC permissions to discover and continuously synchronize Azure networking and security resources.
Azure Onboarding Flow (Via Wizard)
-
In ACE, start the Azure onboarding wizard.
-
Choose an onboarding method. See below Onboarding Methods for Azure subscriptions, management groups, and tenant root groups:
-
Cloud Shell (with script)
-
Terraform (with script)
-
-
Grant the required Azure permissions at the appropriate scope:
-
Subscription
-
Management Group
-
Tenant Root Group
-
-
Azure creates or authorizes the required application access and role assignments.
-
ACE uses the assigned permissions to securely access Azure configuration data.
-
Azure resources are discovered and imported into ACE.
-
If automatic synchronization is enabled, ACE periodically detects and imports changes made in Azure.
Note: ACE uses role-based access and does not require long-term Azure credentials to be stored in ASMS.
Who Performs Azure Onboarding?
Azure onboarding typically requires collaboration between:
-
An Azure administrator, who creates or approves the required application access, service principal, and Azure RBAC role assignments.
-
An ACE administrator, who initiates the onboarding process and verifies the connection.
The onboarding process creates or authorizes the application access and Azure RBAC permissions required for ACE to access Azure configuration data.
Choosing an Onboarding Scope
The scope selected during onboarding determines which Azure resources ACE can discover.
| Scope | Typical Use Case |
|---|---|
| Subscription | Proof of concept (POC) or onboarding a single Azure subscription |
| Management Group | Production environments that contain multiple subscriptions |
| Tenant Root Group | Broadest discovery scope across the Azure tenant |
For most production deployments, onboarding at the Management Group level allows ACE to discover and synchronize subscriptions within that scope automatically.
Onboarding Methods for Azure subscriptions, management groups, and tenant root groups
| Onboarding Method | Description | Automatic synchronization |
|---|---|---|
| Cloud Shell script (via wizard) | Via the onboarding wizard: Ggenerate and runs an Azure Cloud Shell script | Yes |
| No script | Onboard Azure resources through the Azure portal without running scripts | Yes |
| REST API (single account) | Onboard a single subscription via API | No |
| Terraform | Via the onboarding wizard: Generates and runs Terraform to deploy the required Azure permissions and onboarding configuration | No |
Note:
-
For more information about the Azure onboarding script (for the with script method), see Inside the Azure Onboarding Script.
-
For more information about the Azure onboarding script (for terraform), see Inside the Azure Onboarding Template (Terraform).
Automatic Synchronization
-
Cloud Shell, and No Script onboarding methods support automatic synchronization.
-
When these methods are used, ACE can automatically discover Azure subscriptions added within the onboarded scope and synchronize configuration changes.
-
REST API onboarding is limited to a single subscription and does not support automatic discovery or synchronization of additional subscriptions.
-
Terraform-onboarded subscriptions are not auto-discovered by ACE. Terraform onboarding is limited to the specific subscription where the template is deployed, making account management the customer's responsibility.
Before you start
-
Make sure you are logged on to Microsoft Azure portal
 .
.
-
To onboard multiple subscriptions in your Azure account, make sure you have the following permissions:
-
To onboard subscriptions under a management group: User Access Administrator
or Owner permissions. -
To onboard subscriptions under Tenant Root Group, make sure you have access to manage all Azure subscriptions and management groups
.
-
-
Review the list of required permissions and roles here: Permissions Required for Azure Subscriptions.
Note: Azure subscription names must be unique.
Onboarding Azure Subscription
Onboard Azure resources using your preferred method:
Do the following:
-
In the ACE
 Settings area, click Accounts Management.
-
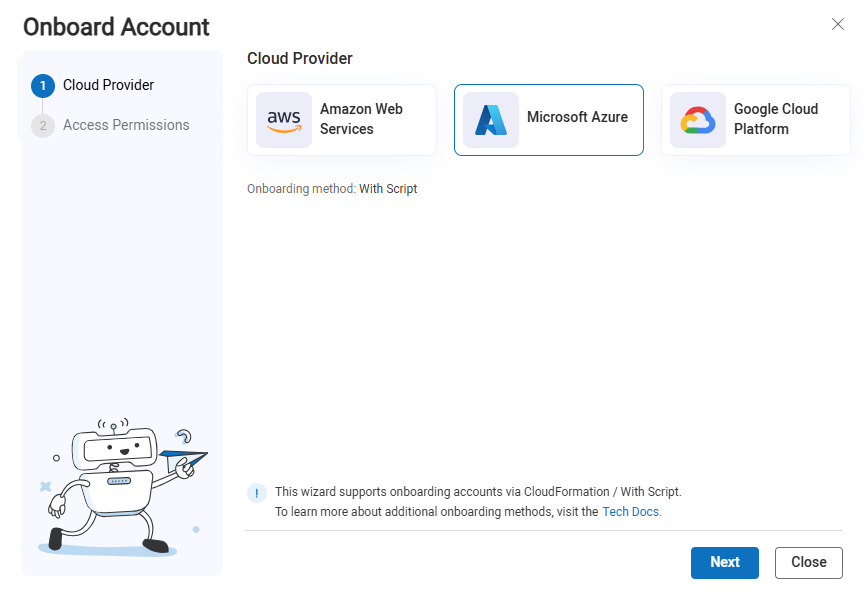
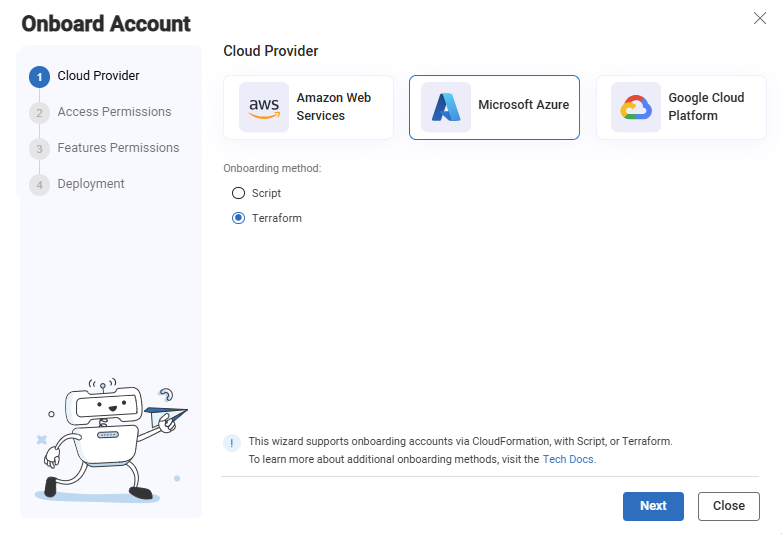
On the Accounts Management page that opens, click +Onboard Accounts. The Onboard Account Wizard opens.
-
Click the
 Microsoft Azure button.
-
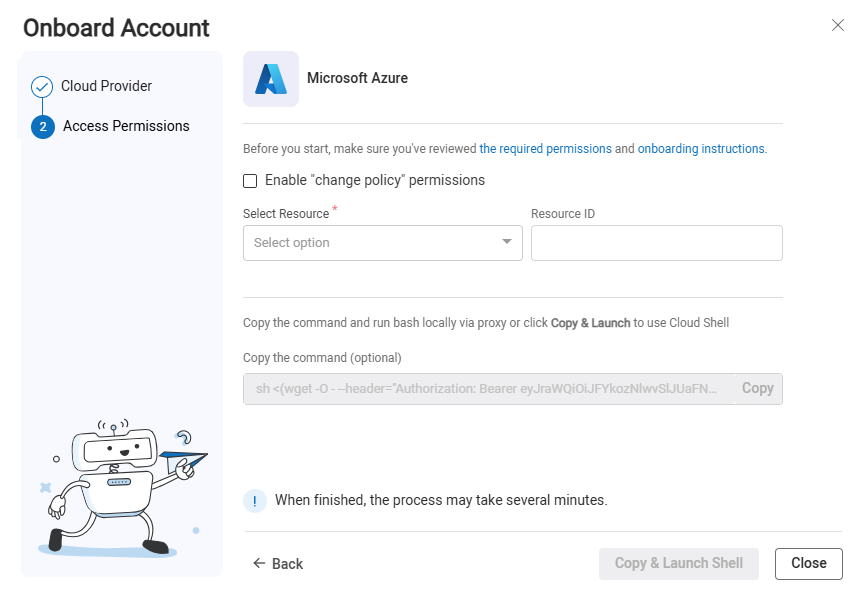
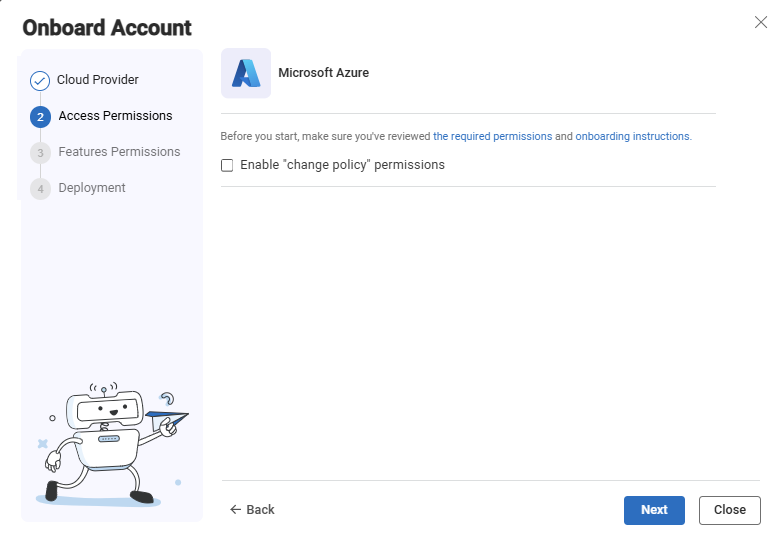
The Azure Onboarding Wizard Access Permissions step appears.
-
Enable Change Policy Permissions:
Choose which level of permissions are required for the role in Azure.
-
Clear the checkbox to fully support your Azure security policy management, security analysis and recommendations without the ability to perform policy changes
-
Select the checkbox to grant all Read functionalities to fully support your Azure security policy management, security analysis and recommendations PLUS enable advanced policy change capabilities for Azure NSGs and to enable Azure VNet flow logs scanning. This requires additional Write permissions beyond the base Read permissions.
-
Base Read permissions are described in Required Azure Permissions for Cloud Network Security,
-
Additional Write permissions are outlined in Optional Feature Permissions for Cloud Network Security.
-
-
-
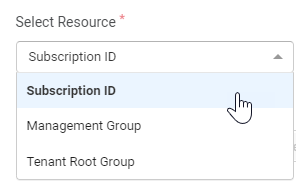
Select the Azure resource type: Subscription ID, Management Group, or Tenant Root Group.
Important: To run the script, the user must possess the necessary permissions for creating a service principal on the selected resource.
-
In the Resource ID field, enter the Subscription ID or Management Group Name of the Azure resource to onboard.
Note: When Tenant Root Group is the Azure resource type, no additional information is required.
The Cloud Shell command field is automatically populated based on the resource type and ID / Name.
-
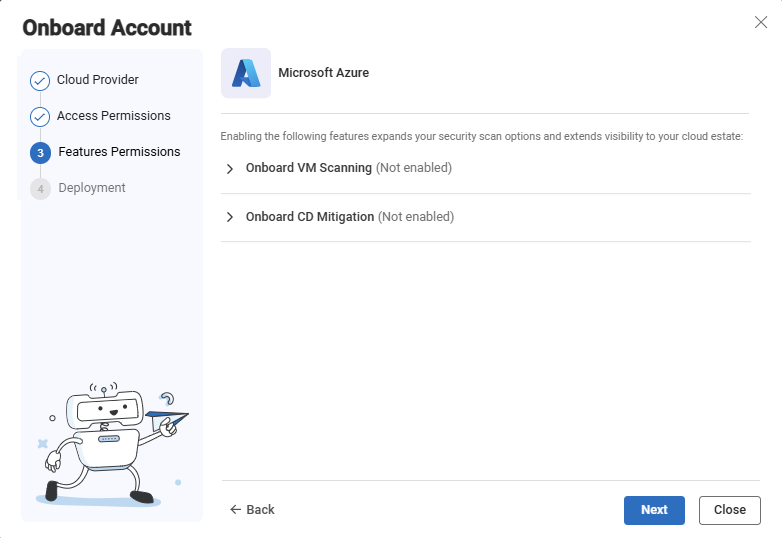
Click Next. The Features Permissions step of the wizard opens.

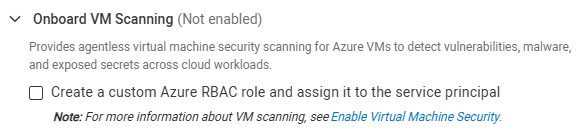
- Onboard VM Scanning (optional)
The VM Scanner feature Provides agentless virtual machine security scanning for Azure VMs to detect vulnerabilities, malware, and exposed secrets across cloud workloads. For more information, see Enable Virtual Machine Security (AWS).
-
Select Create a custom Azure RBAC role and assign it to the service principal. For a list of permissions that are added see Permissions Required for Azure Subscriptions.
-
By default, the VM Scanner feature is set to be onboarded manually. For instructions to manually set permissions, see Enable Virtual Machine Security (Azure).
-
-
Onboard CD Mitigation (optional)
The CD Mitigation feature provides threat management for Azure Container Registry (ACR) by scanning and securing your Continuous Delivery (CD) pipeline, preventing threats from reaching container-based workloads.

-
Select Grant CD mitigation permissions & create related resources to be automatically onboarded.
-
By default, the CD Mitigation feature is set to be onboarded manually.
-
-
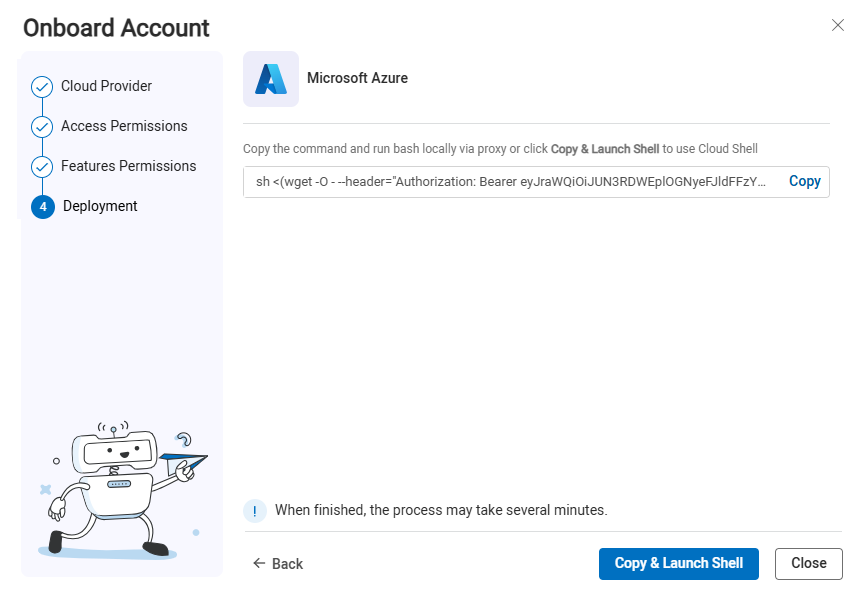
Click Next. The Deployment step of the wizard opens.
-
Complete the onboarding using one of the following methods:
Note: In the following steps, the generated onboarding script automatically assigns Azure’s built-in roles to the service principal. If your environment requires a custom role, follow the instructions in the AlgoPedia article ACE | How to Onboard Azure Using the ‘With Script’ Method When Working With a Custom Role.
-
To open a Cloud Shell session directly from the ACE interface, click
 .
. Note: The Cloud Shell link is copied automatically to your clipboard.
The Azure editor opens in a new browser tab.
-
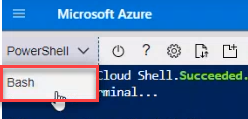
From the dropdown menu select Bash.
-
Paste the Cloud Shell script from your clipboard and then press Enter.
The subscription(s) is onboarded into ACE.
-
-
(Alternative method) If you don't want to open a Cloud Shell session directly from the wizard, you can run bash locally using a proxy:
-
Click Copy to copy the Cloud Shell command.

Note: : The command generates an unreadable script. For an explanation of the script including an example of it in a readable version, see Inside the Azure Onboarding Script.
-
Paste and run the script in your alternative shell to complete onboarding the subscription(s).
-
-
-
In ACE, click Close to close the onboarding wizard.
Note: It may take up to an hour for Azure to sync with ACE.
-
Open Permissions Diagnostics to confirm that the account/subscription/project meets the requirements for the ACE scan types you want to run, and use the remediation links to complete any required setup.
You can onboard Azure subscriptions, managed groups, or tenant root groups without using a script if your system does not support using scripts.
Do the following:
-
Make sure you can access the Azure console as a user with Application Administrator OR Application Developer role.
-
From the Azure CLI, create an Azure service principal based on the ACE Azure multi-tenant application. You can do this with the following command:
az ad sp create --id 'f1764d38-8bca-497f-94ae-2ccec598107d'
The Azure service principal is created.
The next steps explain how to grant access permission to the service principal to a subscription or management group.
-
Navigate to the Azure console and select either the subscription or management group you want to assign role permissions.

-
Click Access control (IAM) from the left menu, and then click +Add.
-
From the dropdown, select Add role assignment.
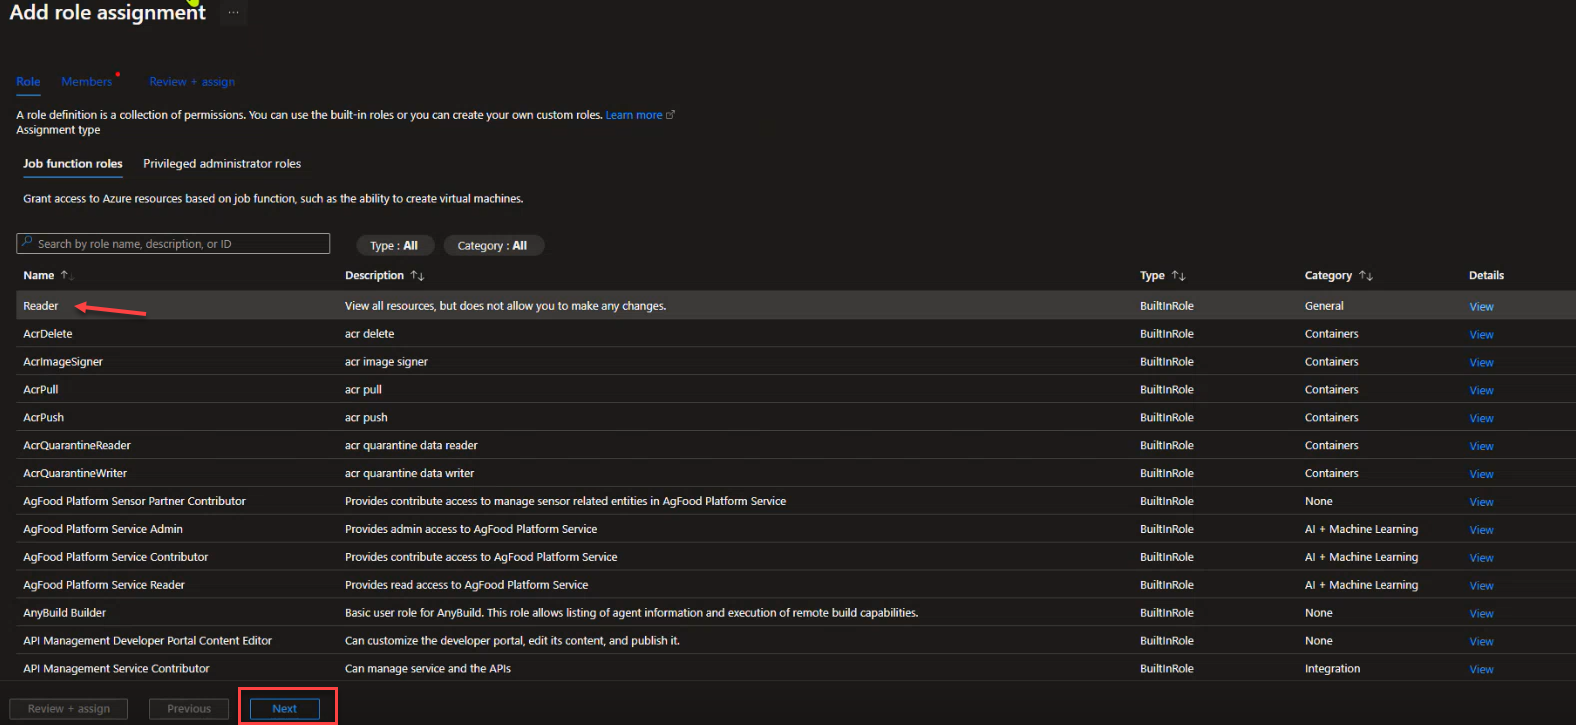
The Add role assignment page appears.
-
Add the role (permission) you want to assign to the service principal for working with the subscription:
-
For Cloud Network Security, choose either:
-
Reader: Enable read access only
-
Contributor: Enable read/write access
-
Custom Role – Create a custom role if needed.
 Click for instructions to create the Custom Role
-
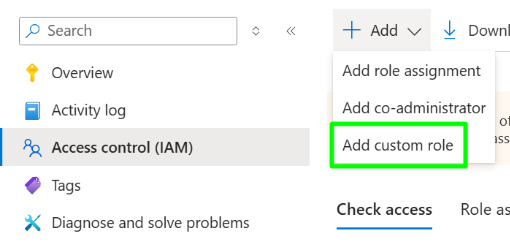
In the Azure Console, go to Access Control (IAM).
-
Click + Add and select Add Custom Role.
-
On the Create Custom Role screen, open the JSON tab.
-
Click Edit and add with the following JSON:
Replace <ASSIGNABLE SCOPE> using the following formats:
-
Management group scope has the format /providers/Microsoft.Management/managementGroups/{managementGroupName}.
-
Subscription scope has the format /subscriptions/{subscriptionId}.
Copy{
"properties": {
"roleName": "AceCustomRole",
"description": "Custom role for Algosec Cloud",
"assignableScopes": [
"<ASSIGNABLE_SCOPE>"
],
"permissions": [
{
"actions": [
"Microsoft.Compute/virtualMachines/read",
"Microsoft.Compute/virtualMachineScaleSets/read",
"Microsoft.Compute/virtualMachineScaleSets/virtualMachines/read",
"Microsoft.Compute/virtualMachineScaleSets/networkInterfaces/read",
"Microsoft.Insights/diagnosticSettings/read",
"Microsoft.Network/applicationSecurityGroups/read",
"Microsoft.Network/azurefirewalls/read",
"Microsoft.Network/connections/read",
"Microsoft.Network/expressRouteCircuits/read",
"Microsoft.Network/expressRouteCircuits/peerings/read",
"Microsoft.Network/firewallPolicies/read",
"Microsoft.Network/firewallPolicies/ruleCollectionGroups/read",
"Microsoft.Network/ipGroups/read",
"Microsoft.Network/loadBalancers/read",
"Microsoft.Network/localnetworkgateways/read",
"Microsoft.Network/locations/serviceTags/read",
"Microsoft.Network/networkInterfaces/read",
"Microsoft.Network/networkSecurityGroups/read",
"Microsoft.Network/networkWatchers/flowLogs/read",
"Microsoft.Network/networkWatchers/queryFlowLogStatus/action",
"Microsoft.Network/networkWatchers/read",
"Microsoft.Network/publicIPAddresses/read",
"Microsoft.Network/routeTables/read",
"Microsoft.Network/virtualHubs/effectiveRoutes/action",
"Microsoft.Network/virtualHubs/hubRouteTables/read",
"Microsoft.Network/virtualHubs/hubVirtualNetworkConnections/read",
"Microsoft.Network/virtualHubs/read",
"Microsoft.Network/virtualNetworkGateways/read",
"Microsoft.Network/virtualNetworks/read",
"Microsoft.Network/virtualWans/read",
"Microsoft.Network/vpnGateways/read",
"Microsoft.Network/vpnsites/read",
"Microsoft.Resources/subscriptions/read",
"Microsoft.Storage/storageAccounts/read",
"Microsoft.Storage/storageAccounts/listkeys/action",
"Microsoft.Web/hostingEnvironments/read"
],
"notActions": [],
"dataActions": [],
"notDataActions": []
}
]
}
} -
-
Click Save.
-
Click Review + Create.
-
Click Create.
-
-
-
For Cloud App Analyzer, add:
-
Log Analytics Reader
-
AcrPull
-
Key Vault Reader
-
For details, see Permissions Required for Azure Subscriptions.
-
-
For additional optional features:
-
For Cloud Network Security, to allow ACE to collect NSG resource logs, grant the service principal the additional roles:
-
Network Contributor
-
Storage Account Contributor
-
-
For Cloud App Analyzer:
-
Azure Kubernetes Service Cluster User Role
-
AcrPush
-
-
Assign the Contributor role to enable VNet flow logs scanning for Cloud App Analyzer.
For details, see Permissions Required for Azure Subscriptions.
-
-
Click Next.
The Member tab appears.
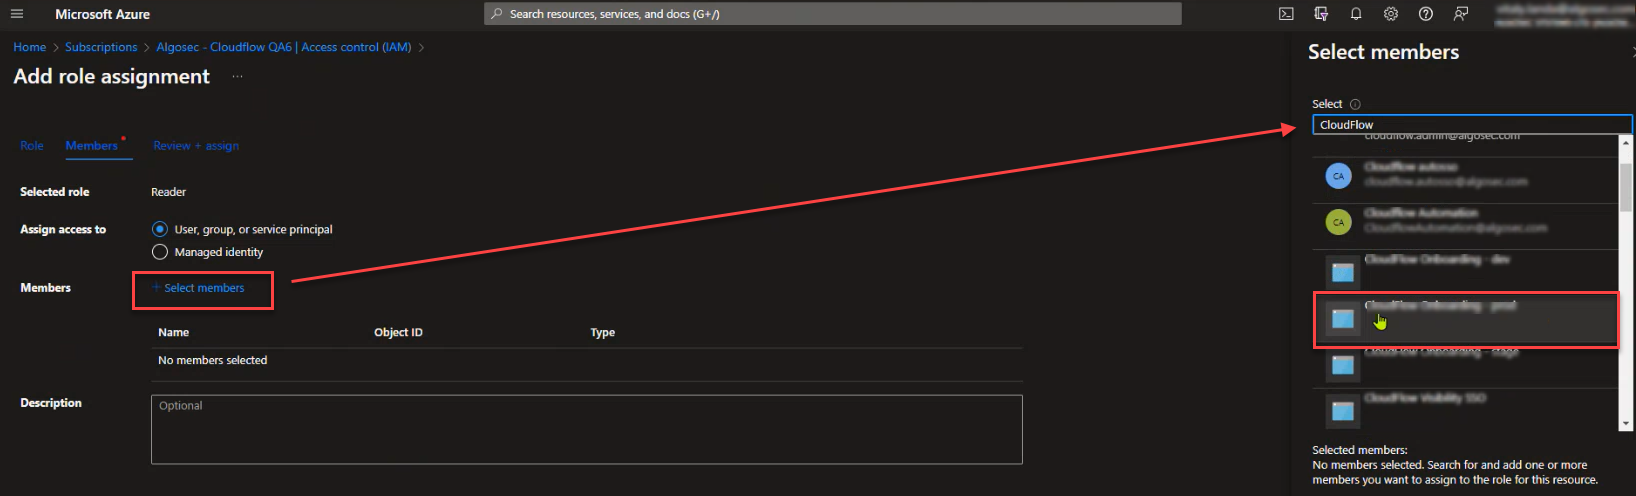
-
Click Select members. From the Select members popup search for and select AlgoSec Cloud Enterprise.
AlgoSec Cloud Enterprise will move to the Selected members section of the popup.
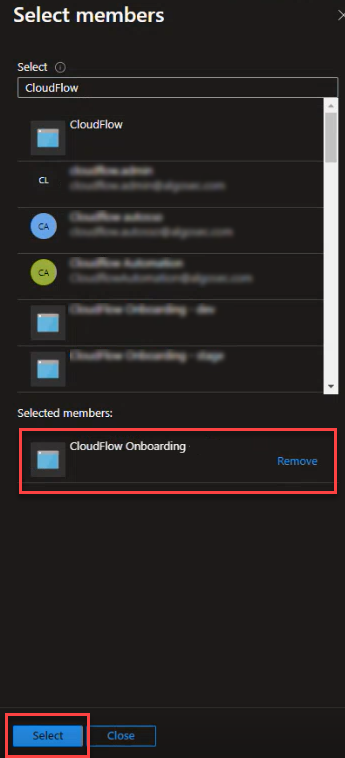
-
Click Select.
The Service Principal is assigned to the specific subscription and role.
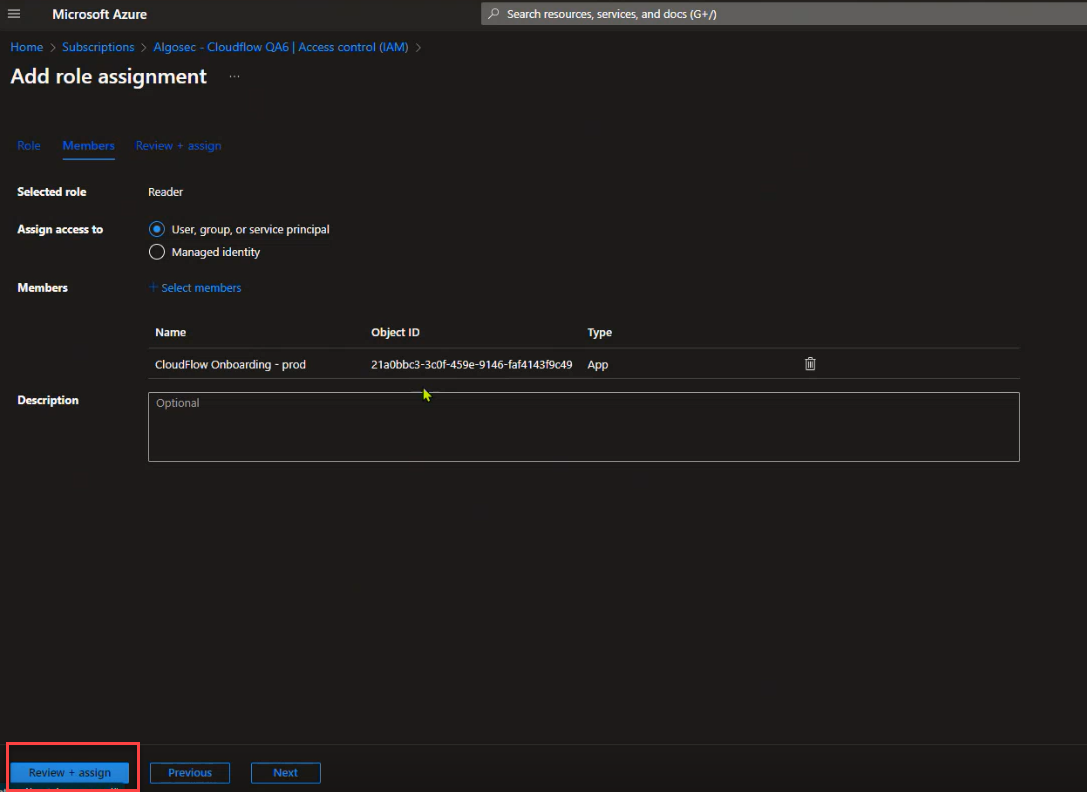
-
Click Review + assign once more to finalize the assignment and allow ACE to access the Azure subscription.
-
Manually onboard VM scanning (Optional)
-
Manually onboard CD mitigation (Optional)
Use this method to manually onboard a CD mitigation deployment using Azure resources and the unified onboarding bundle.
Do the following:
-
Download the Azure resources from the URL corresponding to your region.:
-
US: https://us.app.algosec.com/prevasio/azure-application?tenant_id=${ALGOSEC_TENANT_ID}
-
EU: https://eu.app.algosec.com/prevasio/azure-application?tenant_id=${ALGOSEC_TENANT_ID}
-
ANZ: https://anz.app.algosec.com/prevasio/azure-application?tenant_id=${ALGOSEC_TENANT_ID}
-
IND: https://ind.app.algosec.com/prevasio/azure-application?tenant_id=${ALGOSEC_TENANT_ID}
-
ME: https://me.app.algosec.com/prevasio/azure-application?tenant_id=${ALGOSEC_TENANT_ID}
-
UAE: https://uae.app.algosec.com/prevasio/azure-application?tenant_id=${ALGOSEC_TENANT_ID}
-
SGP: https://sgp.app.algosec.com/prevasio/azure-application?tenant_id=${ALGOSEC_TENANT_ID}
-
-
Create a resource group with the name:
prevasio-${ALGOSEC_TENANT_ID:0:4}${subscription_id:0:4}-resource-group -
Prepare the following parameters:
Copy{
"parameters": {
"subscription-id": {
"value": "$subscription_id"
},
"tenant-id": {
"value": "$azure_tenant_id"
},
"prevasio-hash": {
"value": "${ALGOSEC_TENANT_ID:0:4}${subscription_id:0:4}"
},
"prevasio-host": {
"value": "<*see values below>"
},
"prevasio-additionals": {
"value": See instructions below
},
"algosec-cloud-host": {
"value": "'$ALGOSEC_CLOUD_HOST'"
}
}* For the value of the prevasio-host, choose your region from the following:
-
To generate
prevasio-additionals:- Create this JSON:
{"tenantId":"ALGOSEC_TENANT_ID","clientId":"ALGOSEC_CLIENT_ID","clientSecret":"ALGOSEC_CLIENT_SECRET"} - Convert it to a string
- Convert the string to UTF-8 bytes
- Base64-encode it using your preferred method
- Example (bash):
CopytenantId="your-tenant-id"
clientId="your-client-id"
clientSecret="your-client-secret"
json=$(printf '{"tenantId":"%s","clientId":"%s","clientSecret":"%s"}' "$tenantId" "$clientId" "$clientSecret")
encoded=$(echo -n "$json" | base64)
echo "$encoded" - Create this JSON:
-
In the Azure Portal, go to "Deploy a custom template" in the search bar
-
Choose "Build your own template in the editor"
-
Use the
template.jsonfrom the downloaded zip -
Add the parameters from step c and create the deployment
-
Assign a custom role with the following permissions:
Copy{
"properties": {
"roleName": "Prevasio Application Role ('${ALGOSEC_TENANT_ID:0:4}${subscription_id:0:4}')",
"description": "Allows to create EventGrid subscriptions for ACR registries events.",
"type": "CustomRole",
"permissions": [
{
"actions": [
"Microsoft.EventGrid/eventSubscriptions/read",
"Microsoft.ContainerRegistry/registries/read",
"Microsoft.EventGrid/eventSubscriptions/write",
"Microsoft.Web/sites/functions/write"
],
"notActions": [],
"dataActions": [],
"notDataActions": []
}
],
"assignableScopes": [
"/subscriptions/'$subscription_id'"
]
}
}Note: You can also add a custom role via the Azure Console. For example
-
Assign the role to:
prevasio-$ALGOSEC_TENANT_ID[:5]-application.You can use the following commands:
Copy# Get the app display name
DISPLAY_NAME=$(az ad sp list --display-name prevasio-$ALGOSEC_TENANT_ID[:5]-application --query [].id --output tsv)
# Assign the role
az role assignment create --assignee $DISPLAY_NAME --role "$generated_role_name" --scope /subscriptions/$subscription_id -
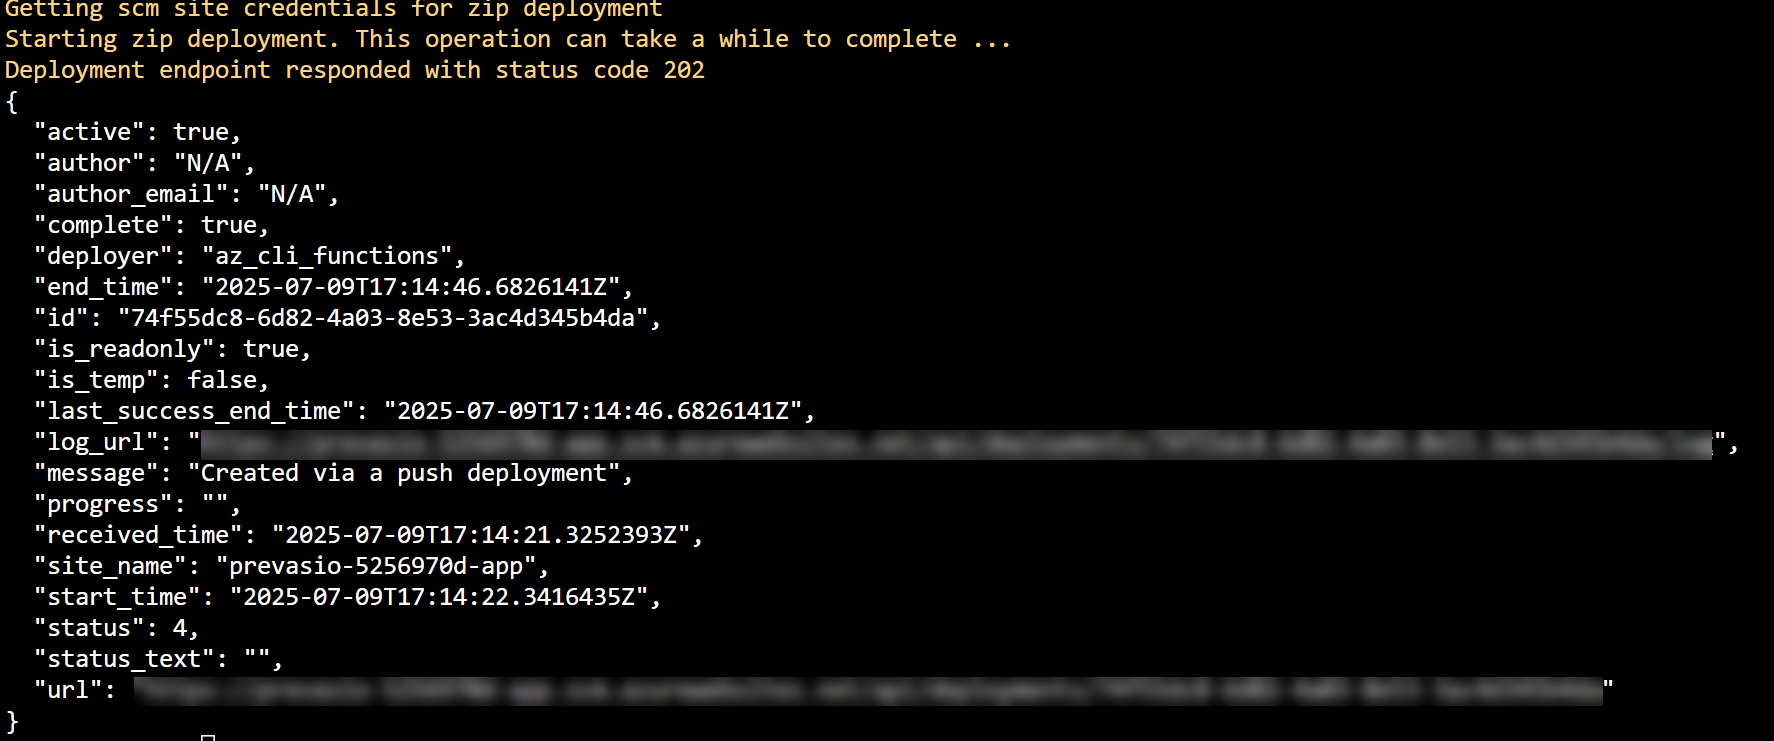
Deploy the app resources using the
function.zipfrom the sources.zip:The easiest way is to run the command:
Copyaz functionapp deployment source config-zip -g prevasio-$ALGOSEC_TENANT_ID[:5]-resource-group -n prevasio-$PREVASIO_HASH-application --src function.zip --build-remote trueOr manually configure WEBSITE_RUN_FROM_PACKAGE pointing to a function.zip with a Blob Storage SAS URL
Results should look like this, for example:
-
Before running Azure CLI commands, set the subscription:
Copyaz account set --subscription "$subscription_id" -
If running locally, log in first:
Copyaz login
-
-
Navigate to Azure Active Directory > Properties > Tenant ID
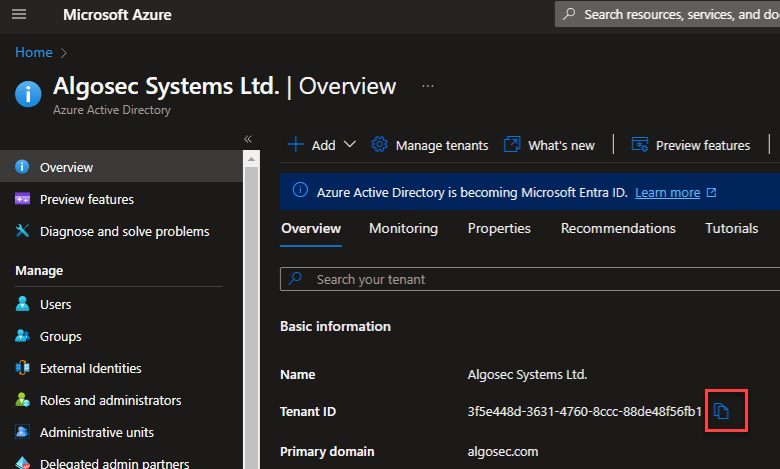
-
Click on the copy icon to copy the Tenant ID associated with the subscription or management group.
-
Open Permissions Diagnostics to confirm that the account/subscription/project meets the requirements for the ACE scan types you want to run, and use the remediation links to complete any required setup.
-
Open the Onboard Azure Resources API page.
-
Configure the request:
-
Set the azure_tenant parameter to your Azure Tenant ID.
-
Set the supportChanges parameter to define the permission level:
-
true: Read/Write permissions
-
false: Read-only permissions (default)
-
For more information, see Optional Feature Permissions for Cloud Network Security.
-
-
Run the API call to complete the onboarding process. See Onboard Azure resources.
You can use API calls to add a single Azure subscription to ACE.
Note: Any changes to a subscription after onboarding are not synchronized with ACE. To delete one or more subscriptions, see Offboard Azure subscriptions from ACE.
Do the following:
-
Make sure you can access the Azure console as a user with Application Administrator OR Application Developer role.
-
From the Azure CLI, create an Azure service principal based on the ACE Azure multi-tenant application. You can do this with the following command:
az ad sp create --id 'f1764d38-8bca-497f-94ae-2ccec598107d'
The Azure service principal is created.
Note: Create your own application + application secret. If you create your own app, auto-discovery won't work.
The next steps explain how to grant access permission to the service principal to a subscription or management group.
-
Navigate to the Azure console and select either the subscription or management group you want to assign role permissions.
-
Click Access control (IAM) from the left menu, and then click +Add.
-
From the dropdown, select Add role assignment.
The Add role assignment page appears.
-
Add the role (permission) you want to assign to the service principal for working with the subscription:
-
For Cloud Network Security, choose either:
-
Reader: Enable read access only
-
Contributor: Enable read/write access
-
Custom Role – Create a custom role if needed.
Click for instructions to create the Custom Role
-
In the Azure Console, go to Access Control (IAM).
-
Click + Add and select Add Custom Role.
-
On the Create Custom Role screen, open the JSON tab.
-
Click Edit and add with the following JSON:
Replace <ASSIGNABLE SCOPE> using the following formats:
-
Management group scope has the format /providers/Microsoft.Management/managementGroups/{managementGroupName}.
-
Subscription scope has the format /subscriptions/{subscriptionId}.
Copy{
"properties": {
"roleName": "AceCustomRole",
"description": "Custom role for Algosec Cloud",
"assignableScopes": [
"<ASSIGNABLE_SCOPE>"
],
"permissions": [
{
"actions": [
"Microsoft.Compute/virtualMachines/read",
"Microsoft.Compute/virtualMachineScaleSets/read",
"Microsoft.Compute/virtualMachineScaleSets/virtualMachines/read",
"Microsoft.Compute/virtualMachineScaleSets/networkInterfaces/read",
"Microsoft.Insights/diagnosticSettings/read",
"Microsoft.Network/applicationSecurityGroups/read",
"Microsoft.Network/azurefirewalls/read",
"Microsoft.Network/connections/read",
"Microsoft.Network/expressRouteCircuits/read",
"Microsoft.Network/expressRouteCircuits/peerings/read",
"Microsoft.Network/firewallPolicies/read",
"Microsoft.Network/firewallPolicies/ruleCollectionGroups/read",
"Microsoft.Network/ipGroups/read",
"Microsoft.Network/loadBalancers/read",
"Microsoft.Network/localnetworkgateways/read",
"Microsoft.Network/locations/serviceTags/read",
"Microsoft.Network/networkInterfaces/read",
"Microsoft.Network/networkSecurityGroups/read",
"Microsoft.Network/networkWatchers/flowLogs/read",
"Microsoft.Network/networkWatchers/queryFlowLogStatus/action",
"Microsoft.Network/networkWatchers/read",
"Microsoft.Network/publicIPAddresses/read",
"Microsoft.Network/routeTables/read",
"Microsoft.Network/virtualHubs/effectiveRoutes/action",
"Microsoft.Network/virtualHubs/hubRouteTables/read",
"Microsoft.Network/virtualHubs/hubVirtualNetworkConnections/read",
"Microsoft.Network/virtualHubs/read",
"Microsoft.Network/virtualNetworkGateways/read",
"Microsoft.Network/virtualNetworks/read",
"Microsoft.Network/virtualWans/read",
"Microsoft.Network/vpnGateways/read",
"Microsoft.Network/vpnsites/read",
"Microsoft.Resources/subscriptions/read",
"Microsoft.Storage/storageAccounts/read",
"Microsoft.Storage/storageAccounts/listkeys/action",
"Microsoft.Web/hostingEnvironments/read"
],
"notActions": [],
"dataActions": [],
"notDataActions": []
}
]
}
} -
-
Click Save.
-
Click Review + Create.
-
Click Create.
-
-
-
For Cloud App Analyzer, add:
-
Log Analytics Reader
-
AcrPull
-
Key Vault Reader
-
For details, see Permissions Required for Azure Subscriptions.
-
-
For additional optional features:
-
For Cloud Network Security, to allow ACE to collect NSG resource logs, grant the service principal the additional roles:
-
Network Contributor
-
Storage Account Contributor
-
-
For Cloud App Analyzer:
-
Azure Kubernetes Service Cluster User Role
-
AcrPush
-
-
Assign the Contributor role to enable VNet flow logs scanning for Cloud App Analyzer.
For details, see Permissions Required for Azure Subscriptions.
-
-
Click Next.
The Member tab appears.
-
Click Select members. From the Select members popup search for and select AlgoSec Cloud Enterprise.
AlgoSec Cloud Enterprise will move to the Selected members section of the popup.
-
Click Select.
The Service Principal is assigned to the specific subscription and role.
-
Click Review + assign once more to finalize the assignment and allow ACE to access the Azure subscription.
-
Manually onboard VM scanning (Optional)
-
Manually onboard CD mitigation (Optional)
Use this method to manually onboard a CD mitigation deployment using Azure resources and the unified onboarding bundle.
Do the following:
-
Download the Azure resources from the URL corresponding to your region.:
-
US: https://us.app.algosec.com/prevasio/azure-application?tenant_id=${ALGOSEC_TENANT_ID}
-
EU: https://eu.app.algosec.com/prevasio/azure-application?tenant_id=${ALGOSEC_TENANT_ID}
-
ANZ: https://anz.app.algosec.com/prevasio/azure-application?tenant_id=${ALGOSEC_TENANT_ID}
-
IND: https://ind.app.algosec.com/prevasio/azure-application?tenant_id=${ALGOSEC_TENANT_ID}
-
ME: https://me.app.algosec.com/prevasio/azure-application?tenant_id=${ALGOSEC_TENANT_ID}
-
UAE: https://uae.app.algosec.com/prevasio/azure-application?tenant_id=${ALGOSEC_TENANT_ID}
-
SGP: https://sgp.app.algosec.com/prevasio/azure-application?tenant_id=${ALGOSEC_TENANT_ID}
-
-
Create a resource group with the name:
prevasio-${ALGOSEC_TENANT_ID:0:4}${subscription_id:0:4}-resource-group -
Prepare the following parameters:
Copy{
"parameters": {
"subscription-id": {
"value": "$subscription_id"
},
"tenant-id": {
"value": "$azure_tenant_id"
},
"prevasio-hash": {
"value": "${ALGOSEC_TENANT_ID:0:4}${subscription_id:0:4}"
},
"prevasio-host": {
"value": "<*see values below>"
},
"prevasio-additionals": {
"value": See instructions below
},
"algosec-cloud-host": {
"value": "'$ALGOSEC_CLOUD_HOST'"
}
}* For the value of the prevasio-host, choose your region from the following:
-
To generate
prevasio-additionals:- Create this JSON:
{"tenantId":"ALGOSEC_TENANT_ID","clientId":"ALGOSEC_CLIENT_ID","clientSecret":"ALGOSEC_CLIENT_SECRET"} - Convert it to a string
- Convert the string to UTF-8 bytes
- Base64-encode it using your preferred method
- Example (bash):
CopytenantId="your-tenant-id"
clientId="your-client-id"
clientSecret="your-client-secret"
json=$(printf '{"tenantId":"%s","clientId":"%s","clientSecret":"%s"}' "$tenantId" "$clientId" "$clientSecret")
encoded=$(echo -n "$json" | base64)
echo "$encoded" - Create this JSON:
-
In the Azure Portal, go to "Deploy a custom template" in the search bar
-
Choose "Build your own template in the editor"
-
Use the
template.jsonfrom the downloaded zip -
Add the parameters from step c and create the deployment
-
Assign a custom role with the following permissions:
Copy{
"properties": {
"roleName": "Prevasio Application Role ('${ALGOSEC_TENANT_ID:0:4}${subscription_id:0:4}')",
"description": "Allows to create EventGrid subscriptions for ACR registries events.",
"type": "CustomRole",
"permissions": [
{
"actions": [
"Microsoft.EventGrid/eventSubscriptions/read",
"Microsoft.ContainerRegistry/registries/read",
"Microsoft.EventGrid/eventSubscriptions/write",
"Microsoft.Web/sites/functions/write"
],
"notActions": [],
"dataActions": [],
"notDataActions": []
}
],
"assignableScopes": [
"/subscriptions/'$subscription_id'"
]
}
}Note: You can also add a custom role via the Azure Console. For example
-
Assign the role to:
prevasio-$ALGOSEC_TENANT_ID[:5]-application.You can use the following commands:
Copy# Get the app display name
DISPLAY_NAME=$(az ad sp list --display-name prevasio-$ALGOSEC_TENANT_ID[:5]-application --query [].id --output tsv)
# Assign the role
az role assignment create --assignee $DISPLAY_NAME --role "$generated_role_name" --scope /subscriptions/$subscription_id -
Deploy the app resources using the
function.zipfrom the sources.zip:The easiest way is to run the command:
Copyaz functionapp deployment source config-zip -g prevasio-$ALGOSEC_TENANT_ID[:5]-resource-group -n prevasio-$PREVASIO_HASH-application --src function.zip --build-remote trueOr manually configure WEBSITE_RUN_FROM_PACKAGE pointing to a function.zip with a Blob Storage SAS URL
Results should look like this, for example:
-
Before running Azure CLI commands, set the subscription:
Copyaz account set --subscription "$subscription_id" -
If running locally, log in first:
Copyaz login
-
-
Navigate to Azure Active Directory > Properties > Tenant ID
-
Click on the copy icon to copy the Tenant ID associated with the subscription or management group.
-
Go to the ACE API documentation and follow the instructions to onboard a new subscription.
See Onboard a single Azure subscription API.
If using your own app, provide the
applicationIdandapplicationSecretparameters. -
Open Permissions Diagnostics to confirm that the account/subscription/project meets the requirements for the ACE scan types you want to run, and use the remediation links to complete any required setup.
You can leverage Terraform, the infrastructure-as-code solution, as another option for onboarding your Azure subscriptions into ACE.
-
In the ACE
Settings area, click Accounts Management.
-
On the Accounts Management page that opens, click +Onboard Accounts. The Onboard Account Wizard opens.
-
Click the
Microsoft Azure button.
-
The Azure Onboarding Wizard Access Permissions step appears.
-
Enable Change Policy Permissions:
Choose which level of permissions are required for the role in Azure.
-
Clear the checkbox to fully support your Azure security policy management, security analysis and recommendations without the ability to perform policy changes
-
Select the checkbox to grant all Read functionalities to fully support your Azure security policy management, security analysis and recommendations PLUS enable advanced policy change capabilities for Azure NSGs and to enable Azure VNet flow logs scanning. This requires additional Write permissions beyond the base Read permissions.
-
Base Read permissions are described in Required Azure Permissions for Cloud Network Security,
-
Additional Write permissions are outlined in Optional Feature Permissions for Cloud Network Security.
-
-
-
Click Next. The Features Permissions step of the wizard opens.
- Onboard VM Scanning (optional)
The VM Scanner feature Provides agentless virtual machine security scanning for Azure VMs to detect vulnerabilities, malware, and exposed secrets across cloud workloads. For more information, see Enable Virtual Machine Security (AWS).
-
Select Create a custom Azure RBAC role and assign it to the service principal. For a list of permissions that are added see Permissions Required for Azure Subscriptions.
-
By default, the VM Scanner feature is set to be onboarded manually. For instructions to manually set permissions, see Enable Virtual Machine Security (Azure).
-
-
Onboard CD Mitigation (optional)
The CD Mitigation feature provides threat management for Azure Container Registry (ACR) by scanning and securing your Continuous Delivery (CD) pipeline, preventing threats from reaching container-based workloads.
-
Select Grant CD mitigation permissions & create related resources to be automatically onboarded.
-
By default, the CD Mitigation feature is set to be onboarded manually.
-
-
Click Next. The Deployment step of the wizard opens.
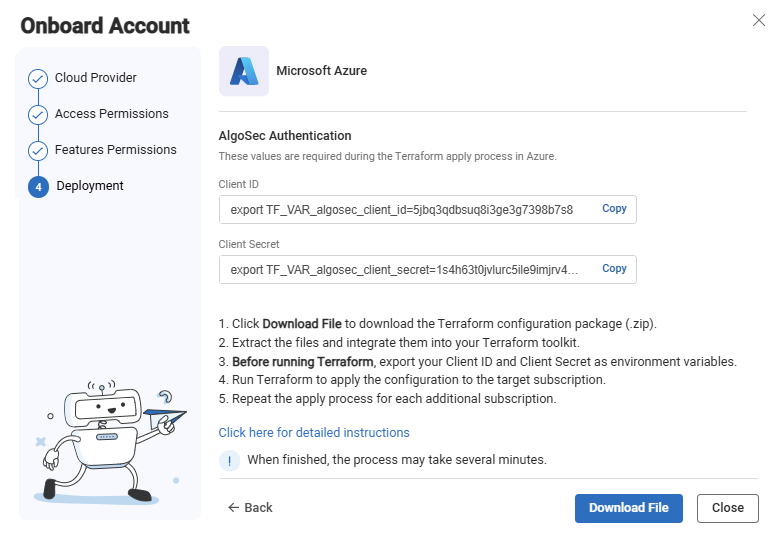
- Click Download File. The zip file that contains the terraform template is downloaded to your machine. You will use it later in these steps.
-
Copy the Client ID and Client Secret to also be used later in these steps.
-
Click Close to close the wizard.
-
Run the Azure CLI and log in to your Azure Subscription.
-
Upload the zip file to a directory of your choice. (If you are updating an existing terraform template, save the zip file in the same directory you used to onboard subscriptions with Terraform, or in the directory that contains your Terraform state file (to learn more about Terraform state, see State).
-
Extract the zip file:
unzip <zip file name>
-
Export the environment variables (Client ID and Client Secret) that you saved previously:
export TF_VAR_algosec_client_id=<Client ID> export TF_VAR_algosec_client_secret=<Client Secret>
-
If you receive a "Access Denied" error, run the following. Otherwise continue to the next step:
az account get-access-token --resource https://graph.microsoft.com
az account get-access-token --resource https://management.azure.com
-
Run:
terraform init
-
Run one of the following:
-
To apply on the current Subscription:
terraform apply
-
To apply on another Subscription:
terraform apply -var="subscription_id=<Subscription ID>"
-
-
When prompted to approve the changes, type Yes and press Enter. Terraform resources and permissions are updated.
-
Open Permissions Diagnostics to confirm that the account/subscription/project meets the requirements for the ACE scan types you want to run, and use the remediation links to complete any required setup.
Enable Azure resource logs for traffic analysis
For each Azure device where resource logs are enabled in your connected subscription, ACE automatically collects resource logs.
By enabling Azure resource logs:
-
For ACE Cloud Network Security, The resource logs provide all the details needed to display rule usage data on the risk trigger and network policy pages. On the Network policy pages, ACE users can clean up old or unused NSG / Azure Native Firewall policy rules, supported by the display of this data. For more details, see Last used and Clean Up Policies.
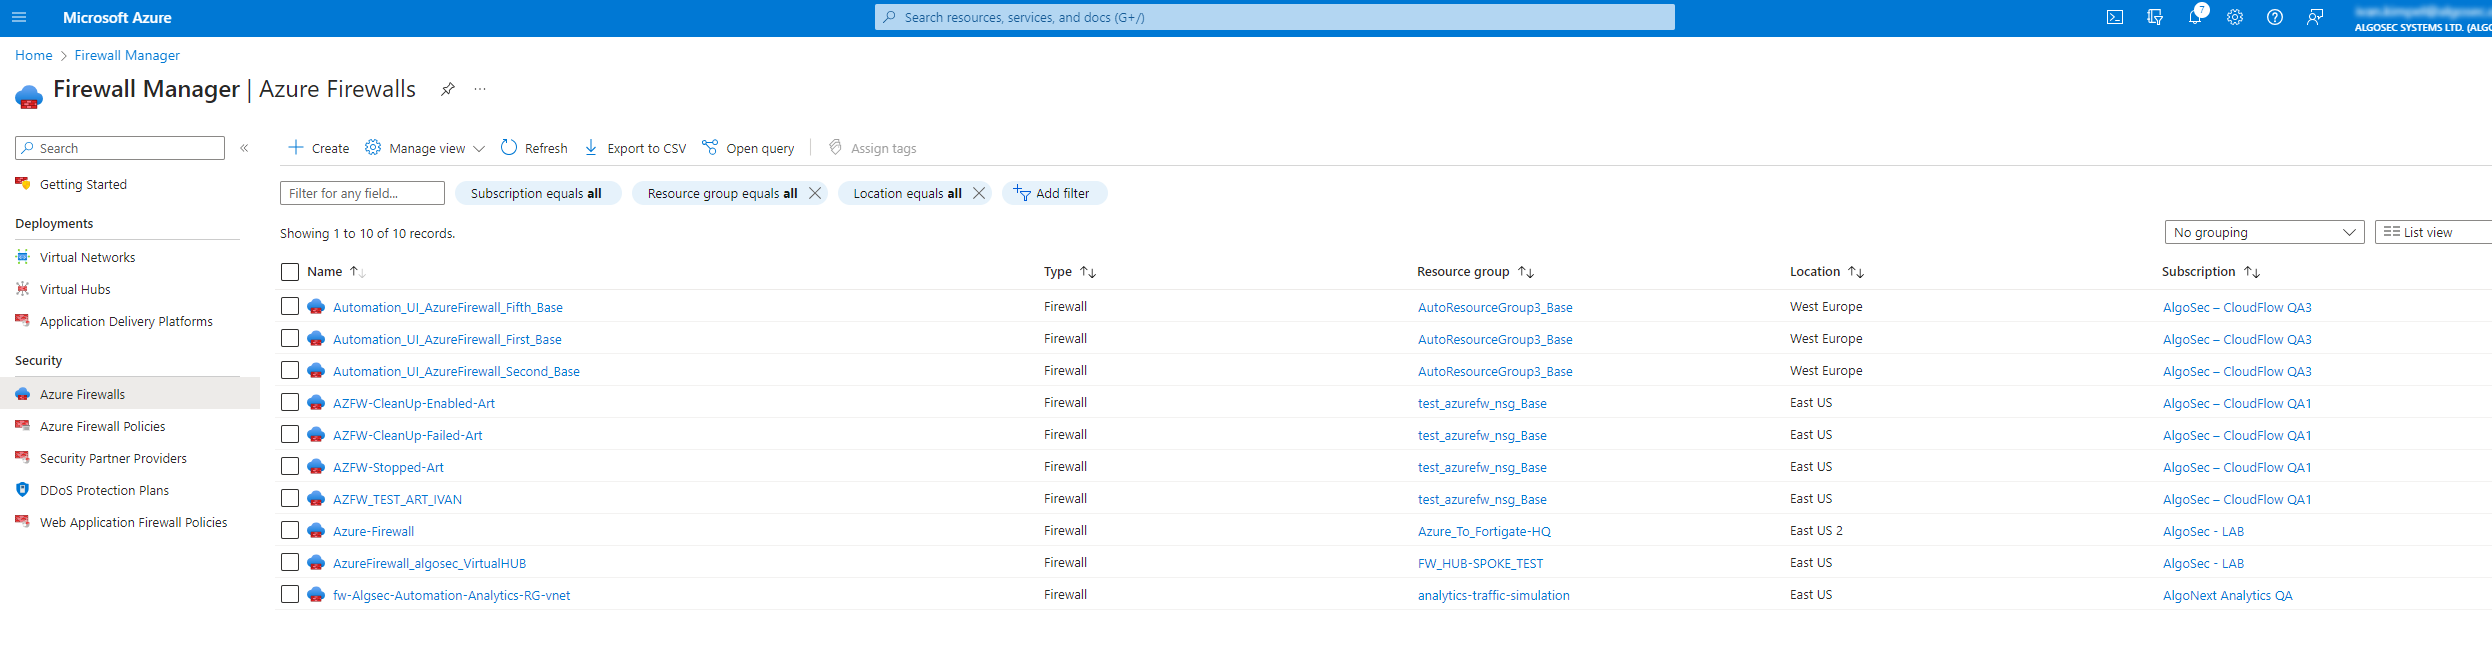
To enable Azure Native Firewall flow logging, do the following:
-
In the Microsoft Azure portal, select Azure Firewalls.
The Azure Firewall page appears with a list of Azure Native Firewall instances that span different Azure regions and subscriptions.
-
From the list, click on the firewall that you want to enable flow logging and select Diagnostic Settings.
The list of configured diagnostic settings appears.
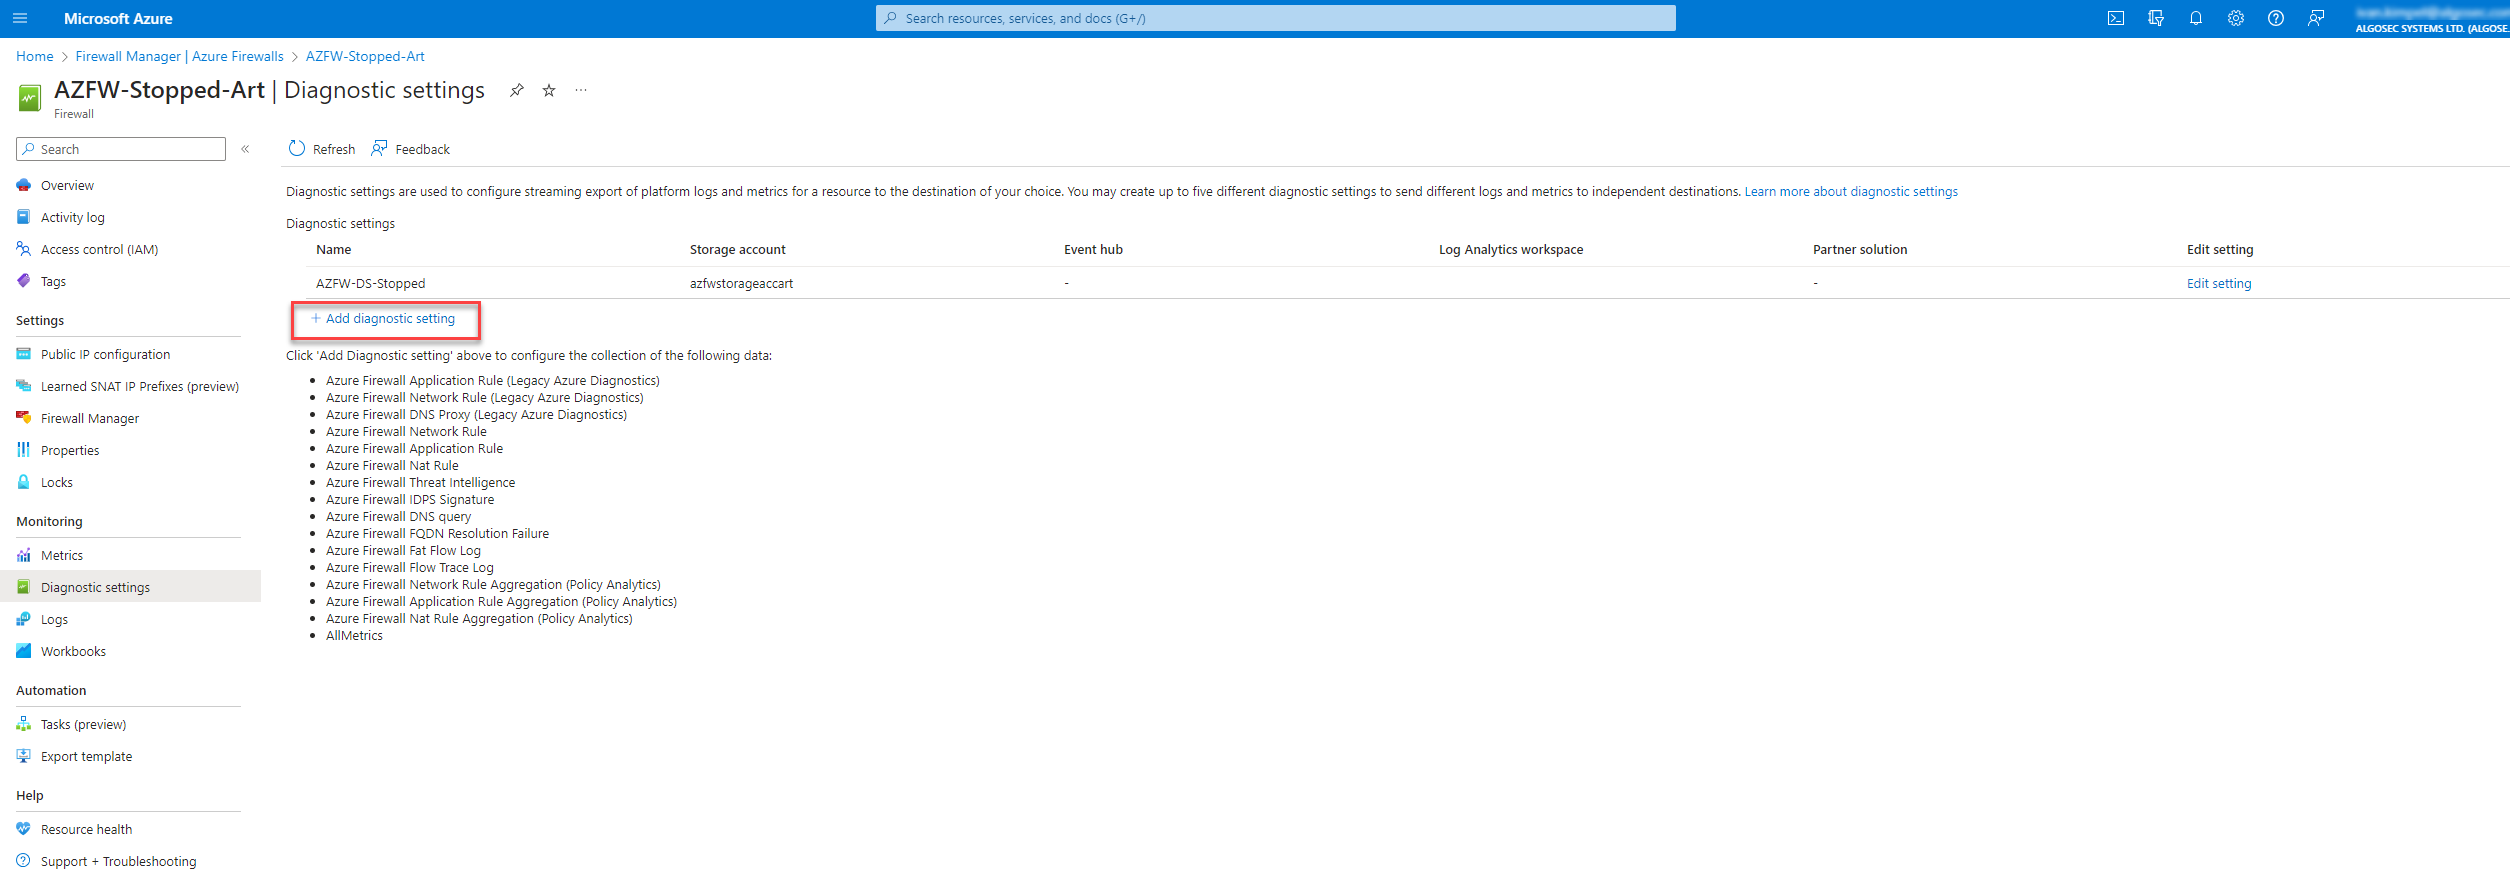
-
Click + Add diagnostic setting.
The page to add diagnostic settings appears.
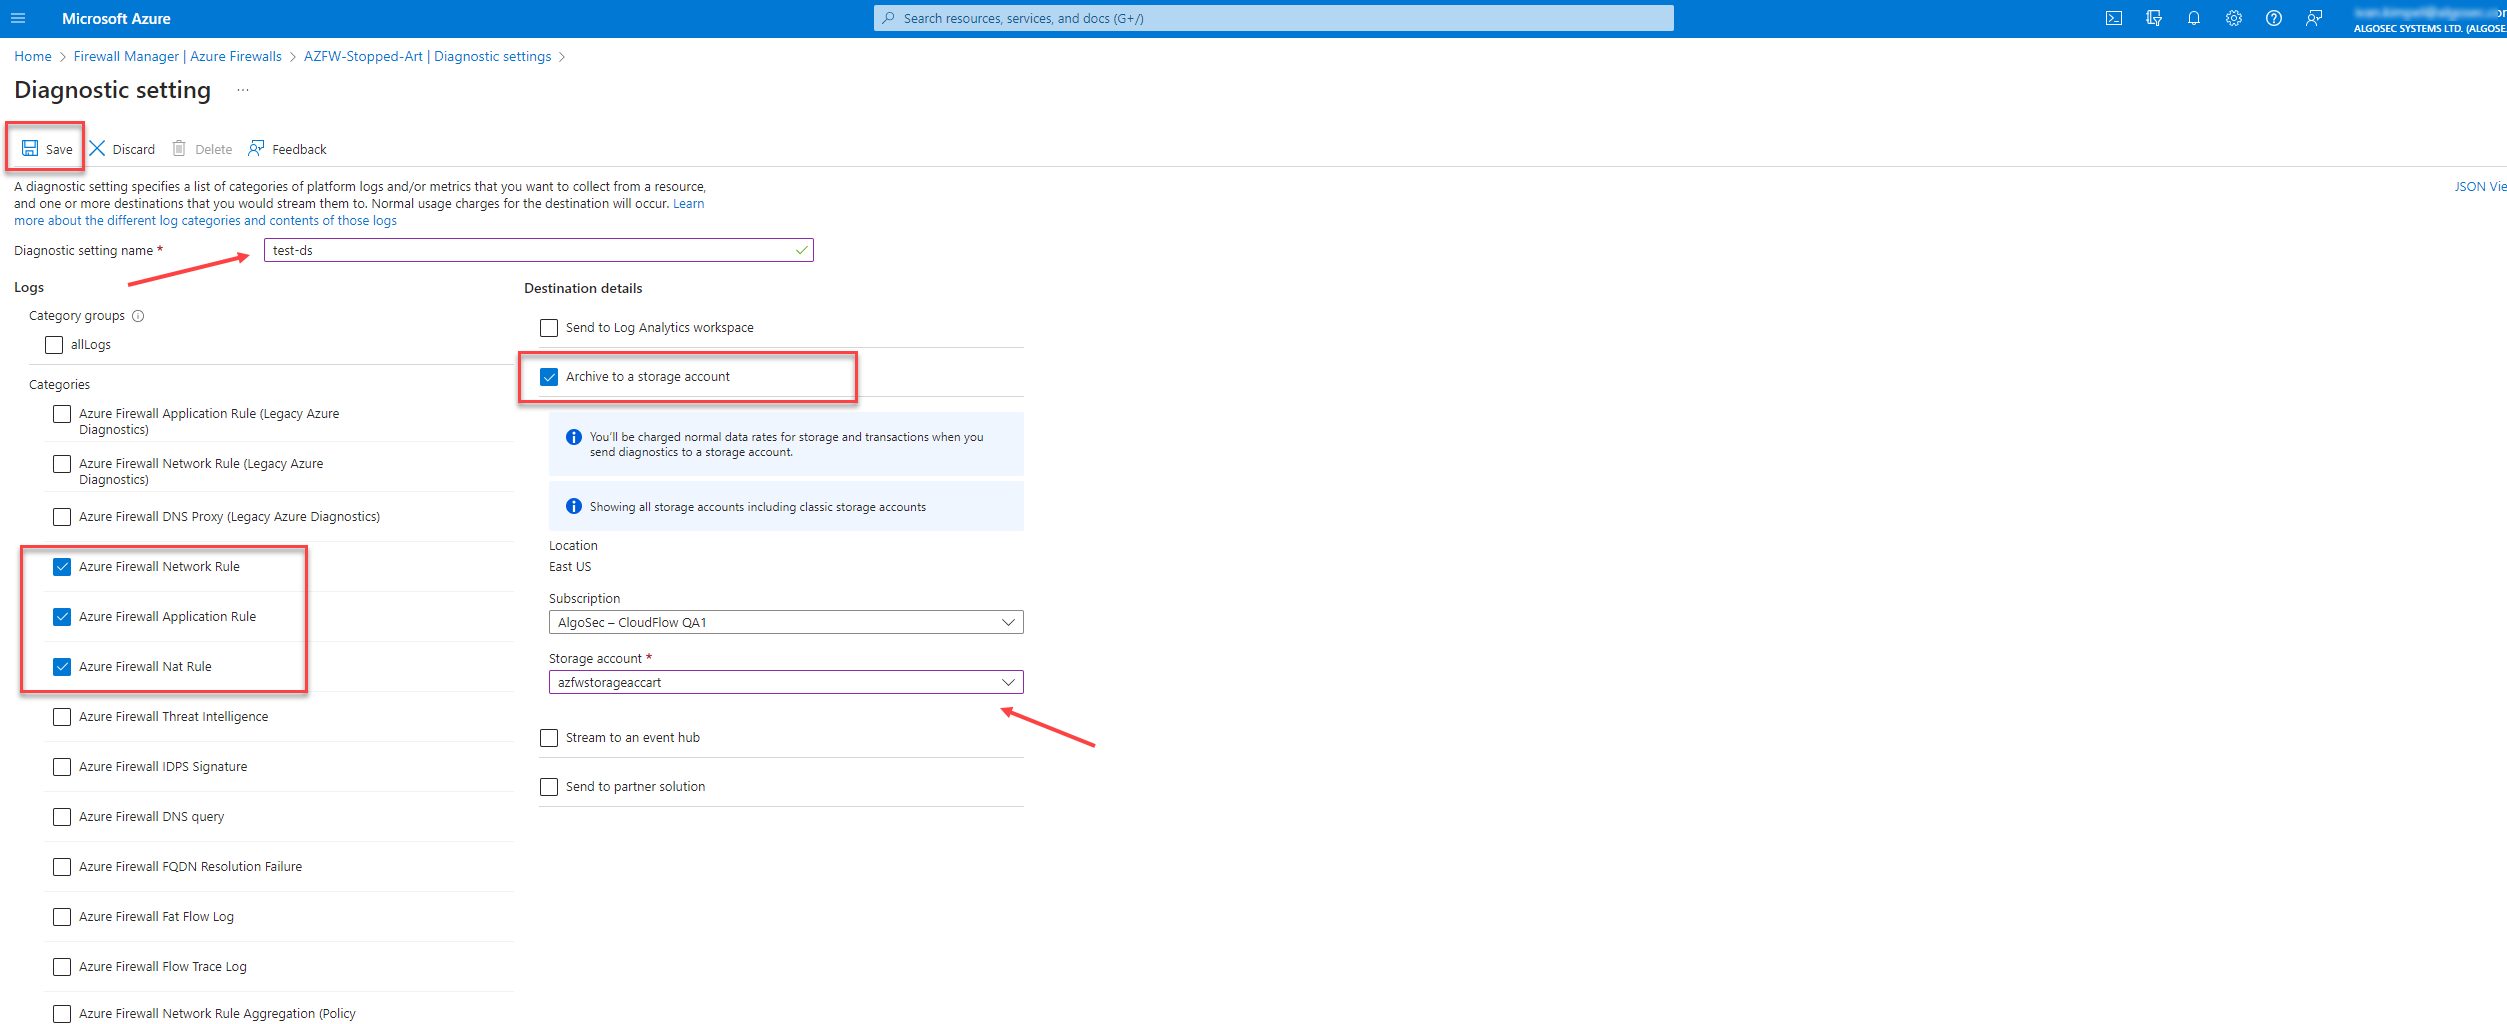
-
Enter a Diagnostic setting name.
-
Under Categories, check the following rules to collect log data:
-
Azure Firewall Network Rule
-
Azure Firewall Application Rule
-
Azure Firewall NAT Rule
Note: If any of these categories are not checked, ACE displays "Flow logs disabled" when showing details related to flow logs. For more details, see Last used and Clean Up Policies.
-
-
Under Destination details, check Archive to a storage account and use the Storage Account dropdown to select the account where the traffic log data is saved.
Note: We recommend using a storage account located in the same subscription as the Azure Native Firewall.
-
Click Save.
Azure Native Firewall flow logs will now be saved to the storage account and automatically appear in ACE after the next data collection cycle.
Note: It may take up to one hour for log flow data to begin appearing in ACE.
-
-
Repeat these steps for each firewall you want to enable flow logging.
Note: Azure has deprecated NSG flow log support. However, existing NSG flow logging configurations will continue to function.
AlgoSec Cloud Enterprise relies on resource log data to identify unused NSG rules. To maintain this functionality for newly onboarded NSGs, follow the steps below to enable resource logging for NSGs:
Do the following:
-
Configure the required permissions on the ACE ActiveDirectory application using the PowerShell script.
-
Configure NSG Diagnostic Settings to enable ACE to collect, retrieve and analyze resource logs.
-
Enable resource logging by either:
-
Enable resource logging manually for one NSG
Add Diagnostic Setting
Every NSG must have the diagnostic setting NetworkSecurityGroupRuleCounter added for it.
To add it:
-
Browse to the subject NSG and click on the Add diagnostic settings in the left navigation.
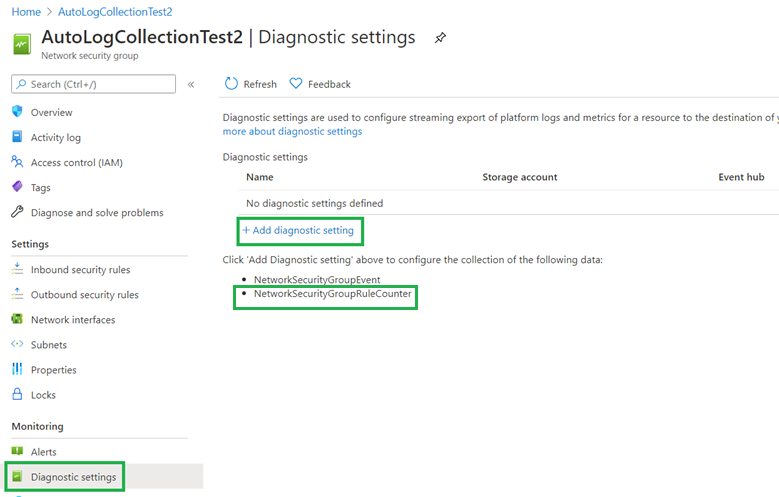
-
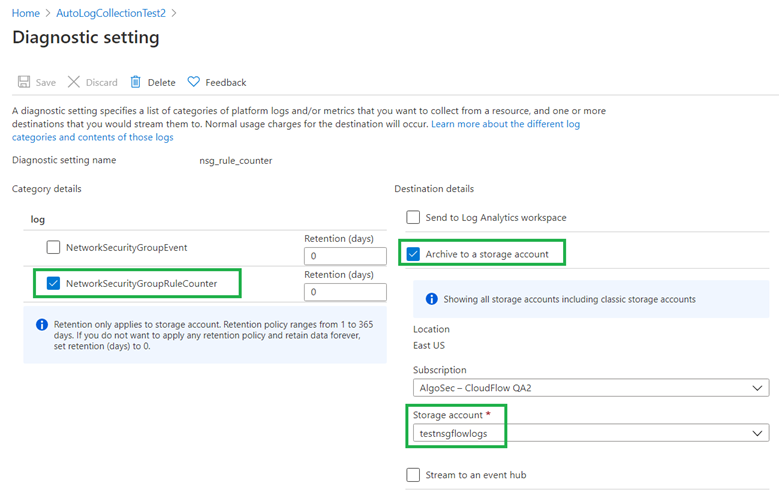
Click Add diagnostic setting in the main Diagnostic settings workspace that is displayed.
-
Select the NetworkSecurityGroupRuleCounter option.
-
In the Storage account dropdown, select the required storage account.
-
-
Enable resource logging for multiple NSGs using a PowerShell Script
This procedure describes how to enable resource logging for multiple Azure NSGs using a PowerShell script provided by ACE.
Note: Although the script is recommended for enabling resource logging for multiple NSGs, it can also be used to enable resource logging for a single NSG.
Do the following:
-
In your Azure subscription, register the microsoft.Insights resource provider. Do the following:
- In your Azure subscription, browse to the Resource providers section.
-
Search for the microsoft.Insights provider and select the row in the grid.
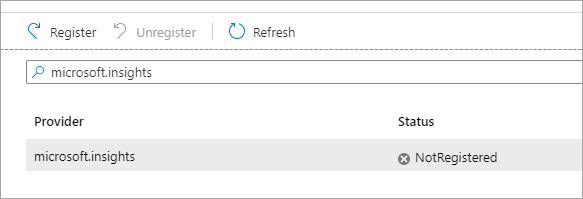
- Click the
 Register button and wait for the registration to complete.
-
Manually create a CSV file that lists the resource logging details, and save it to a local directory.
The script that you will download in step 3 will ask for the path to the CSV file and will enable resource logging on all NSGs in each subscription you list in the CSV file.The CSV file must have the following headers (horizontally):
Subscription The Azure subscription ID. Region The region for your Azure subscription. Storage The Azure storage blob where your resource logs are stored. Example
The following table shows a sample CSV file to use when enabling resource logging on multiple NSGs. The ACE script will enable resource logging for all NSGs on each subscription listed.
Subscription Region Storage 1c2d1333-1234-4665-aaaa-bc22ccc42323 eastus /subscriptions/1c2d1333-1234-4665-aaaa-bc22ccc42323/resourceGroups/AutoDcExclusive_
RgA_Base/providers/Microsoft.Storage/
storageAccounts/EastUS_SA1c2d1333-1234-4665-aaaa-bc22ccc42323 centralus /subscriptions/1c2d1333-1234-4665-aaaa-bc22ccc42323/resourceGroups/AutoDcExclusive_
RgA_Base/providers/Microsoft.Storage/
storageAccounts/CentralUS_SA88855544-abab-4665-8fdf-bc22ccc42c06 eastus /subscriptions/88855544-abab-4665-8fdf-bc22ccc42c06/resourceGroups/2c06_RG1/providers/
Microsoft.Storage/storageAccounts/EastUS_SA -
On the Azure portal Cloud Shell page
- Click the PowerShell script upload/download icon (bottom task bar)
- Select the upload option
- Browse to and select ACE's enableNsgFlowLogs.ps1 script.
Note: For users logged into ACE, this script is available at https://cloudflow.algosec.com/cloudflow/assets/files/enableNsgFlowLogs.ps1.
-
Run the enableNsgFlowLogs.ps1 script. When prompted, enter the path to the CSV file you created in step 2.
As the script runs, it enables resource logging for all NSGs in each Azure subscription you listed in the CSV file, and provides the following feedback:
- Details about the results for each subscription, as the script runs through them
- Summary of all actions performed, once the script has run on all subscriptions listed
-
If you want to manage the retention policy, follow Microsoft's Azure Storage lifecycle management
instructions.
-
-
-
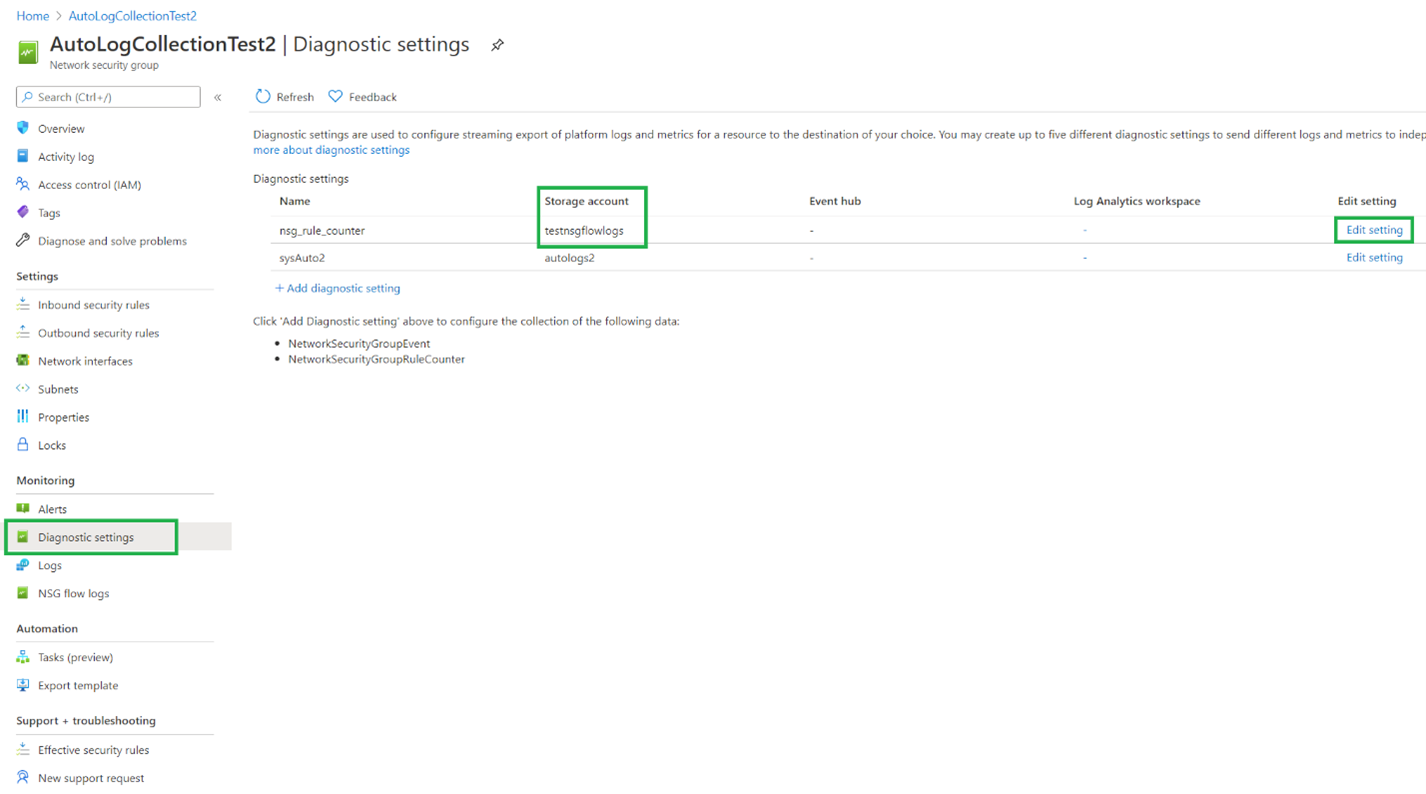
Verify existence of diagnostic settings for resource logs
It is essential to verify that the required diagnostic settings have been made.
The status Enabled seen in the this image shows you that resource logs have been successfully configured for the NSG named in the same row.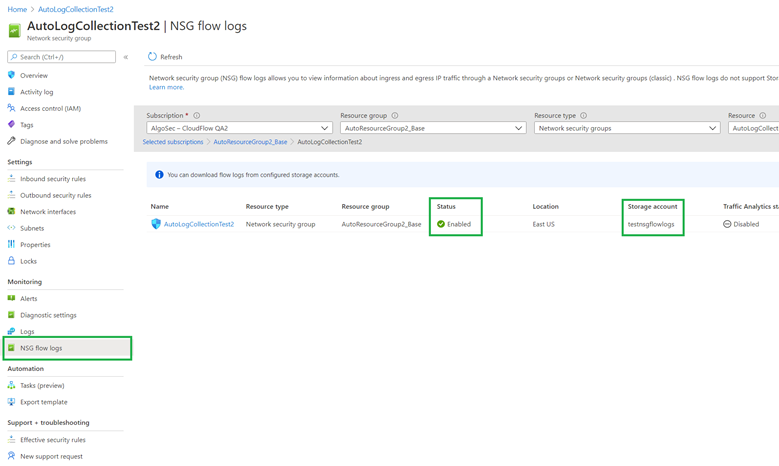
Check if the diagnostic setting has been configured by looking for indications such as those in the following image. If the diagnostic setting has not been configured, be sure to follow the procedure to enable resource logging for NSGs, above.
-
-
Configure log collection parameters
ACE administrators can configure the frequency at which logs are collected, or entirely enable or disable the feature, via API.
Modify the following parameters as needed:
TRAFFIC_LOG_FREQUENCY_PERIOD_MINUTES
Determines the frequency, in minutes, at which ACE collects resource logs from Azure NSGs.
Value: Integer
Default: 60
ENABLE_TRAFFIC_LOGS Determines whether resource log collection is enabled for Azure NSGs.
Disabling this parameter will cause ACE to display Flow logs disabled in the Last used column on the risk trigger details pages, even when resource logging is enabled in the Azure NSG itself.
Value: Boolean
Default: Enabled
INACTIVE_RULE_PERIOD Determines the number of days for which ACE checks for resource logs.
Default = 30
NSG rules where resource logs are enabled but no hits are found during the period defined by this parameter are considered as unused.
In the Last used column, these rules will be marked as No traffic logged.
For details, see Last used.
To modify any of these parameters, contact AlgoSec support.
-
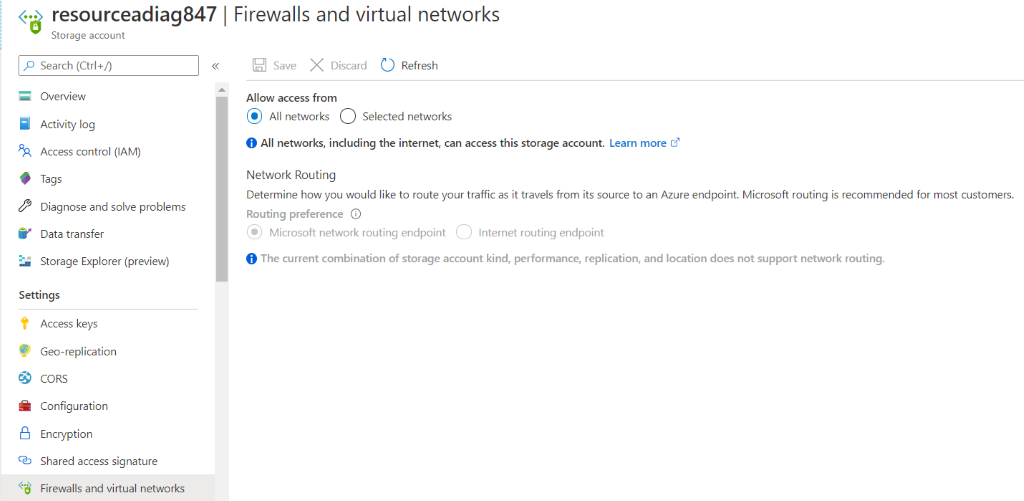
Configure the Storage Account Firewall (Optional)
If the subscription being configured includes a storage account from which resource logs will be collected, network access may require configuration.
Do the following:
-
Determine if the storage account's firewall can be configured to allow:
-
Access from all networks, or
-
Access only from selected networks
-
-
If you select allowing access from All networks, the default setting, no further configuration is required.
-
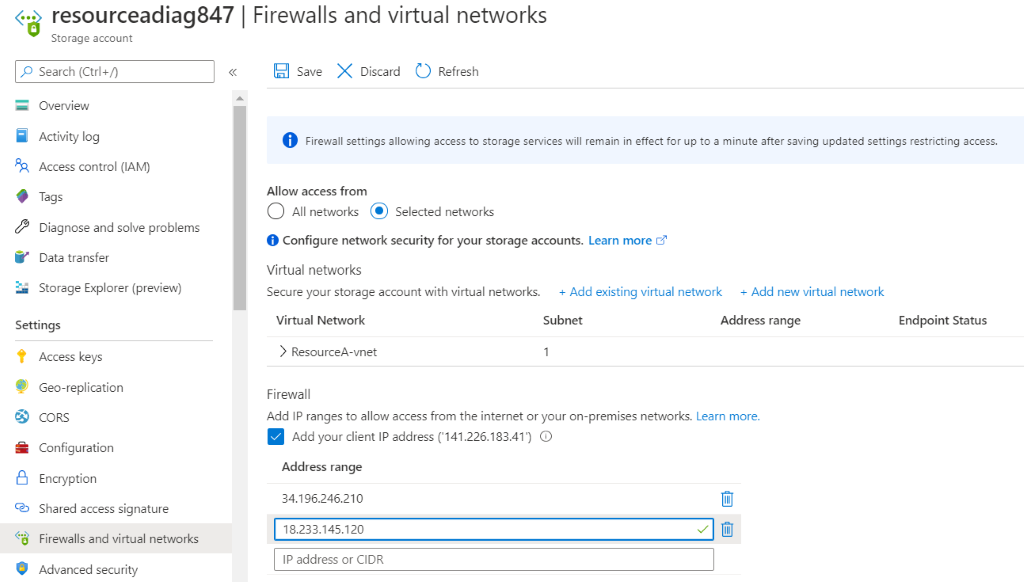
If you select allowing access from Selected networks, to enable ACE to collect resource logs from the storage account:
-
Copy the Current ACE service IPs for your region, listed below:
US region
18.209.205.33
23.21.89.217
52.21.25.44
3.209.54.0
54.227.108.96
18.214.35.180
35.173.194.159
35.171.119.114
100.27.77.227
EU region 3.124.48.17
3.66.94.197
52.29.166.50
3.124.153.26
18.184.87.109
3.75.56.9
52.59.98.60
3.69.134.56
52.29.118.194
ANZ region
13.237.219.32
3.24.141.128
52.62.160.212
3.105.51.188
13.211.181.98
13.54.65.108
13.238.234.53
52.65.218.87
54.153.142.211
ME region
157.241.75.15
16.24.37.180
16.24.41.212
157.175.12.203
157.175.16.203
16.24.52.115
16.24.42.118
16.24.29.104
15.185.85.1
UAE region
51.112.135.86
51.112.113.39
51.112.73.196
40.172.22.39
51.112.99.112
51.112.87.113
3.29.200.208
51.112.98.9
3.28.25.184
IND region
35.154.132.171
15.206.226.212
13.234.86.181
13.235.251.214
13.232.123.11
13.202.116.204
3.108.144.76
13.234.15.109
3.109.35.125
Singapore region
47.128.94.17
13.215.67.101
13.228.167.214
18.138.210.100
54.169.211.39
18.139.78.46
3.1.129.153
13.229.0.222
3.1.56.162
-
Add these ACE service IPs to the Firewall-Address range configuration as shown at the bottom of the figure below.
-
-
The resource logs will be created when you run traffic through the subject NSG(s).
â See also:
