Onboard Google Cloud Projects
This topic describes how to add Google Cloud projects to ACE Cloud Network Security.
How Google Cloud Onboarding Works
ACE connects to Google Cloud using a secure, service-account-based access model.
During onboarding, a Google Cloud administrator creates or configures the service account, IAM role, and permissions required for ACE to read Google Cloud networking and security configuration. Depending on the onboarding method, this is done by running a Google Cloud Shell script, deploying Terraform configuration, following the no-script workflow, or using the REST API.
After onboarding is complete, ACE can discover Google Cloud resources such as:
-
VPC networks
-
Subnets
-
Network interfaces
-
Virtual machines
-
Firewall rules
-
Firewall policies
-
Routers
-
Interconnect-related resources
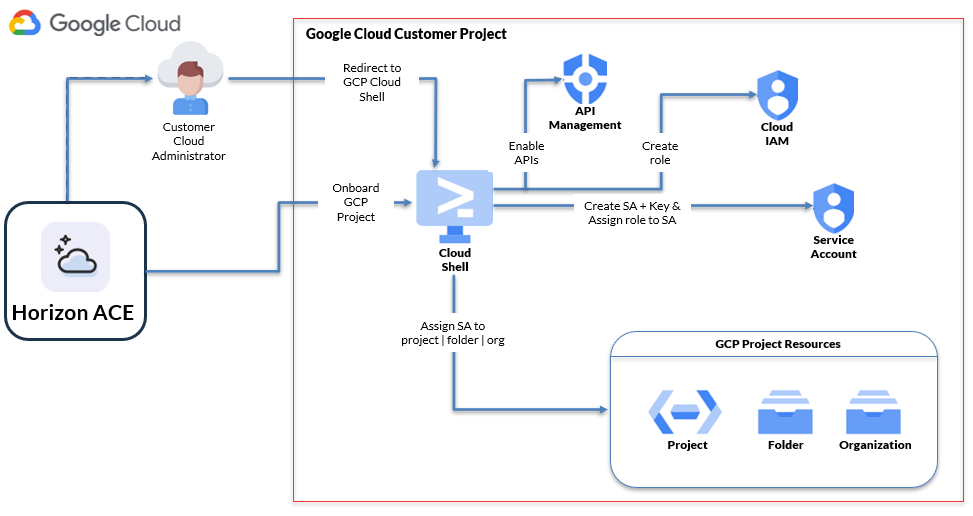
ACE uses a service account and IAM permissions to discover and continuously synchronize Google Cloud networking and security resources.
Google Cloud Onboarding Flow (Via Wizard)
-
In ACE, start the Google Cloud onboarding wizard.
-
Choose an onboarding method. See below Onboarding Methods for Google Cloud Projects:
-
Select the Google Cloud scope to onboard:
-
Project
-
Folder
-
Organization
-
-
Create or configure the required service account, IAM role, and role assignment.
-
ACE uses the service account permissions to securely access Google Cloud configuration data.
-
Google Cloud resources are discovered and imported into ACE.
-
If automatic synchronization is enabled, ACE periodically detects and imports changes made in Google Cloud.
Note: ASMS does not connect directly to Google Cloud APIs. Google Cloud data is collected through ACE, and ASMS receives the relevant data through the ACE integration.
Who Performs Google Cloud Onboarding?
Google Cloud onboarding typically requires collaboration between:
-
A Google Cloud administrator, who creates or approves the required service account and IAM permissions.
-
An ACE administrator, who initiates the onboarding process and verifies the connection.
The onboarding process creates or configures the service account and IAM permissions required for ACE to access Google Cloud configuration data.
Choosing an Onboarding Scope
The scope selected during onboarding determines which Google Cloud resources ACE can discover.
| Scope | Typical Use Case |
|---|---|
| Project | Proof of concept (POC) or onboarding a single Google Cloud project |
| Folder | Production environments where multiple projects are grouped under a folder |
| Organization | Broad discovery across all projects in a Google Cloud organization |
For most production deployments, onboarding at the folder or organization level allows ACE to discover and synchronize projects within that scope automatically.
Onboarding Methods for Google Cloud Projects
Note: Depending on which onboarding method you choose, changes to onboarded account resources may be automatically synced every hour.
| Onboarding Method | Description | Automatic synchronization |
|---|---|---|
| Cloud Shell script (via wizard) | Via the onboarding wizard: Generates and runs a Google Cloud Shell script | Yes |
| No script | Onboard Google Cloud resources manually through the Google Cloud console | Yes |
| Terraform | Via the onboarding wizard: Uses Terraform to deploy the required Google Cloud permissions and onboarding configuration | No |
| REST API (single project) | Onboard a single Google Cloud project via API | No |
Notes:
-
To add Google Projects to ACE , you need Google Cloud service account credentials.
-
Onboarding means giving access to ACE to collect data from your Google Cloud projects. To stop data collection (delete your project), you must withdraw access to ACE by revoking the ACE permissions within your cloud vendor environment.
-
Project IDs must be unique across all organizations for the onboarding process to complete successfully.
-
Discovery of projects might take some time after initial onboarding, especially if done on the organization level.
Note:
-
For more information about the GCP onboarding script, see Inside the GCP Onboarding Script.
-
For more information about the GCP onboarding script (using terraform), see Inside the Google Terraform Onboarding Template.
Automatic Synchronization
-
Cloud Shell and No Script onboarding methods support automatic synchronization.
-
When these methods are used, ACE can automatically discover Google Cloud projects added under the onboarded folder or organization scope and synchronize configuration changes.
-
REST API onboarding is limited to a single Google Cloud project and does not support automatic discovery or synchronization of additional projects.
-
Terraform-onboarded projects are not auto-discovered by ACE. Terraform onboarding is limited to the specific project where the template is deployed, making account management the customer's responsibility.
Before you start
To connect a Google Cloud account that is managed by an organization, make sure you are logged on to Google Cloud console.
Required permissions and roles
To onboard multiple projects in a Google Cloud account, make sure you have the following roles enabled:
-
To onboard projects under a folder:roles/resourcemanager.folderAdmin
-
To onboard projects under an organization:roles/resourcemanager.organizationAdmin
To learn more about the roles and APIs required by Cloud App Analyzer, see Permissions Required for Google Cloud Projects.
Onboarding Google Cloud Projects
Onboard Google Cloud resources using your preferred method:
Do the following:
-
In the ACE
 Settings area, click Accounts Management.
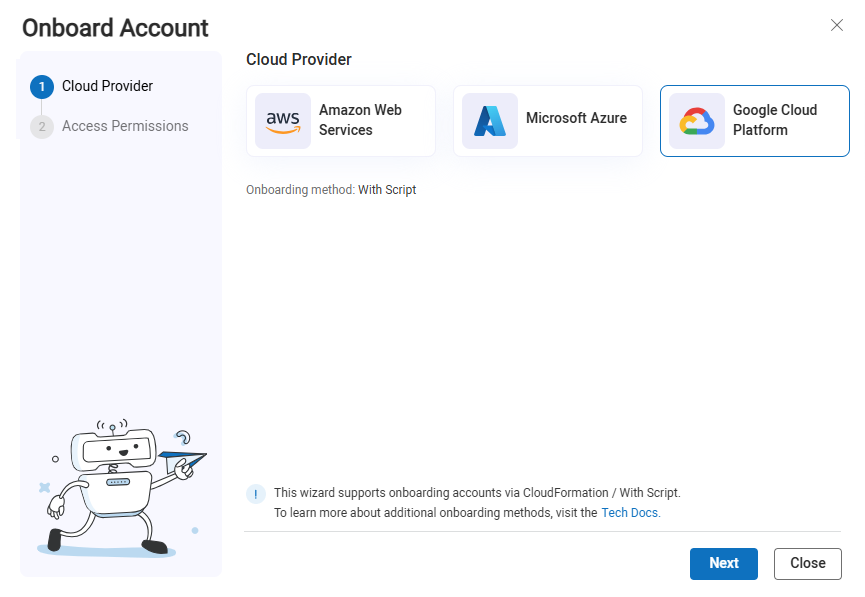
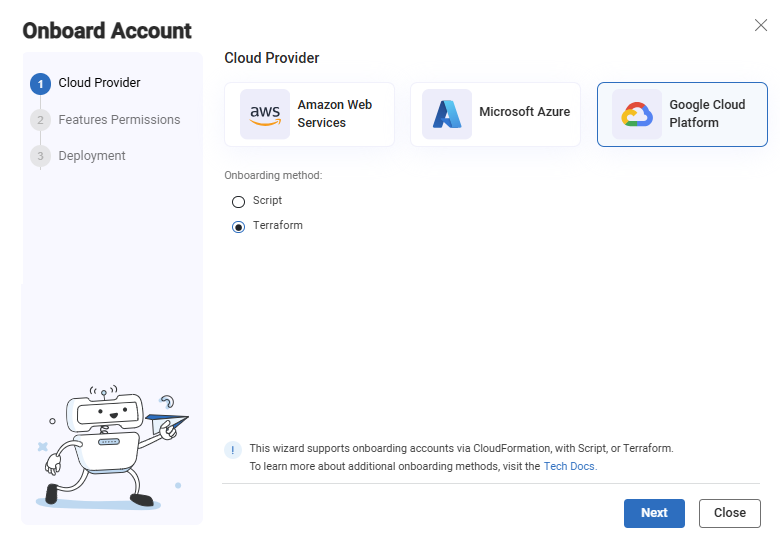
On the Accounts Management page that opens, click +Onboard Accounts. The Onboard Account Cloud Provider selection page appears.
-
Click the
 Google Cloud Platform button and click Next.
The Google Access Permissions step appears..
-
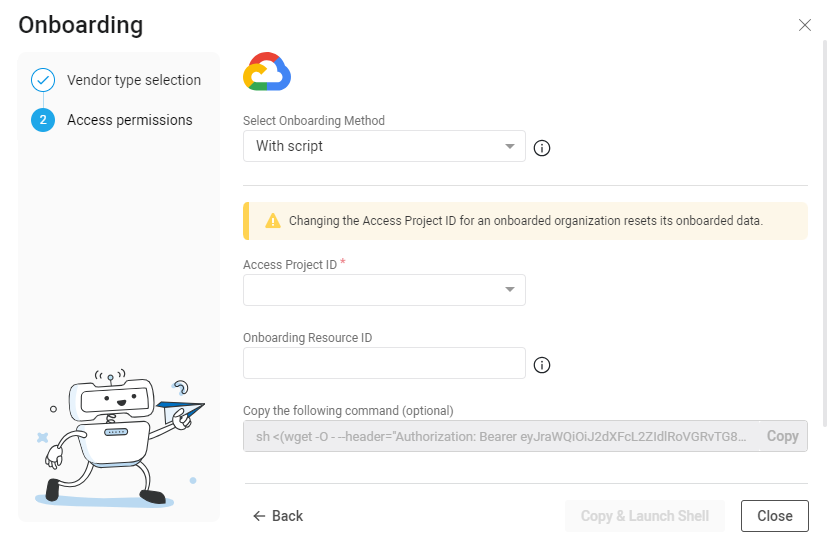
In the Access Project ID field, input an Access Project ID using one of the following methods:
-
From the dropdown: Select an existing Google Cloud Project ID to grant access to the Google Cloud resource. ACE will have access to the previous resources and the new resource.
-
Enter a new Access Project ID into the field: The project is used to establish access to the Google Cloud resources.
Warning: Changing the Access Project ID for an already onboarded organization resets its onboarded data.
-
-
(Optional) In the Onboarding resource ID field, enter the ID of the project, folder, or organization root to onboard.
Note: When this field is left blank, ACE will onboard the project you entered in the Access project ID field.
-
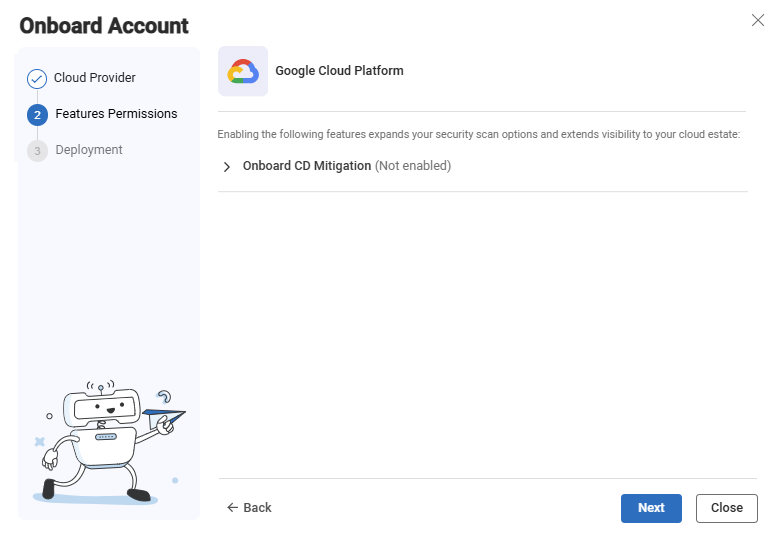
Click Next. The Features permissions step of the wizard appears.
-
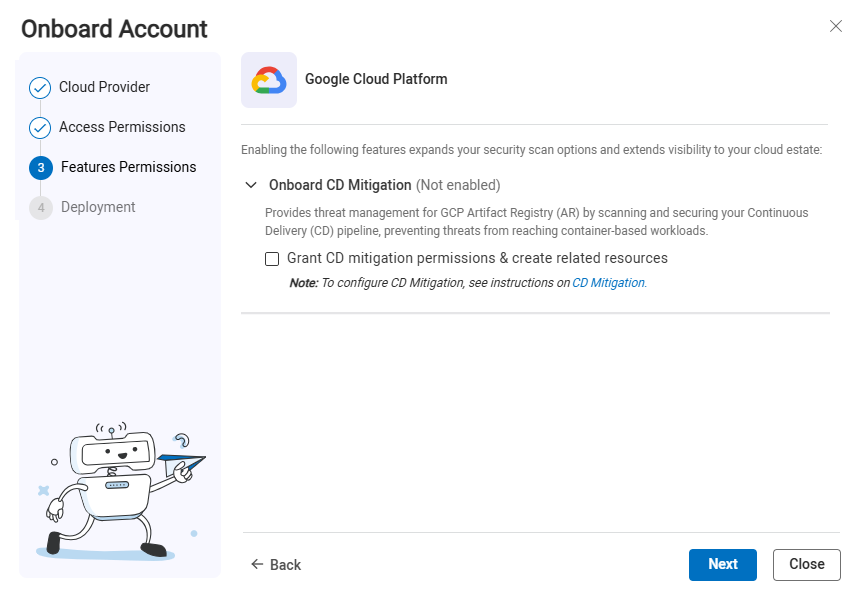
Onboard CD Mitigation (optional)
The CD Mitigation feature provides threat management for GCP Artifact Registry (AR) by scanning and securing your Continuous Delivery (CD) pipeline, preventing threats from reaching container-based workloads.
-
Select Grant CD mitigation permissions & create related resources to be automatically onboarded. For information related to automatic onboarding, .
-
By default, the CD Mitigation feature is set to be onboarded manually. For instructions for manual onboarding, see .
-
-
Click Next. The Deployment step of the wizard appears.
-
Complete the onboarding using one of the following methods:
-
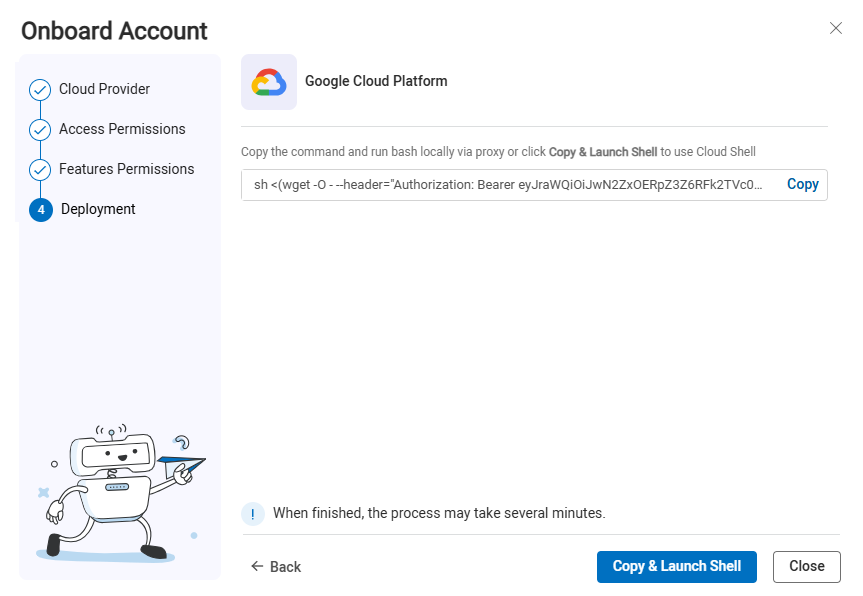
To open a Cloud Shell session directly from the ACE interface:
-
Click Copy & Launch Shell.
The Cloud Shell command is automatically copied into the system memory and the browser opens a new tab with the Google Cloud Shell displayed.
Important: Before clicking Copy & Launch Shell, make sure no Google Cloud Shell terminals are already open to avoid "Billing not found" errors.
-
Paste the Cloud Shell command from system memory (Ctrl-Shift-V) and press Enter.
The Authorize Cloud Shell confirmation window appears.
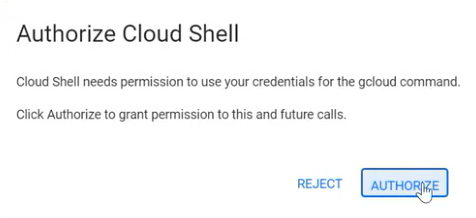
-
Click AUTHORIZE.
An onboarding script runs in the Cloud Shell. This script creates an access project and automates all the steps necessary to onboard the resource(s) to ACE.
-
When the script finishes, press Ctrl-D to close the terminal.
The ACE Onboarding Management page displays the newly onboarded resources.
Note: It may take up to an hour for Google Cloud to sync with ACE.
-
-
(Alternative method) If you don't want to open a Cloud Shell session directly from the wizard, you can run bash locally using a proxy:
-
Click Copy to copy the Cloud Shell command.

Note: The command generates an unreadable script. For an explanation of the script including an example of it in a readable version, see Inside the GCP Onboarding Script.
-
Paste and run the script in your alternative shell to complete onboarding the subscription(s).
The ACE Onboarding Management page displays the newly onboarded resources.
Note: It may take up to an hour for Google Cloud to sync with ACE.
-
-
-
Open Permissions Diagnostics to confirm that the account/subscription/project meets the requirements for the ACE scan types you want to run, and use the remediation links to complete any required setup.
Requires ACE read-only access
You can onboard Google Cloud Projects without using a script if your system does not support using scripts.
Do the following:
-
Log in to the https://console.cloud.google.com/ as a user with the following permissions:
- Organization Role Administrator or IAM Role Administrator
-
Organization Policy Administrator
-
Enable the required APIs for your project:
-
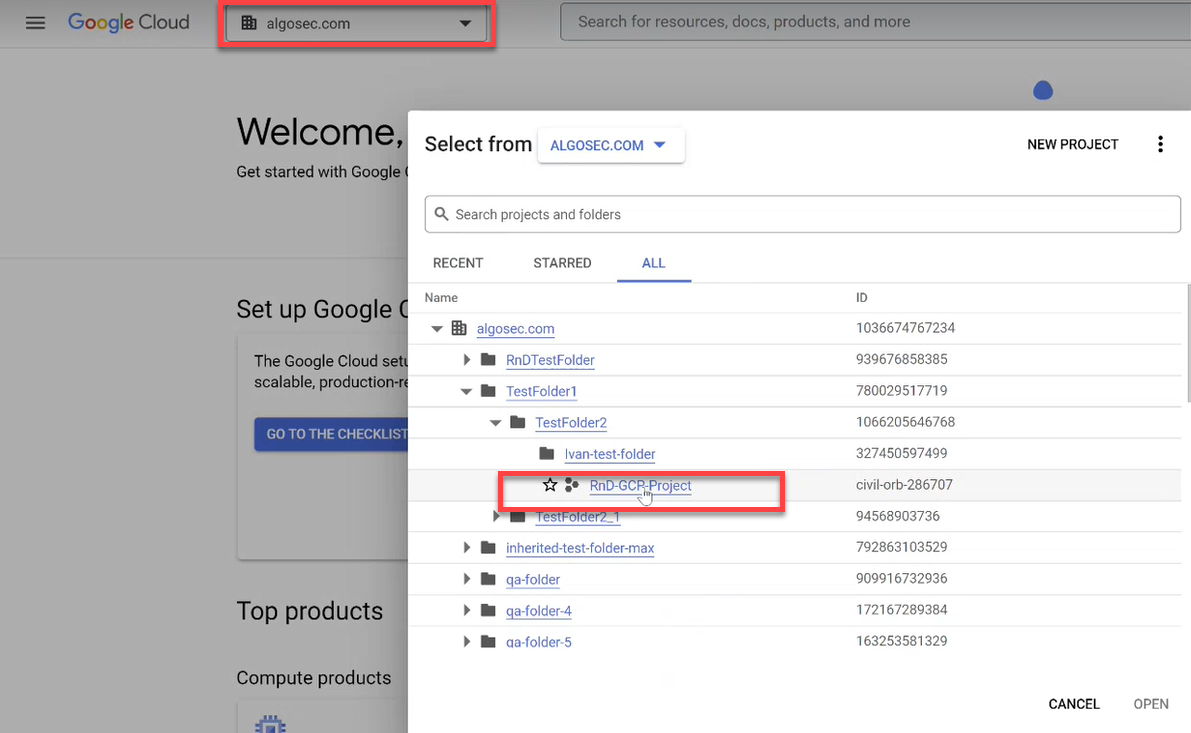
Click the project dropdown from the menu and choose your current project in the popup window that opens.
In this example, the project is called RnD-GCP-Project.
-
Click APIs & Services in the navigation menu.
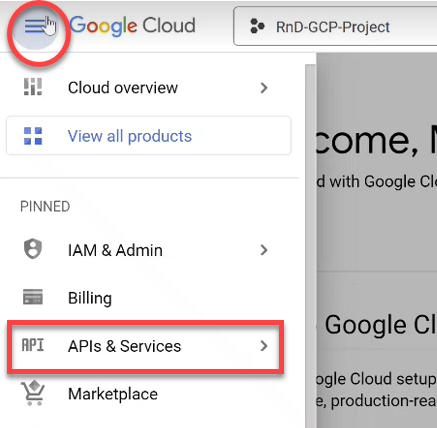
The APIs & Services page opens.
-
Click +ENABLE APIS & SERVICES at the top of the screen.

The Welcome to the API Library screen opens.
-
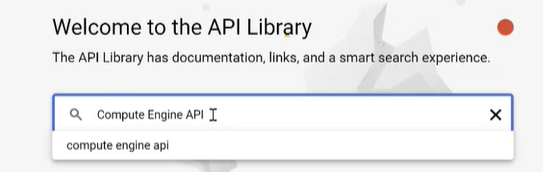
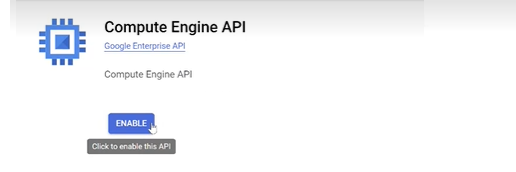
Search for Compute Engine API and make sure it is enabled.
-
Repeat the previous step for
-
Identity and Access Management (IAM) API
-
Cloud Storage API
-
Cloud Resource Manager API
-
Cloud Logging API
Note: For a details about required permissions see Permissions required for Google Cloud
-
-
-
Add a Service Account:
-
Select APIs & Services > Credentials in the navigation menu.
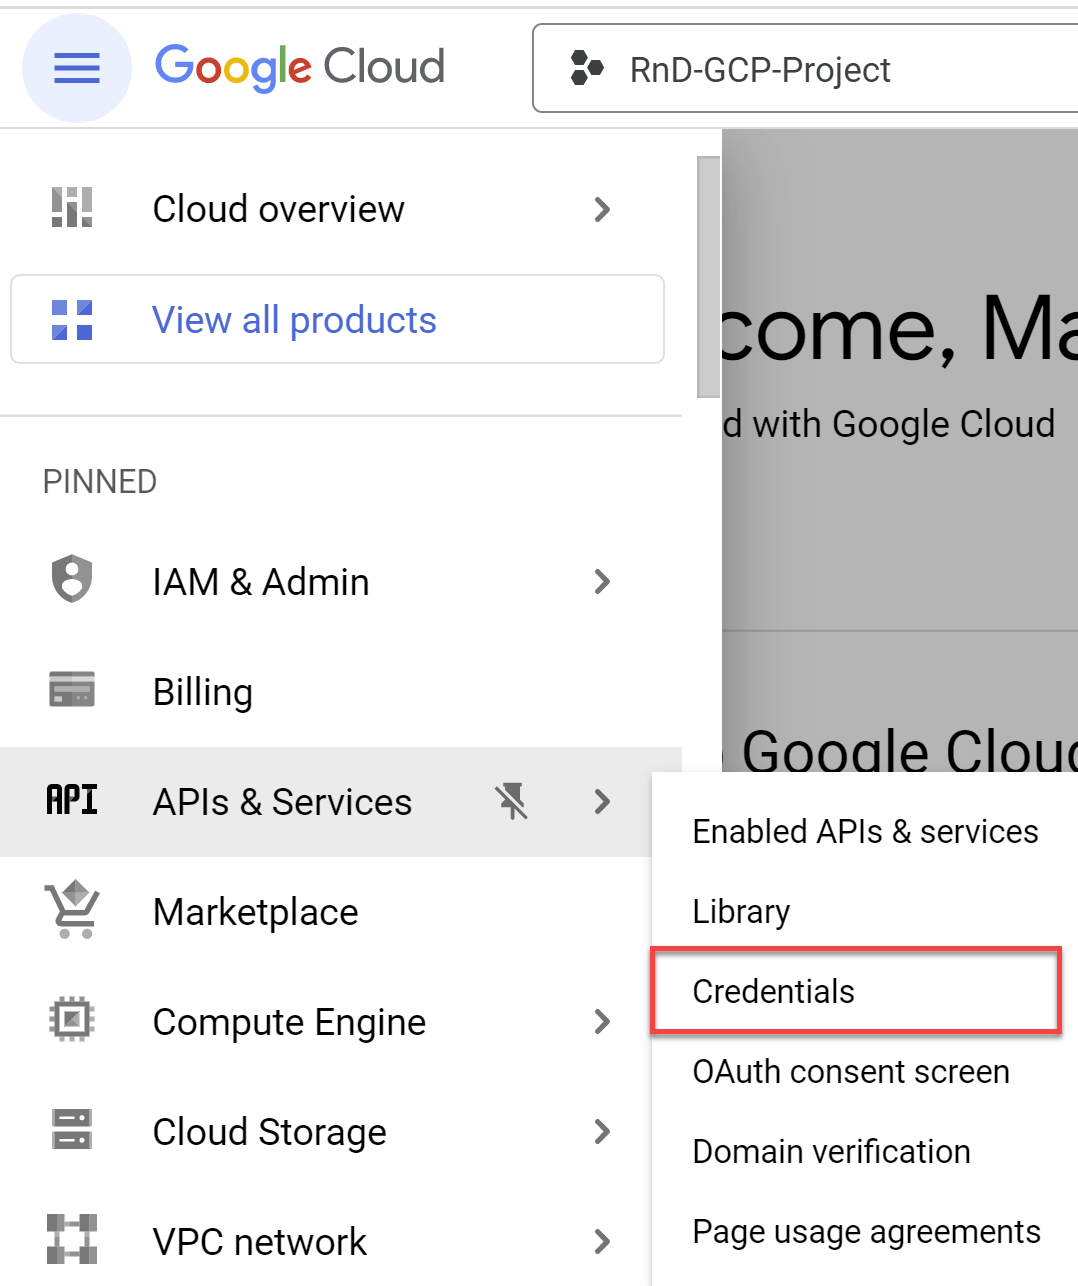
The Credentials screen opens.
-
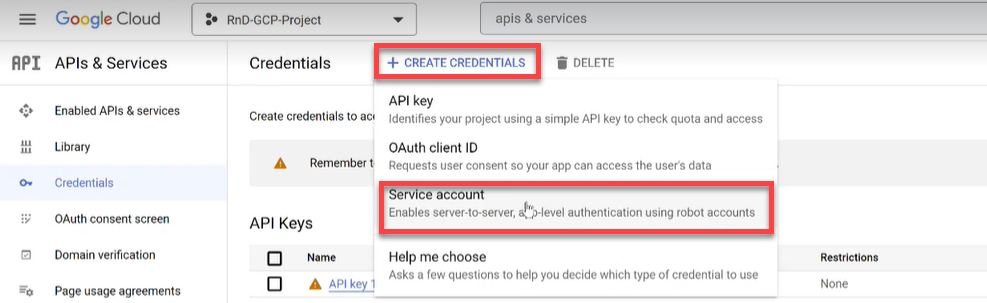
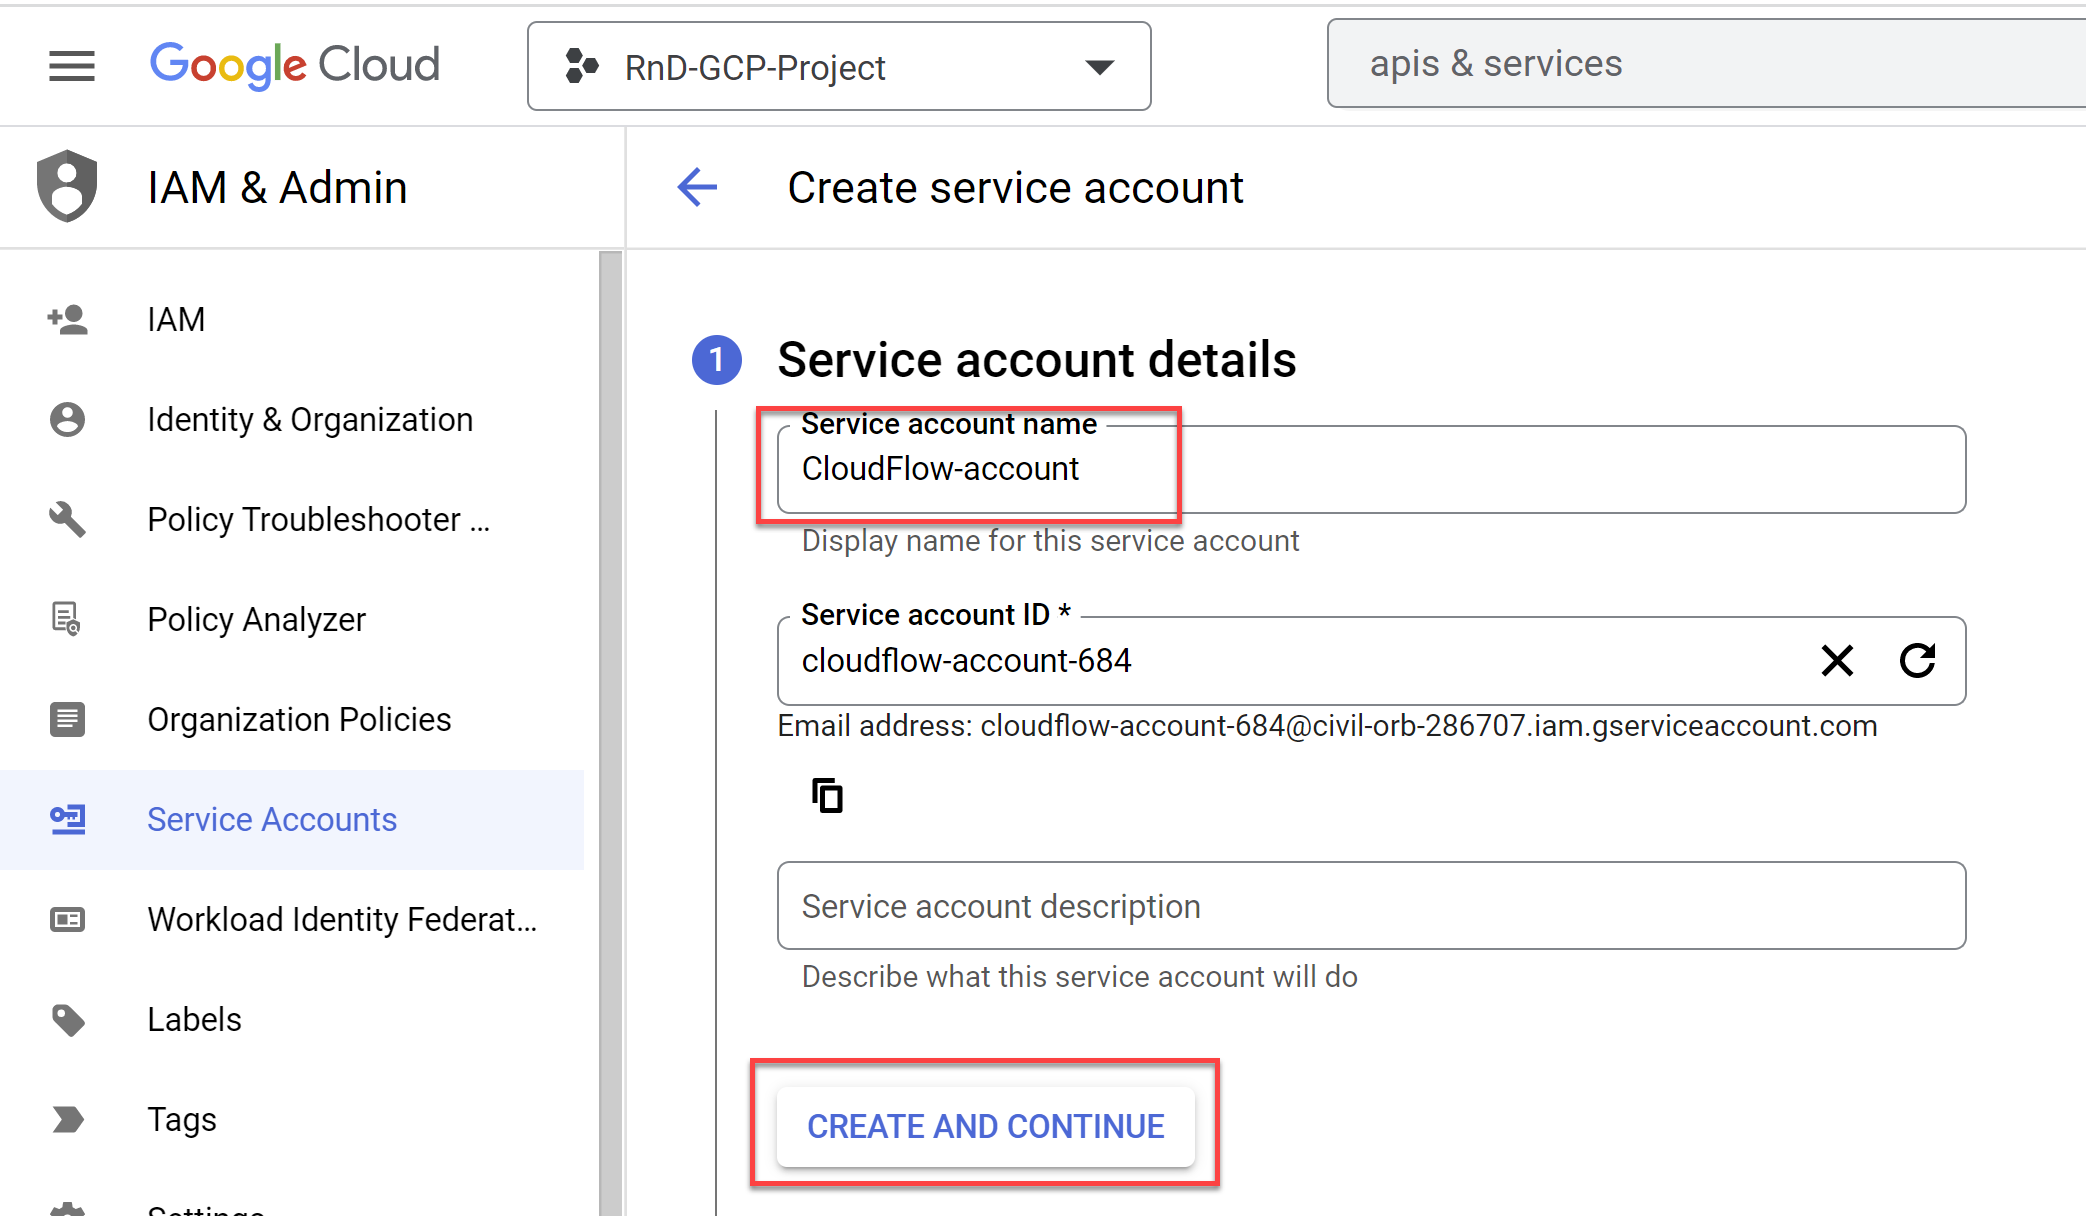
Click on +CREATE CREDENTIALS and select Service account from the dropdown list.
-
In the Service account name field enter "ACE-account" and click CREATE AND CONTINUE.
-
Click the Select a role dropdown and scroll to Project with the role Viewer.
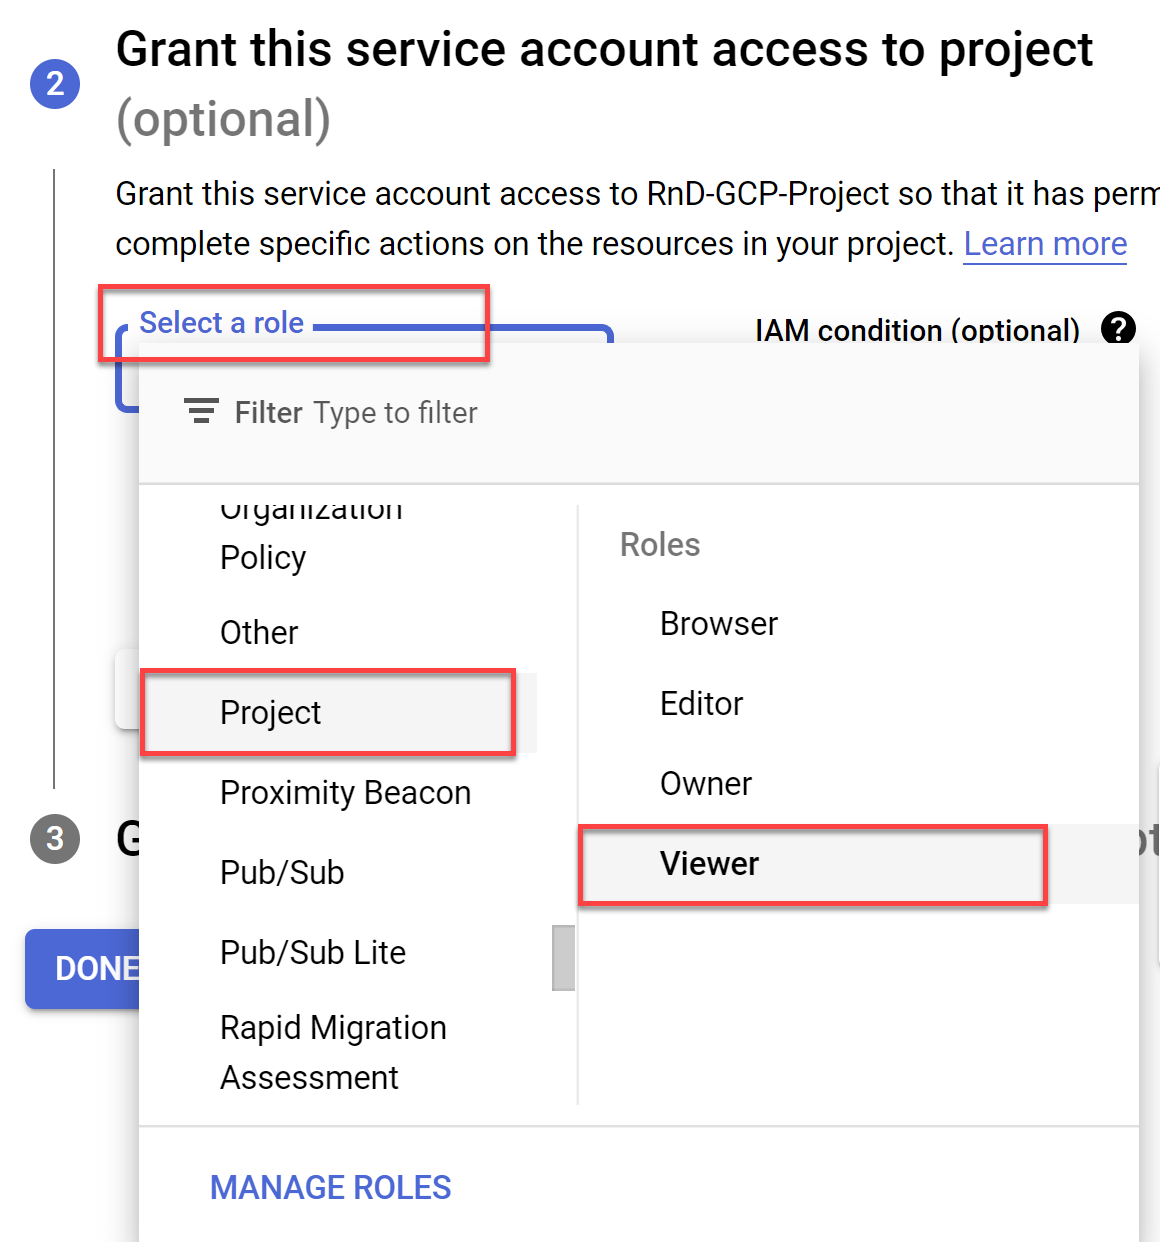
Note: For the list of the Viewer role permissions see the Roles ID column in Permissions required for Google Cloud .
-
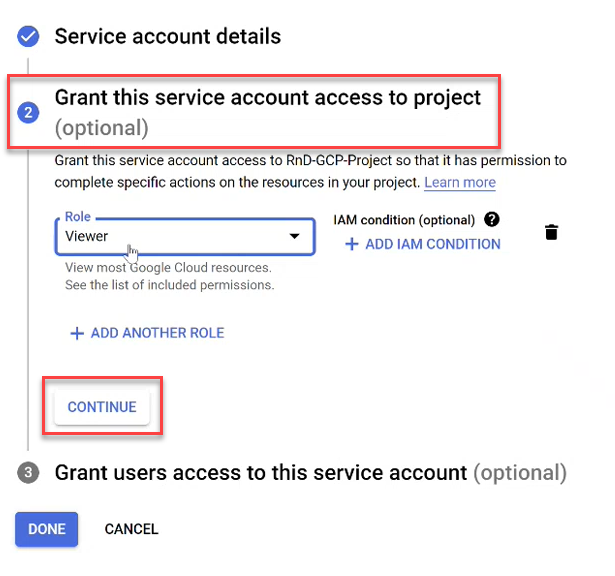
Click CONTINUE to save your changes. (Do not click DONE until you see a checkmark next to Grant this service account access to project).
-
Click DONE.
-
Copy the created Service Account email to use it later in Step 6b.

-
-
Export the Service Account credentials as a JSON file:
-
On the Credentials page, click on the Service Account email link for the ACE account.

The ACE account page opens.
-
Select the KEYS tab. Click ADD KEY, and choose Create new key.
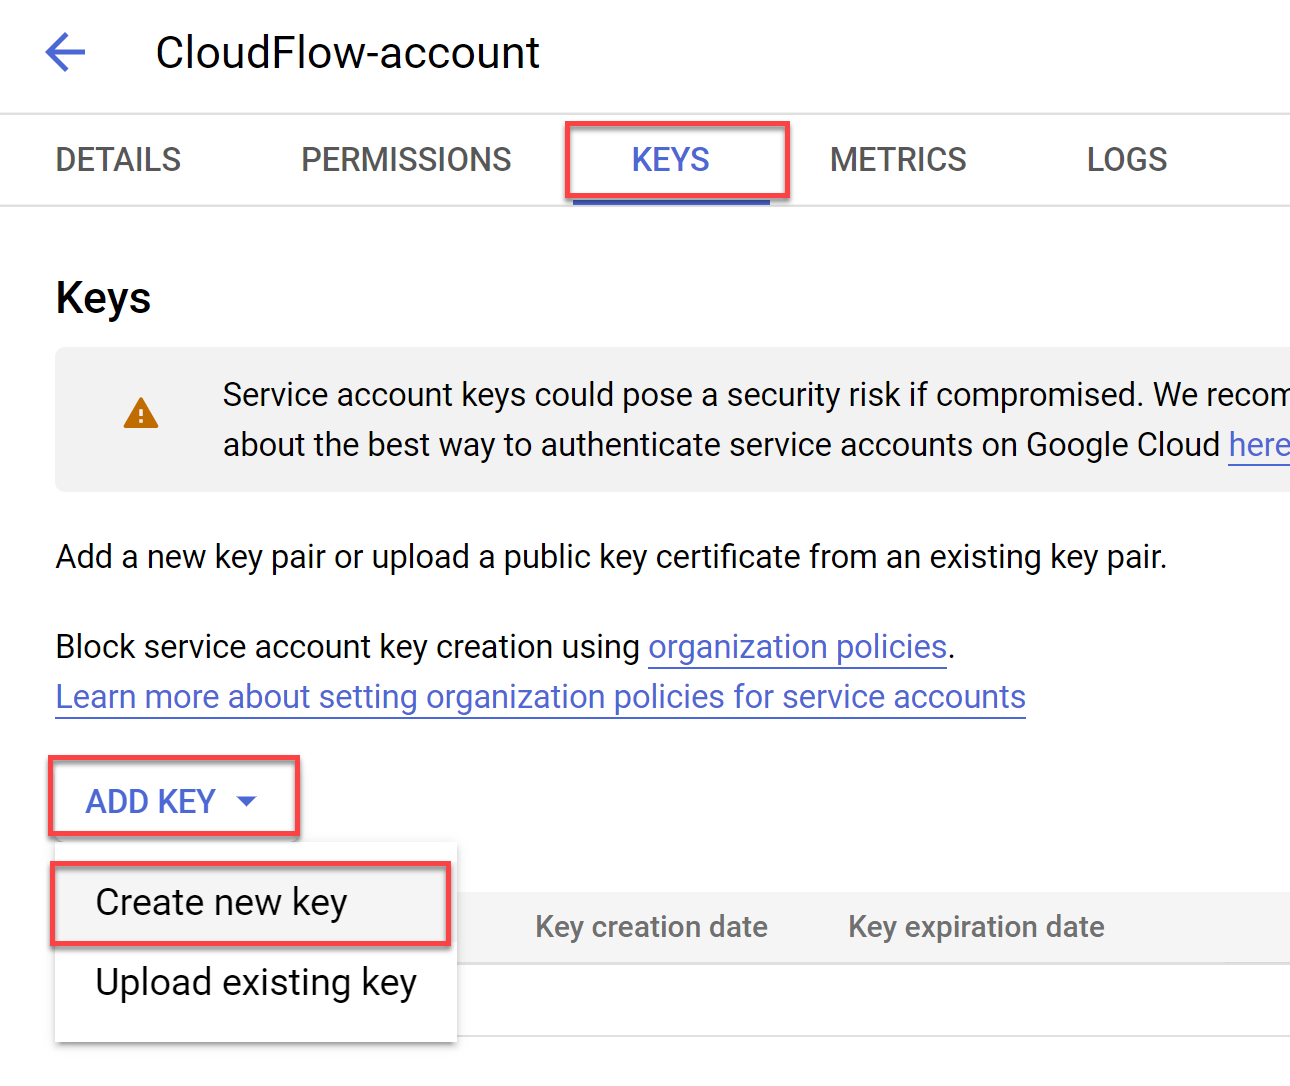
The Create Private Key for ACE-account dialog appears.
-
Select JSON for Key type and then click CREATE.
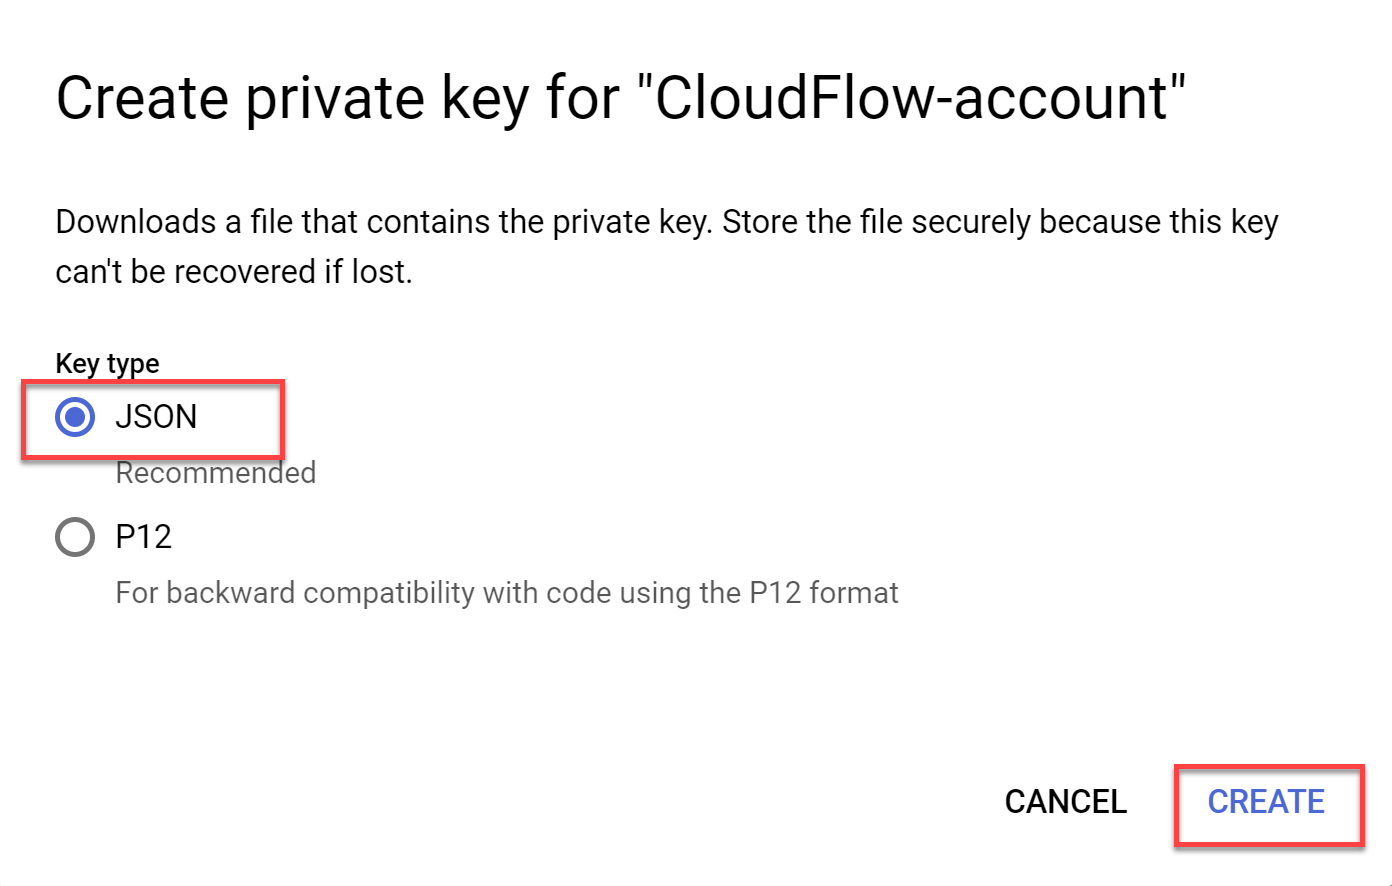
The JSON file is downloaded to your computer. You will use this file in Step 8.
This is an example of the Service Account credentials in a JSON file:
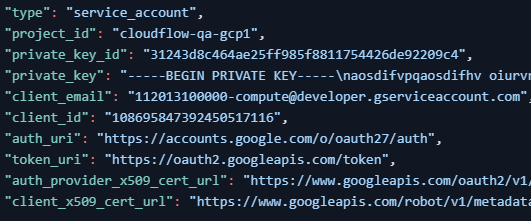
Note: Your browser may block downloading the file. See the URL box for notifications.
-
-
Create custom role with required permissions for your organization. See List of roles added to the selected target
-
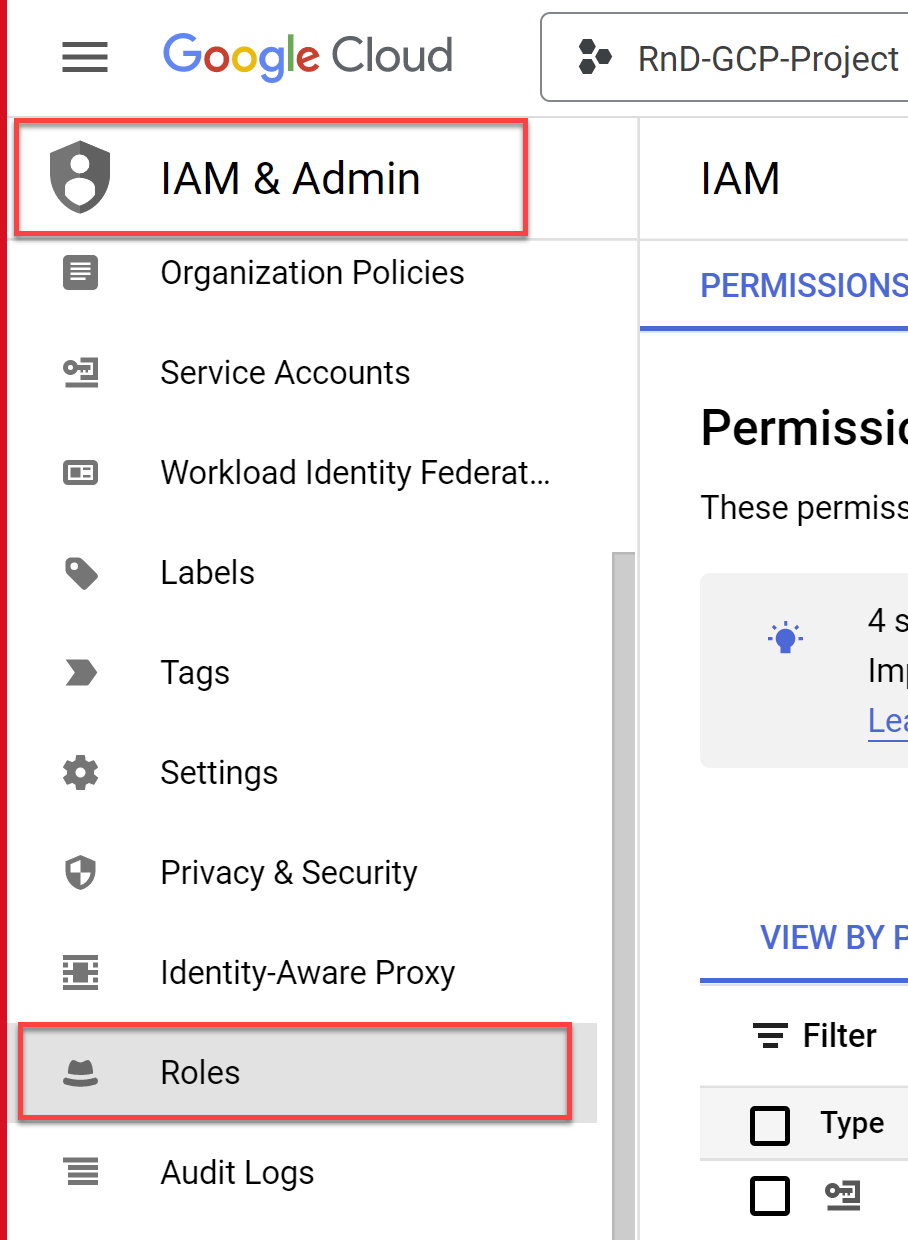
Select Roles located under IAM & Admin in the navigation menu.
-
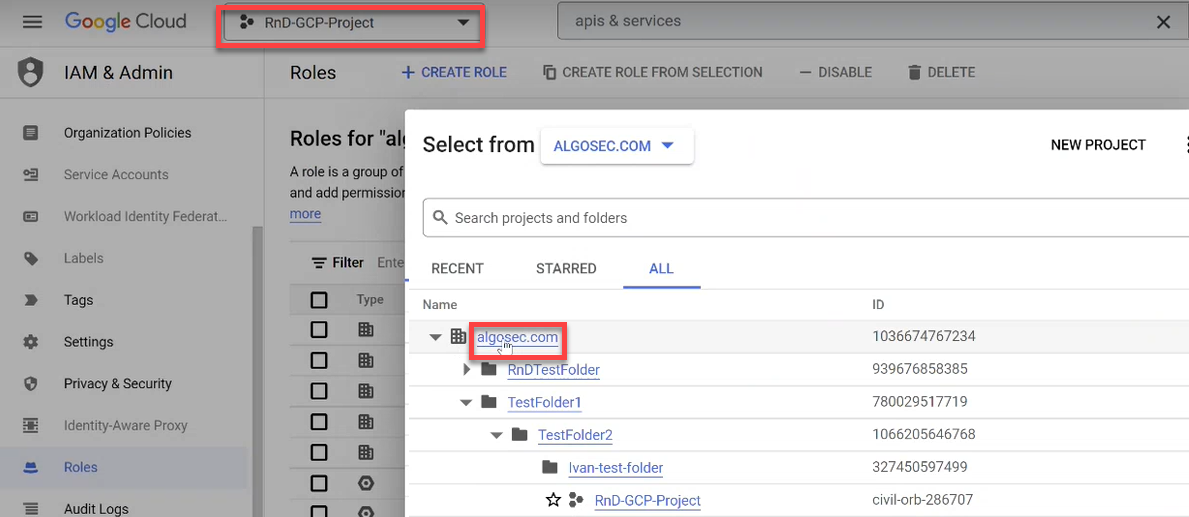
Click the project dropdown from the menu and choose your organization in the popup window that opens.
-
Click +CREATE ROLE. The Create Role screen opens.
-
Enter the role Title and ID and then click +ADD PERMISSIONS.
In the example below, Title is "Inherited Policy Viewer" and ID is "InheritedPolicyViewer".

The Add permissions window opens.
-
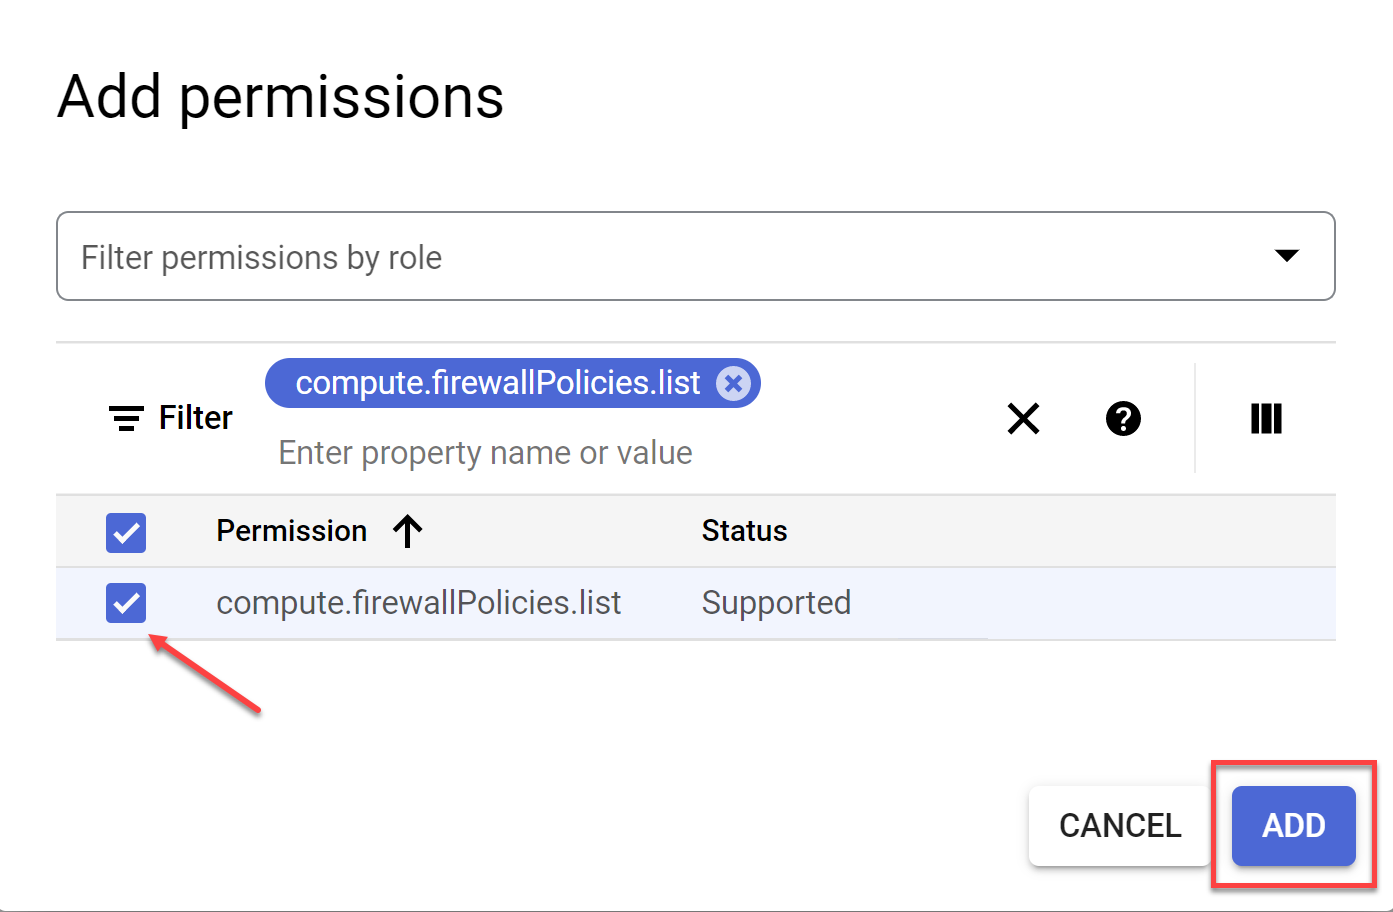
In the Enter property name or value field enter compute.firewallPolicies.list.
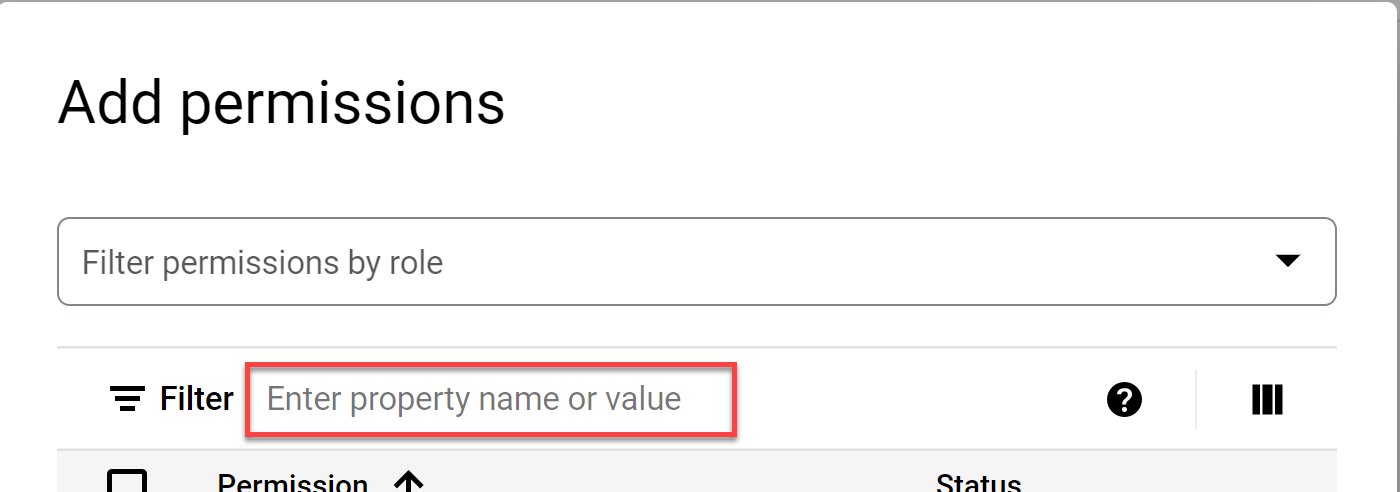
-
Choose the matching string from the list, click the checkbox to activate it and press ADD.
-
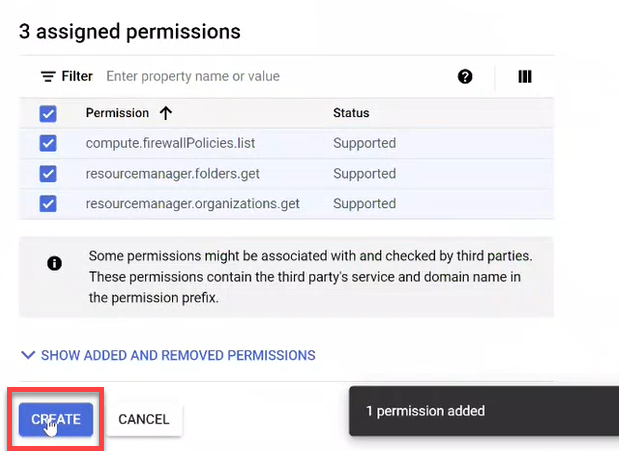
Repeat steps d through f for
-
resourcemanager.folders.get
-
resourcemanager.organizations.get
-
storage.buckets.list
Note: For a details about required permissions see Permissions required for Google Cloud
-
-
Click CREATE to complete the role creation process.
-
-
Assign the required role to the Service Account:
-
Select IAM located under IAM & Admin in the navigation menu and then click GRANT ACCESS or ADD.
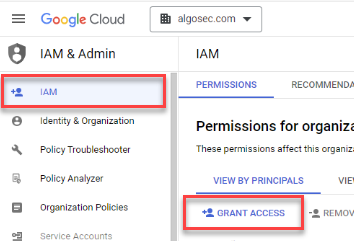
The Add principals screen opens.
-
Paste the Service Account email you copied from Step 3g into the New principals field and then choose it from the dropdown.
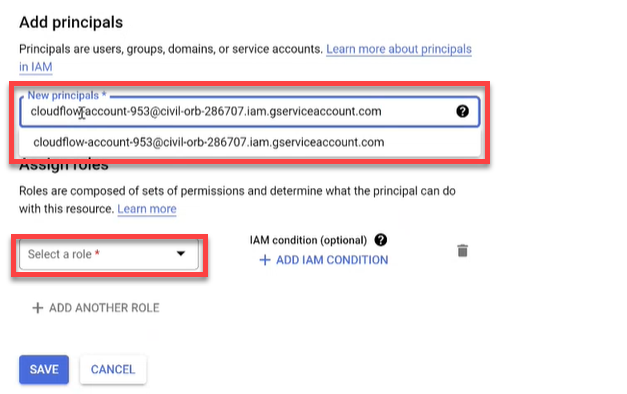
-
Click Select a role and choose Custom from the Quick access.
-
In the Roles list on the right side of the dialog window, click on the inherited role name you created in Step 5d.
-
Click SAVE. The policy is updated.
-
-
Open the Onboard Google Cloud Resources API page.
-
Enter your values into the request:
-
In the request body, provide the values Organization ID (organization_id) and the Service Account Key (data).
-
The Service Account Key is contained in the JSON file downloaded earlier (see Step 4c).
-
-
Run the API call to complete the onboarding process.
-
 Manually onboard CD mitigation (Optional):
-
Prerequisites
Before deploying the solution in Google Cloud Platform, ensure the following prerequisites are completed.
Do the following:
-
Open theGoogle Cloud Console.
-
Sign in with your Google account.
-
In the top navigation bar, select your GCP project.
-
Make note of your Project ID and Project Number.
-
In the top-right corner of the console, click Activate Cloud Shell
-
A terminal window will open at the bottom of the screen, already authenticated.
-
Confirm your active project:
Copygcloud config list project
-
-
Set the GCP Project and Prepare Required Values
Ensure the correct project is selected in your Cloud Shell session and gather all required values before deploying.
Do the following:
-
If needed, set the correct project:
Copygcloud config set project <your-project-id> -
Have the following required values ready:
-
To generate the
ADDITIONALSvalue:Create the following JSON:
Copy{"tenantId":"ALGOSEC_TENANT_ID","clientId":"ALGOSEC_CLIENT_ID","clientSecret":"ALGOSEC_CLIENT_SECRET"}Convert the JSON to a plain string.
Convert the string to UTF-8 bytes (most text editors or tools do this automatically).
Base64 encode the UTF-8 byte string using a tool or terminal command.
Example (bash):
CopytenantId="your-tenant-id"
clientId="your-client-id"
clientSecret="your-client-secret"
json=$(printf '{"tenantId":"%s","clientId":"%s","clientSecret":"%s"}' "$tenantId" "$clientId" "$clientSecret")
encoded=$(echo -n "$json" | base64)
echo "$encoded" -
Export following variables:
Copyexport PROJECT_ID=<your-gcp-project-id>
export HASH=<your-unique-id>
export PROJECT_NUMBER=$(gcloud projects describe $PROJECT_ID --format="value(projectNumber)")
export SOURCES_URL="<GENERAL_ENV_URL>/prevasio/gcp-application"
export ALGOSEC_TENANT_ID="<Your Tenant ID>"
export SERVICE_ACCOUNT_EMAIL=<Your SERVICE_ACCOUNT_EMAIL>
export SERVICE_ACCOUNT_NAME=<Your SERVICE_ACCOUNT_NAME>
export ADDITIONALS=<ADDITIONALS value>
export ORG_ID=<GCP ORG ID>
export ALGOSEC_CLOUD_HOST=<GENERAL_ENV_URL>
export PREVASIO_HOST=<GENERAL_ENV_URL>
export NOTE_ID="prevasio-$HASH-note"
export ATTESTOR_ID="prevasio-$HASH-attestor"
export BINAUTHZ_SA="service-${PROJECT_NUMBER}@gcp-sa-binaryauthorization.iam.gserviceaccount.com"
export REGION=<your region for ex. us-east1>
-
-
Create Binary Authorization Attestor
This step configures a Binary Authorization attestor for trusted image signing, using a KMS signing key and GCP IAM roles.
Do the following:
-
Set the required environment variables:
Copyexport NOTE_ID="prevasio-$HASH-note"
export ATTESTOR_ID="prevasio-$HASH-attestor"
export BINAUTHZ_SA="service-${PROJECT_NUMBER}@gcp-sa-binaryauthorization.iam.gserviceaccount.com" -
Create a Container Analysis note:
Copycat <<EOF > attestor_note.json
{
"attestation": {
"hint": {
"human_readable_name": "Prevasio attestation authority"
}
}
}
EOF
curl -s -X POST -H "Authorization: Bearer $(gcloud auth print-access-token)" \
-H "Content-Type: application/json" \
--data-binary @attestor_note.json \
"https://containeranalysis.googleapis.com/v1/projects/${PROJECT_ID}/notes/?noteId=${NOTE_ID}"
rm attestor_note.json -
Create the attestor using the note you just defined:
Copygcloud container binauthz attestors create $ATTESTOR_ID \
--attestation-authority-note=$NOTE_ID \
--attestation-authority-note-project=$PROJECT_ID \
--project=$PROJECT_ID -
Grant IAM access for the attestor to view occurrences:
Copycat <<EOF > iam_request.json
{
"resource": "projects/${PROJECT_ID}/notes/${NOTE_ID}",
"policy": {
"bindings": [
{
"role": "roles/containeranalysis.notes.occurrences.viewer",
"members": [
"serviceAccount:${BINAUTHZ_SA}"
]
}
]
}
}
EOF
curl -s -X POST -H "Authorization: Bearer $(gcloud auth print-access-token)" \
-H "Content-Type: application/json" \
--data-binary @iam_request.json \
"https://containeranalysis.googleapis.com/v1/projects/${PROJECT_ID}/notes/${NOTE_ID}:setIamPolicy"
rm iam_request.json -
Create a KMS keyring and signing key (idempotent):
Copygcloud kms keyrings create prevasio-attestor-keyring \
--location=global --project=$PROJECT_ID --quiet || true
gcloud kms keys create prevasio-attestor-key \
--keyring=prevasio-attestor-keyring \
--location=global \
--purpose=asymmetric-signing \
--default-algorithm=ec-sign-p256-sha256 \
--project=$PROJECT_ID --quiet || true -
Grant the Compute Engine default service account permission to sign with the key:
Copygcloud kms keys add-iam-policy-binding prevasio-attestor-key \
--keyring=prevasio-attestor-keyring \
--location=global \
--member="serviceAccount:${PROJECT_NUMBER}[email protected]" \
--role="roles/cloudkms.signer" \
--project=$PROJECT_ID -
Attach the KMS public key to the Binary Authorization attestor:
Copygcloud beta container binauthz attestors public-keys add \
--attestor=$ATTESTOR_ID \
--keyversion-project=$PROJECT_ID \
--keyversion-location=global \
--keyversion-keyring=prevasio-attestor-keyring \
--keyversion-key=prevasio-attestor-key \
--keyversion=1 \
--project=$PROJECT_ID
-
-
Update Binary Authorization Policy
-
export the current policy
gcloud container binauthz policy export --project=$PROJECT_ID --quiet --verbosity=error > ./policy.yaml -
extract current attestors
ATTESTORS=($(awk '/-/{if ($1=="requireAttestationsBy:") print $NF}' ./policy.yaml)) -
add your new attestor
ATTESTORS+=("projects/$PROJECT_ID/attestors/$ATTESTOR_ID") -
create a new policy file with updated attestors
Copyecho -e "defaultAdmissionRule:\n enforcementMode: ENFORCED_BLOCK_AND_AUDIT_LOG\n evaluationMode: REQUIRE_ATTESTATION\n requireAttestationsBy:" > ./updated_policy.yaml
for attestor in "${ATTESTORS[@]}"; do echo " - $attestor"; done >> ./updated_policy.yaml
echo "globalPolicyEvaluationMode: ENABLE" >> ./updated_policy.yaml -
import the updated policy
gcloud container binauthz policy import ./updated_policy.yaml --project=$PROJECT_ID --quiet --verbosity=error -
clean up temporary files
rm -f ./policy.yaml ./updated_policy.yaml
-
-
Prepare Working Directory and Download Resources
Set up a clean local directory for the deployment and download required application resources.
Do the following:
-
Create and enter a clean working directory:
Copymkdir -p prevasio-onboarding && rm -rf prevasio-onboarding/*
cd prevasio-onboardingThis will:
- Create a folder named
prevasio-onboarding - Delete any existing content
- Change into that directory
- Create a folder named
-
Download application resources based on your region <SOURCE_URL>:
- US: https://us.app.algosec.com/prevasio/gcp-application?tenant_id=${ALGOSEC_TENANT_ID}
- EU: https://eu.app.algosec.com/prevasio/gcp-application?tenant_id=${ALGOSEC_TENANT_ID}
- ANZ: https://anz.app.algosec.com/prevasio/gcp-application?tenant_id=${ALGOSEC_TENANT_ID}
- IND: https://ind.app.algosec.com/prevasio/gcp-application?tenant_id=${ALGOSEC_TENANT_ID}
- ME: https://me.app.algosec.com/prevasio/gcp-application?tenant_id=${ALGOSEC_TENANT_ID}
- UAE: https://uae.app.algosec.com/prevasio/gcp-application?tenant_id=${ALGOSEC_TENANT_ID}
- SGP: https://sgp.app.algosec.com/prevasio/gcp-application?tenant_id=${ALGOSEC_TENANT_ID}
Or use the following Bash script:
Copywget -O sources.zip "${SOURCES_URL}?tenant_id=${ALGOSEC_TENANT_ID}"
unzip sources.zipFor <SOURCE_URL> see HERE.
-
Enable the required GCP APIs for each project you plan to onboard:
Copygcloud services enable \
artifactregistry.googleapis.com \
cloudfunctions.googleapis.com \
cloudkms.googleapis.com \
cloudscheduler.googleapis.com \
compute.googleapis.com \
container.googleapis.com \
pubsub.googleapis.com \
secretmanager.googleapis.com \
binaryauthorization.googleapis.com \
cloudbuild.googleapis.com \
containeranalysis.googleapis.com \
run.googleapis.com
-
-
Get Project Number and Configure Secrets
Retrieve your GCP project number and create secrets to securely store configuration values, granting access to the default compute service account.
Do the following:
-
Set your project ID and retrieve your project number:
CopyPROJECT_ID=<your-project-id>
PROJECT_NUMBER=$(gcloud projects describe "$PROJECT_ID" --format="value(projectNumber)") -
Create a secret to store your organization ID:
Copyecho "$ORG_ID" | gcloud secrets create prevasio-$HASH-org-id --data-file=- --project=$PROJECT_ID -
Grant the compute engine service account access to the organization ID secret:
Copygcloud secrets add-iam-policy-binding prevasio-$HASH-org-id \
--member="serviceAccount:${PROJECT_NUMBER}[email protected]" \
--role="roles/secretmanager.secretAccessor" -
Create a secret to store the Prevasio host URL:
Copyecho "$PREVASIO_HOST" | gcloud secrets create prevasio-$HASH-host --data-file=- --project=$PROJECT_ID -
Grant the compute engine service account access to the Prevasio host secret:
Copygcloud secrets add-iam-policy-binding prevasio-$HASH-host \
--member="serviceAccount:${PROJECT_NUMBER}[email protected]" \
--role="roles/secretmanager.secretAccessor"
-
-
Create Additional Secrets and Grant Access
Store additional configuration parameters and the AlgoSec Cloud host value as GCP secrets, and assign access to the Compute Engine default service account.
Do the following:
-
Create a secret to store additional configuration parameters (Base64-encoded):
Copyecho "$ADDITIONALS" | gcloud secrets create prevasio-$HASH-additionals --data-file=- --project=$PROJECT_ID -
Grant access to the Compute Engine service account for the
additionalssecret:Copygcloud secrets add-iam-policy-binding prevasio-$HASH-additionals \
--member="serviceAccount:${PROJECT_NUMBER}[email protected]" \
--role="roles/secretmanager.secretAccessor" -
Create a secret to securely store the AlgoSec Cloud host value:
Copyecho "$ALGOSEC_CLOUD_HOST" | gcloud secrets create prevasio-$HASH-algosec-cloud-host --data-file=- --project=$PROJECT_ID -
Grant the Compute Engine service account permission to access the AlgoSec Cloud host secret:
Copygcloud secrets add-iam-policy-binding prevasio-$HASH-algosec-cloud-host \
--member="serviceAccount:${PROJECT_NUMBER}[email protected]" \
--role="roles/secretmanager.secretAccessor"
-
-
Deploy Cloud Functions
Deploy the required Cloud Functions using the Google Cloud CLI. These functions handle event forwarding and container scanning operations.
Do the following:
-
Deploy the Events Forwarder Function:
Copygcloud functions deploy prevasio-$HASH-events-forwarder \
--gen2 \
--set-env-vars=HASH=$HASH \
--set-secrets=PREVASIO_HOST=prevasio-$HASH-host:1,PREVASIO_ADDITIONALS=prevasio-$HASH-additionals:1,ORGANIZATION_ID=prevasio-$HASH-org-id:1,ALGOSEC_CLOUD_HOST=prevasio-$HASH-algosec-cloud-host:1 \
--region=$REGION \
--runtime=python310 \
--source=./function/events_forwarder \
--entry-point=forward_func \
--trigger-http \
--no-allow-unauthenticated \
--max-instances=1 \
--memory=128Mi \
--project=$PROJECT_ID -
Deploy the Cloud Run Scanner Function:
Copygcloud functions deploy prevasio-$HASH-cloud-run-scanner \
--gen2 \
--region=$REGION \
--runtime=python310 \
--source=./function/cloud_run_scanner \
--entry-point=scan_func \
--trigger-http \
--no-allow-unauthenticated \
--max-instances=1 \
--memory=256Mi \
--project=$PROJECT_ID
-
-
Create Cloud Scheduler Job and Trigger Scanner
Configure a recurring scan using Cloud Scheduler, and manually invoke the scanner once to verify it is operational.
Do the following:
-
Create a Cloud Scheduler job to invoke the scanner every 6 hours:
Copygcloud scheduler jobs create http prevasio-$HASH-cloud-run-scanner-scheduler \
--schedule="0 */6 * * *" \
--uri="https://$REGION-$PROJECT_ID.cloudfunctions.net/prevasio-$HASH-cloud-run-scanner" \
--location=$REGION \
--oidc-service-account-email=${PROJECT_NUMBER}[email protected] -
Trigger the scanner function once manually to verify it's working:
Copycurl -X POST -H "Authorization: Bearer $(gcloud auth print-identity-token)" \
"https://$REGION-$PROJECT_ID.cloudfunctions.net/prevasio-$HASH-cloud-run-scanner"
-
-
Create Pub/Sub Topic and Deploy Attestation Function
Create a Pub/Sub topic to manage image signing events and deploy a function to handle attestation creation for scanned images.
Do the following:
-
Create a Pub/Sub topic for images that need attestation:
Copygcloud pubsub topics create prevasio-$HASH-images-to-sign --project=$PROJECT_ID -
Grant publishing rights to the Compute Engine service account:
Copygcloud pubsub topics add-iam-policy-binding prevasio-$HASH-images-to-sign \
--member="serviceAccount:${PROJECT_NUMBER}[email protected]" \
--role="roles/pubsub.publisher" -
Deploy the image attestation creator Cloud Function:
Copygcloud functions deploy prevasio-$HASH-image-attestation-creator \
--gen2 \
--set-env-vars=HASH=$HASH \
--region=$REGION \
--runtime=python310 \
--source=./function/image_attestation_creator \
--entry-point=creator_func \
--trigger-http \
--no-allow-unauthenticated \
--max-instances=10 \
--memory=128Mi \
--project=$PROJECT_ID -
Create a Pub/Sub subscription that triggers the attestation function:
Copygcloud pubsub subscriptions create prevasio-$HASH-image-attestation-creator-subscription \
--topic=projects/$PROJECT_ID/topics/prevasio-$HASH-images-to-sign \
--expiration-period=never \
--push-endpoint=https://$REGION-$PROJECT_ID.cloudfunctions.net/prevasio-$HASH-image-attestation-creator \
--push-auth-service-account=${PROJECT_NUMBER}[email protected] \
--ack-deadline=65 \
--message-retention-duration=10m \
--project=$PROJECT_ID
-
-
Create and Run the Image Publishing Script
Use this script to scan your Artifact Registry for container images and publish them to the Pub/Sub topic for signing.
Do the following:
-
Run the following from Cloud Shell or your terminal:
CopyPROJECT_ID=$PROJECT_ID
HASH=$HASH
for REGION in $(gcloud compute regions list --format="value(name)" --project=$PROJECT_ID); do
for REPO in $(gcloud artifacts repositories list \
--location=$REGION \
--project=$PROJECT_ID \
--format="value(REPOSITORY)" 2>/dev/null); do
IMAGE_PATH="${REGION}-docker.pkg.dev/${PROJECT_ID}/${REPO}"
for IMAGE in $(gcloud artifacts docker images list $IMAGE_PATH \
--project=$PROJECT_ID \
--format="value[separator='@'](IMAGE,DIGEST)" 2>/dev/null); do
echo "Publishing image: $IMAGE"
gcloud pubsub topics publish prevasio-$HASH-images-to-sign \
--message="$IMAGE" \
--project=$PROJECT_ID > /dev/null
done
done
done
echo "Done publishing image events."
-
-
Create GCR Topic and Event Subscription
Ensure a GCR Pub/Sub topic exists for container image activity, and subscribe to it with the event forwarder Cloud Function.
Do the following:
-
Check if a GCR topic exists; if not, create it:
Copygcloud pubsub topics list --project=$PROJECT_ID --format="value(name)" | grep "/gcr" || \
gcloud pubsub topics create gcr --project=$PROJECT_ID -
Create a subscription that pushes GCR event messages to the events forwarder function:
Copygcloud pubsub subscriptions create prevasio-$HASH-event-subscription \
--topic=projects/$PROJECT_ID/topics/gcr \
--expiration-period=never \
--push-endpoint=https://$REGION-$PROJECT_ID.cloudfunctions.net/prevasio-$HASH-events-forwarder \
--push-auth-service-account=${PROJECT_NUMBER}[email protected] \
--ack-deadline=65 \
--message-retention-duration=10m \
--project=$PROJECT_ID
-
-
Pub/Sub Subscription Check (optional)
Note: This step is optional, but it’s helpful for verifying that the subscription is configured correctly. If the values are incorrect, you may not receive notifications as expected.
-
Describe a Pub/Sub Subscription
Copygcloud pubsub subscriptions describe prevasio-$HASH-event-subscription --project=$PROJECT_IDThis command retrieves and displays the details of the Pub/Sub subscription named prevasio-$HASH-event-subscription in the specified Google Cloud project. It is useful for verifying the configuration, status, and properties of the subscription, such as its topic, push/pull settings, and message retention policies.
-
Update a Pub/Sub Subscription to Use a Push Endpoint
Copygcloud pubsub subscriptions update prevasio-$HASH-event-subscription \
--push-endpoint=https://$REGION-project-in-second-qa-folder.cloudfunctions.net/prevasio-$HASH-events-forwarder \
--push-auth-service-account=$PROJECT_NUMBER[email protected] \
--project=$PROJECT_IDThis command updates the Pub/Sub subscription named prevasio-$HASH-event-subscription in your specified Google Cloud project. It sets the subscription to push messages to a specific Cloud Function endpoint (--push-endpoint) and uses a designated service account (--push-auth-service-account) for authentication. This configuration enables secure, automated delivery of Pub/Sub messages to your Cloud Function for processing.
Note: If you accidentally provide incorrect values for the push endpoint or service account, you can simply rerun this command with the correct values to update the subscription settings.
-
-
Authenticate and Set GCP Service Account
Ensure the correct service account is authenticated and set as the active identity in your GCP environment before running further commands.
Do the following:
-
Login:
Copygcloud auth login -
Set the active account to your service account email:
Copygcloud iam service-accounts keys create $SERVICE_ACCOUNT_NAME.json --iam-account=$SERVICE_ACCOUNT_EMAIL --project=$PROJECT_ID -
Activate the service account using its key file:
Copygcloud auth activate-service-account $SERVICE_ACCOUNT_EMAIL --key-file=$SERVICE_ACCOUNT_NAME.json
-
-
-
Open Permissions Diagnostics to confirm that the account/subscription/project meets the requirements for the ACE scan types you want to run, and use the remediation links to complete any required setup.
You can use API calls to add a single Google Cloud project to ACE.
Note: Any changes to a project after onboarding are not synced with ACE. To delete one or more manually added projects, see Offboard Google Cloud projects from ACE.
Do the following:
-
Log in to the https://console.cloud.google.com/ as a user with the following permissions:
- Organization Role Administrator or IAM Role Administrator
-
Organization Policy Administrator
-
Enable the required APIs for your project:
-
Click the project dropdown from the menu and choose your current project in the popup window that opens.
In this example, the project is called RnD-GCP-Project.
-
Click APIs & Services in the navigation menu.
The APIs & Services page opens.
-
Click +ENABLE APIS & SERVICES at the top of the screen.
The Welcome to the API Library screen opens.
-
Search for Compute Engine API and make sure it is enabled.
-
Repeat the previous step for
-
Identity and Access Management (IAM) API
-
Cloud Storage API
-
Cloud Resource Manager API
-
Cloud Logging API
Note: For a details about required permissions see Permissions required for Google Cloud
-
-
-
Add a Service Account:
-
Select APIs & Services > Credentials in the navigation menu.
The Credentials screen opens.
-
Click on +CREATE CREDENTIALS and select Service account from the dropdown list.
-
In the Service account name field enter "ACE-account" and click CREATE AND CONTINUE.
-
Click the Select a role dropdown and scroll to Project with the role Viewer.
Note: For the list of the Viewer role permissions see the Roles ID column in Permissions required for Google Cloud .
-
Click CONTINUE to save your changes. (Do not click DONE until you see a checkmark next to Grant this service account access to project).
-
Click DONE.
-
Copy the created Service Account email to use it later in Step 6b.
-
-
Export the Service Account credentials as a JSON file:
-
On the Credentials page, click on the Service Account email link for the ACE account.
The ACE account page opens.
-
Select the KEYS tab. Click ADD KEY, and choose Create new key.
The Create Private Key for ACE-account dialog appears.
-
Select JSON for Key type and then click CREATE.
The JSON file is downloaded to your computer. You will use this file in Step 8.
This is an example of the Service Account credentials in a JSON file:
Note: Your browser may block downloading the file. See the URL box for notifications.
-
-
Create custom role with required permissions for your organization. See List of roles added to the selected target
-
Select Roles located under IAM & Admin in the navigation menu.
-
Click the project dropdown from the menu and choose your organization in the popup window that opens.
-
Click +CREATE ROLE. The Create Role screen opens.
-
Enter the role Title and ID and then click +ADD PERMISSIONS.
In the example below, Title is "Inherited Policy Viewer" and ID is "InheritedPolicyViewer".
The Add permissions window opens.
-
In the Enter property name or value field enter compute.firewallPolicies.list.
-
Choose the matching string from the list, click the checkbox to activate it and press ADD.
-
Repeat steps d through f for
-
resourcemanager.folders.get
-
resourcemanager.organizations.get
-
storage.buckets.list
Note: For a details about required permissions see Permissions required for Google Cloud
-
-
Click CREATE to complete the role creation process.
-
-
Assign the required role to the Service Account:
-
Select IAM located under IAM & Admin in the navigation menu and then click GRANT ACCESS or ADD.
The Add principals screen opens.
-
Paste the Service Account email you copied from Step 3g into the New principals field and then choose it from the dropdown.
-
Click Select a role and choose Custom from the Quick access.
-
In the Roles list on the right side of the dialog window, click on the inherited role name you created in Step 5d.
-
Click SAVE. The policy is updated.
-
-
Manually onboard CD mitigation (Optional):
-
Prerequisites
Before deploying the solution in Google Cloud Platform, ensure the following prerequisites are completed.
Do the following:
-
Open theGoogle Cloud Console.
-
Sign in with your Google account.
-
In the top navigation bar, select your GCP project.
-
Make note of your Project ID and Project Number.
-
In the top-right corner of the console, click Activate Cloud Shell
-
A terminal window will open at the bottom of the screen, already authenticated.
-
Confirm your active project:
Copygcloud config list project
-
-
Set the GCP Project and Prepare Required Values
Ensure the correct project is selected in your Cloud Shell session and gather all required values before deploying.
Do the following:
-
If needed, set the correct project:
Copygcloud config set project <your-project-id> -
Have the following required values ready:
-
To generate the
ADDITIONALSvalue:Create the following JSON:
Copy{"tenantId":"ALGOSEC_TENANT_ID","clientId":"ALGOSEC_CLIENT_ID","clientSecret":"ALGOSEC_CLIENT_SECRET"}Convert the JSON to a plain string.
Convert the string to UTF-8 bytes (most text editors or tools do this automatically).
Base64 encode the UTF-8 byte string using a tool or terminal command.
Example (bash):
CopytenantId="your-tenant-id"
clientId="your-client-id"
clientSecret="your-client-secret"
json=$(printf '{"tenantId":"%s","clientId":"%s","clientSecret":"%s"}' "$tenantId" "$clientId" "$clientSecret")
encoded=$(echo -n "$json" | base64)
echo "$encoded" -
Export following variables:
Copyexport PROJECT_ID=<your-gcp-project-id>
export HASH=<your-unique-id>
export PROJECT_NUMBER=$(gcloud projects describe $PROJECT_ID --format="value(projectNumber)")
export SOURCES_URL="<GENERAL_ENV_URL>/prevasio/gcp-application"
export ALGOSEC_TENANT_ID="<Your Tenant ID>"
export SERVICE_ACCOUNT_EMAIL=<Your SERVICE_ACCOUNT_EMAIL>
export SERVICE_ACCOUNT_NAME=<Your SERVICE_ACCOUNT_NAME>
export ADDITIONALS=<ADDITIONALS value>
export ORG_ID=<GCP ORG ID>
export ALGOSEC_CLOUD_HOST=<GENERAL_ENV_URL>
export PREVASIO_HOST=<GENERAL_ENV_URL>
export NOTE_ID="prevasio-$HASH-note"
export ATTESTOR_ID="prevasio-$HASH-attestor"
export BINAUTHZ_SA="service-${PROJECT_NUMBER}@gcp-sa-binaryauthorization.iam.gserviceaccount.com"
export REGION=<your region for ex. us-east1>
-
-
Create Binary Authorization Attestor
This step configures a Binary Authorization attestor for trusted image signing, using a KMS signing key and GCP IAM roles.
Do the following:
-
Set the required environment variables:
Copyexport NOTE_ID="prevasio-$HASH-note"
export ATTESTOR_ID="prevasio-$HASH-attestor"
export BINAUTHZ_SA="service-${PROJECT_NUMBER}@gcp-sa-binaryauthorization.iam.gserviceaccount.com" -
Create a Container Analysis note:
Copycat <<EOF > attestor_note.json
{
"attestation": {
"hint": {
"human_readable_name": "Prevasio attestation authority"
}
}
}
EOF
curl -s -X POST -H "Authorization: Bearer $(gcloud auth print-access-token)" \
-H "Content-Type: application/json" \
--data-binary @attestor_note.json \
"https://containeranalysis.googleapis.com/v1/projects/${PROJECT_ID}/notes/?noteId=${NOTE_ID}"
rm attestor_note.json -
Create the attestor using the note you just defined:
Copygcloud container binauthz attestors create $ATTESTOR_ID \
--attestation-authority-note=$NOTE_ID \
--attestation-authority-note-project=$PROJECT_ID \
--project=$PROJECT_ID -
Grant IAM access for the attestor to view occurrences:
Copycat <<EOF > iam_request.json
{
"resource": "projects/${PROJECT_ID}/notes/${NOTE_ID}",
"policy": {
"bindings": [
{
"role": "roles/containeranalysis.notes.occurrences.viewer",
"members": [
"serviceAccount:${BINAUTHZ_SA}"
]
}
]
}
}
EOF
curl -s -X POST -H "Authorization: Bearer $(gcloud auth print-access-token)" \
-H "Content-Type: application/json" \
--data-binary @iam_request.json \
"https://containeranalysis.googleapis.com/v1/projects/${PROJECT_ID}/notes/${NOTE_ID}:setIamPolicy"
rm iam_request.json -
Create a KMS keyring and signing key (idempotent):
Copygcloud kms keyrings create prevasio-attestor-keyring \
--location=global --project=$PROJECT_ID --quiet || true
gcloud kms keys create prevasio-attestor-key \
--keyring=prevasio-attestor-keyring \
--location=global \
--purpose=asymmetric-signing \
--default-algorithm=ec-sign-p256-sha256 \
--project=$PROJECT_ID --quiet || true -
Grant the Compute Engine default service account permission to sign with the key:
Copygcloud kms keys add-iam-policy-binding prevasio-attestor-key \
--keyring=prevasio-attestor-keyring \
--location=global \
--member="serviceAccount:${PROJECT_NUMBER}[email protected]" \
--role="roles/cloudkms.signer" \
--project=$PROJECT_ID -
Attach the KMS public key to the Binary Authorization attestor:
Copygcloud beta container binauthz attestors public-keys add \
--attestor=$ATTESTOR_ID \
--keyversion-project=$PROJECT_ID \
--keyversion-location=global \
--keyversion-keyring=prevasio-attestor-keyring \
--keyversion-key=prevasio-attestor-key \
--keyversion=1 \
--project=$PROJECT_ID
-
-
Update Binary Authorization Policy
-
export the current policy
gcloud container binauthz policy export --project=$PROJECT_ID --quiet --verbosity=error > ./policy.yaml -
extract current attestors
ATTESTORS=($(awk '/-/{if ($1=="requireAttestationsBy:") print $NF}' ./policy.yaml)) -
add your new attestor
ATTESTORS+=("projects/$PROJECT_ID/attestors/$ATTESTOR_ID") -
create a new policy file with updated attestors
Copyecho -e "defaultAdmissionRule:\n enforcementMode: ENFORCED_BLOCK_AND_AUDIT_LOG\n evaluationMode: REQUIRE_ATTESTATION\n requireAttestationsBy:" > ./updated_policy.yaml
for attestor in "${ATTESTORS[@]}"; do echo " - $attestor"; done >> ./updated_policy.yaml
echo "globalPolicyEvaluationMode: ENABLE" >> ./updated_policy.yaml -
import the updated policy
gcloud container binauthz policy import ./updated_policy.yaml --project=$PROJECT_ID --quiet --verbosity=error -
clean up temporary files
rm -f ./policy.yaml ./updated_policy.yaml
-
-
Prepare Working Directory and Download Resources
Set up a clean local directory for the deployment and download required application resources.
Do the following:
-
Create and enter a clean working directory:
Copymkdir -p prevasio-onboarding && rm -rf prevasio-onboarding/*
cd prevasio-onboardingThis will:
- Create a folder named
prevasio-onboarding - Delete any existing content
- Change into that directory
- Create a folder named
-
Download application resources based on your region <SOURCE_URL>:
- US: https://us.app.algosec.com/prevasio/gcp-application?tenant_id=${ALGOSEC_TENANT_ID}
- EU: https://eu.app.algosec.com/prevasio/gcp-application?tenant_id=${ALGOSEC_TENANT_ID}
- ANZ: https://anz.app.algosec.com/prevasio/gcp-application?tenant_id=${ALGOSEC_TENANT_ID}
- IND: https://ind.app.algosec.com/prevasio/gcp-application?tenant_id=${ALGOSEC_TENANT_ID}
- ME: https://me.app.algosec.com/prevasio/gcp-application?tenant_id=${ALGOSEC_TENANT_ID}
- UAE: https://uae.app.algosec.com/prevasio/gcp-application?tenant_id=${ALGOSEC_TENANT_ID}
- SGP: https://sgp.app.algosec.com/prevasio/gcp-application?tenant_id=${ALGOSEC_TENANT_ID}
Or use the following Bash script:
Copywget -O sources.zip "${SOURCES_URL}?tenant_id=${ALGOSEC_TENANT_ID}"
unzip sources.zipFor <SOURCE_URL> see HERE.
-
Enable the required GCP APIs for each project you plan to onboard:
Copygcloud services enable \
artifactregistry.googleapis.com \
cloudfunctions.googleapis.com \
cloudkms.googleapis.com \
cloudscheduler.googleapis.com \
compute.googleapis.com \
container.googleapis.com \
pubsub.googleapis.com \
secretmanager.googleapis.com \
binaryauthorization.googleapis.com \
cloudbuild.googleapis.com \
containeranalysis.googleapis.com \
run.googleapis.com
-
-
Get Project Number and Configure Secrets
Retrieve your GCP project number and create secrets to securely store configuration values, granting access to the default compute service account.
Do the following:
-
Set your project ID and retrieve your project number:
CopyPROJECT_ID=<your-project-id>
PROJECT_NUMBER=$(gcloud projects describe "$PROJECT_ID" --format="value(projectNumber)") -
Create a secret to store your organization ID:
Copyecho "$ORG_ID" | gcloud secrets create prevasio-$HASH-org-id --data-file=- --project=$PROJECT_ID -
Grant the compute engine service account access to the organization ID secret:
Copygcloud secrets add-iam-policy-binding prevasio-$HASH-org-id \
--member="serviceAccount:${PROJECT_NUMBER}[email protected]" \
--role="roles/secretmanager.secretAccessor" -
Create a secret to store the Prevasio host URL:
Copyecho "$PREVASIO_HOST" | gcloud secrets create prevasio-$HASH-host --data-file=- --project=$PROJECT_ID -
Grant the compute engine service account access to the Prevasio host secret:
Copygcloud secrets add-iam-policy-binding prevasio-$HASH-host \
--member="serviceAccount:${PROJECT_NUMBER}[email protected]" \
--role="roles/secretmanager.secretAccessor"
-
-
Create Additional Secrets and Grant Access
Store additional configuration parameters and the AlgoSec Cloud host value as GCP secrets, and assign access to the Compute Engine default service account.
Do the following:
-
Create a secret to store additional configuration parameters (Base64-encoded):
Copyecho "$ADDITIONALS" | gcloud secrets create prevasio-$HASH-additionals --data-file=- --project=$PROJECT_ID -
Grant access to the Compute Engine service account for the
additionalssecret:Copygcloud secrets add-iam-policy-binding prevasio-$HASH-additionals \
--member="serviceAccount:${PROJECT_NUMBER}[email protected]" \
--role="roles/secretmanager.secretAccessor" -
Create a secret to securely store the AlgoSec Cloud host value:
Copyecho "$ALGOSEC_CLOUD_HOST" | gcloud secrets create prevasio-$HASH-algosec-cloud-host --data-file=- --project=$PROJECT_ID -
Grant the Compute Engine service account permission to access the AlgoSec Cloud host secret:
Copygcloud secrets add-iam-policy-binding prevasio-$HASH-algosec-cloud-host \
--member="serviceAccount:${PROJECT_NUMBER}[email protected]" \
--role="roles/secretmanager.secretAccessor"
-
-
Deploy Cloud Functions
Deploy the required Cloud Functions using the Google Cloud CLI. These functions handle event forwarding and container scanning operations.
Do the following:
-
Deploy the Events Forwarder Function:
Copygcloud functions deploy prevasio-$HASH-events-forwarder \
--gen2 \
--set-env-vars=HASH=$HASH \
--set-secrets=PREVASIO_HOST=prevasio-$HASH-host:1,PREVASIO_ADDITIONALS=prevasio-$HASH-additionals:1,ORGANIZATION_ID=prevasio-$HASH-org-id:1,ALGOSEC_CLOUD_HOST=prevasio-$HASH-algosec-cloud-host:1 \
--region=$REGION \
--runtime=python310 \
--source=./function/events_forwarder \
--entry-point=forward_func \
--trigger-http \
--no-allow-unauthenticated \
--max-instances=1 \
--memory=128Mi \
--project=$PROJECT_ID -
Deploy the Cloud Run Scanner Function:
Copygcloud functions deploy prevasio-$HASH-cloud-run-scanner \
--gen2 \
--region=$REGION \
--runtime=python310 \
--source=./function/cloud_run_scanner \
--entry-point=scan_func \
--trigger-http \
--no-allow-unauthenticated \
--max-instances=1 \
--memory=256Mi \
--project=$PROJECT_ID
-
-
Create Cloud Scheduler Job and Trigger Scanner
Configure a recurring scan using Cloud Scheduler, and manually invoke the scanner once to verify it is operational.
Do the following:
-
Create a Cloud Scheduler job to invoke the scanner every 6 hours:
Copygcloud scheduler jobs create http prevasio-$HASH-cloud-run-scanner-scheduler \
--schedule="0 */6 * * *" \
--uri="https://$REGION-$PROJECT_ID.cloudfunctions.net/prevasio-$HASH-cloud-run-scanner" \
--location=$REGION \
--oidc-service-account-email=${PROJECT_NUMBER}[email protected] -
Trigger the scanner function once manually to verify it's working:
Copycurl -X POST -H "Authorization: Bearer $(gcloud auth print-identity-token)" \
"https://$REGION-$PROJECT_ID.cloudfunctions.net/prevasio-$HASH-cloud-run-scanner"
-
-
Create Pub/Sub Topic and Deploy Attestation Function
Create a Pub/Sub topic to manage image signing events and deploy a function to handle attestation creation for scanned images.
Do the following:
-
Create a Pub/Sub topic for images that need attestation:
Copygcloud pubsub topics create prevasio-$HASH-images-to-sign --project=$PROJECT_ID -
Grant publishing rights to the Compute Engine service account:
Copygcloud pubsub topics add-iam-policy-binding prevasio-$HASH-images-to-sign \
--member="serviceAccount:${PROJECT_NUMBER}[email protected]" \
--role="roles/pubsub.publisher" -
Deploy the image attestation creator Cloud Function:
Copygcloud functions deploy prevasio-$HASH-image-attestation-creator \
--gen2 \
--set-env-vars=HASH=$HASH \
--region=$REGION \
--runtime=python310 \
--source=./function/image_attestation_creator \
--entry-point=creator_func \
--trigger-http \
--no-allow-unauthenticated \
--max-instances=10 \
--memory=128Mi \
--project=$PROJECT_ID -
Create a Pub/Sub subscription that triggers the attestation function:
Copygcloud pubsub subscriptions create prevasio-$HASH-image-attestation-creator-subscription \
--topic=projects/$PROJECT_ID/topics/prevasio-$HASH-images-to-sign \
--expiration-period=never \
--push-endpoint=https://$REGION-$PROJECT_ID.cloudfunctions.net/prevasio-$HASH-image-attestation-creator \
--push-auth-service-account=${PROJECT_NUMBER}[email protected] \
--ack-deadline=65 \
--message-retention-duration=10m \
--project=$PROJECT_ID
-
-
Create and Run the Image Publishing Script
Use this script to scan your Artifact Registry for container images and publish them to the Pub/Sub topic for signing.
Do the following:
-
Run the following from Cloud Shell or your terminal:
CopyPROJECT_ID=$PROJECT_ID
HASH=$HASH
for REGION in $(gcloud compute regions list --format="value(name)" --project=$PROJECT_ID); do
for REPO in $(gcloud artifacts repositories list \
--location=$REGION \
--project=$PROJECT_ID \
--format="value(REPOSITORY)" 2>/dev/null); do
IMAGE_PATH="${REGION}-docker.pkg.dev/${PROJECT_ID}/${REPO}"
for IMAGE in $(gcloud artifacts docker images list $IMAGE_PATH \
--project=$PROJECT_ID \
--format="value[separator='@'](IMAGE,DIGEST)" 2>/dev/null); do
echo "Publishing image: $IMAGE"
gcloud pubsub topics publish prevasio-$HASH-images-to-sign \
--message="$IMAGE" \
--project=$PROJECT_ID > /dev/null
done
done
done
echo "Done publishing image events."
-
-
Create GCR Topic and Event Subscription
Ensure a GCR Pub/Sub topic exists for container image activity, and subscribe to it with the event forwarder Cloud Function.
Do the following:
-
Check if a GCR topic exists; if not, create it:
Copygcloud pubsub topics list --project=$PROJECT_ID --format="value(name)" | grep "/gcr" || \
gcloud pubsub topics create gcr --project=$PROJECT_ID -
Create a subscription that pushes GCR event messages to the events forwarder function:
Copygcloud pubsub subscriptions create prevasio-$HASH-event-subscription \
--topic=projects/$PROJECT_ID/topics/gcr \
--expiration-period=never \
--push-endpoint=https://$REGION-$PROJECT_ID.cloudfunctions.net/prevasio-$HASH-events-forwarder \
--push-auth-service-account=${PROJECT_NUMBER}[email protected] \
--ack-deadline=65 \
--message-retention-duration=10m \
--project=$PROJECT_ID
-
-
Pub/Sub Subscription Check (optional)
Note: This step is optional, but it’s helpful for verifying that the subscription is configured correctly. If the values are incorrect, you may not receive notifications as expected.
-
Describe a Pub/Sub Subscription
Copygcloud pubsub subscriptions describe prevasio-$HASH-event-subscription --project=$PROJECT_IDThis command retrieves and displays the details of the Pub/Sub subscription named prevasio-$HASH-event-subscription in the specified Google Cloud project. It is useful for verifying the configuration, status, and properties of the subscription, such as its topic, push/pull settings, and message retention policies.
-
Update a Pub/Sub Subscription to Use a Push Endpoint
Copygcloud pubsub subscriptions update prevasio-$HASH-event-subscription \
--push-endpoint=https://$REGION-project-in-second-qa-folder.cloudfunctions.net/prevasio-$HASH-events-forwarder \
--push-auth-service-account=$PROJECT_NUMBER[email protected] \
--project=$PROJECT_IDThis command updates the Pub/Sub subscription named prevasio-$HASH-event-subscription in your specified Google Cloud project. It sets the subscription to push messages to a specific Cloud Function endpoint (--push-endpoint) and uses a designated service account (--push-auth-service-account) for authentication. This configuration enables secure, automated delivery of Pub/Sub messages to your Cloud Function for processing.
Note: If you accidentally provide incorrect values for the push endpoint or service account, you can simply rerun this command with the correct values to update the subscription settings.
-
-
Authenticate and Set GCP Service Account
Ensure the correct service account is authenticated and set as the active identity in your GCP environment before running further commands.
Do the following:
-
Login:
Copygcloud auth login -
Set the active account to your service account email:
Copygcloud iam service-accounts keys create $SERVICE_ACCOUNT_NAME.json --iam-account=$SERVICE_ACCOUNT_EMAIL --project=$PROJECT_ID -
Activate the service account using its key file:
Copygcloud auth activate-service-account $SERVICE_ACCOUNT_EMAIL --key-file=$SERVICE_ACCOUNT_NAME.json
-
-
-
Onboard the project via ACE API
Complete the onboarding process by sending an API request to register the new GCP project in the ACE platform.
Do the following:
-
Go to the Onboard a single GCP project API
-
Follow the instructions to send the request, providing all required fields such as project ID, tenant ID, and credentials.
-
If you've created your own app during this setup, be sure to include the
applicationIdandapplicationSecretparameters in your API request payload.
-
-
Open Permissions Diagnostics to confirm that the account/subscription/project meets the requirements for the ACE scan types you want to run, and use the remediation links to complete any required setup.
You can leverage Terraform, the infrastructure-as-code solution, as another option for onboarding your Google Cloud projects into ACE.
Do the following:
-
In the ACE
Settings area, click Accounts Management.On the Accounts Management page that opens, click +Onboard Accounts. The Onboard Account Cloud Provider selection page appears.
-
Click the
Google Cloud Platform button. -
The Features permissions step of the wizard appears.
-
Onboard CD Mitigation (optional)
The CD Mitigation feature provides threat management for GCP Artifact Registry (AR) by scanning and securing your Continuous Delivery (CD) pipeline, preventing threats from reaching container-based workloads. For more infomration about CD mitigation, see Google Cloud CD Mitigation.
-
Select Grant CD mitigation permissions & create related resources to be automatically onboarded. For information related to automatic onboarding.
-
By default, the CD Mitigation feature is set to be onboarded manually.
-
-
Click Next. The Deployment step of the wizard appears.
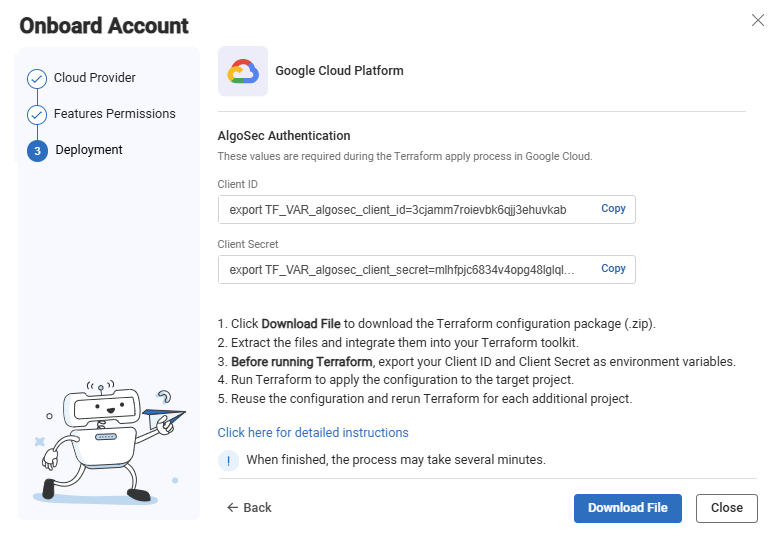
- Click Download File. The zip file that contains the terraform template is downloaded to your machine. You will use it later in these steps.
-
Copy the Client ID and Client Secret to also be used later in these steps.
-
Click Close to close the wizard.
-
Run the Google Cloud CLI and log in to your GCP Project.
-
Upload the zip file to a directory of your choice. (If you are updating an existing terraform template, save the zip file in the same directory you used to onboard subscriptions with Terraform, or in the directory that contains your Terraform state file (to learn more about Terraform state, see State).
-
Extract the zip file:
unzip <zip file name>
-
Export the environment variables (Client ID and Client Secret) that you saved previously:
export TF_VAR_algosec_client_id=<Client ID> export TF_VAR_algosec_client_secret=<Client Secret>
-
If you have enabled, CD Mitigation:
-
If you already have a topic named “gcr”, run:
terraform import google_pubsub_topic.gcr projects/<Project ID>/topics/gcr
before executing terraform apply.
-
Make sure that you have a Compute Engine service account (<PROJECT_NUMBER>[email protected]) in the project.
-
-
Run:
terraform init
-
Run one of the following:
-
To apply on the current project:
terraform apply
-
To apply on another project:
terraform apply -var="project_id=<Project ID>"
-
-
When prompted to approve the changes, type Yes and press Enter. Terraform resources and permissions are updated.
Open Permissions Diagnostics to confirm that the account/subscription/project meets the requirements for the ACE scan types you want to run, and use the remediation links to complete any required setup.
Permissions required for Google Cloud
Notes:
-
When using the "With script" onboarding method: APIs are automatically enabled. If you want to remove the write permission serviceusage.serviceUsageAdmin, you can do so, but you will need to manually enable the following APIs for each Project.
-
When using the "No script" onboarding method, the following APIs must be enabled for each Project before adding the Google Cloud permissions listed in the table below. For details, see Step 2 in To Onboard Google Cloud resources | No script.
Important: Missing permissions can cause ACE to malfunction and lead to data inconsistencies. AlgoSec is not responsible for any issues arising from missing permissions.
See Permissions Required for Google Cloud Projects.
Enable Google Cloud logs
By enabling Google Cloud logs, ACE can retrieve and analyze logs. This provides data, shown on the Risks page and Network Policy page, such as the date each rule was last used.
Do the following:
-
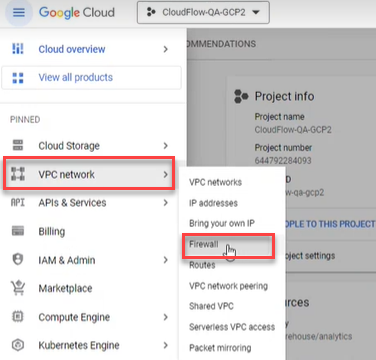
In the Google Cloud console, select VPC network > Firewall.
-
Click the firewall selector at the top of the page.
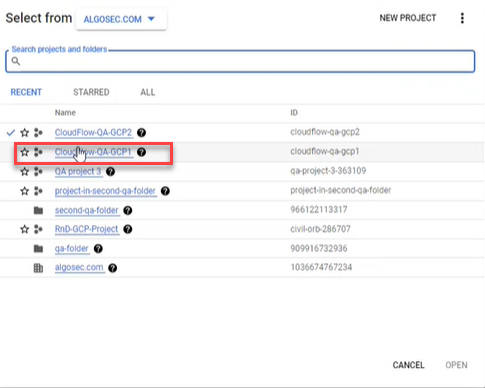
The Select From dialog appears.

-
Select the firewall whose rules you want to log.
-
Select the rules.
Enable Google Cloud logs for rules in a local firewall policy
-
Use the checkbox to the left of the rule name to select individual rules. To select all rules in the project, click the checkbox in the header. Then click CONFIGURE LOGS.
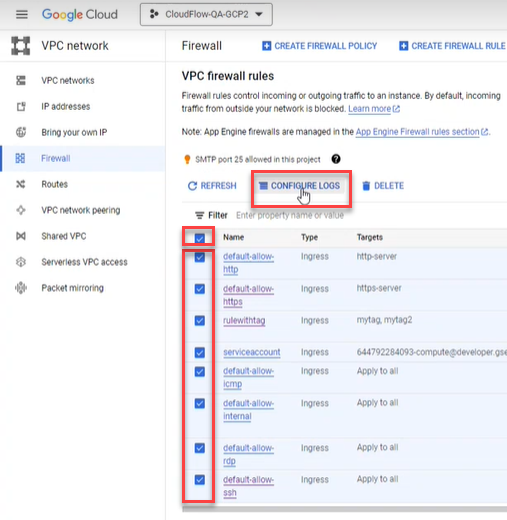
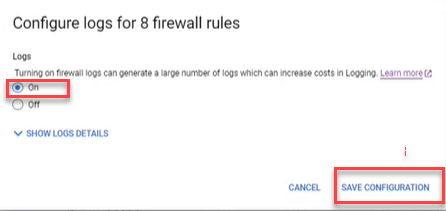
-
In the popup that appears, select On. Then click SAVE CONFIGURATION.
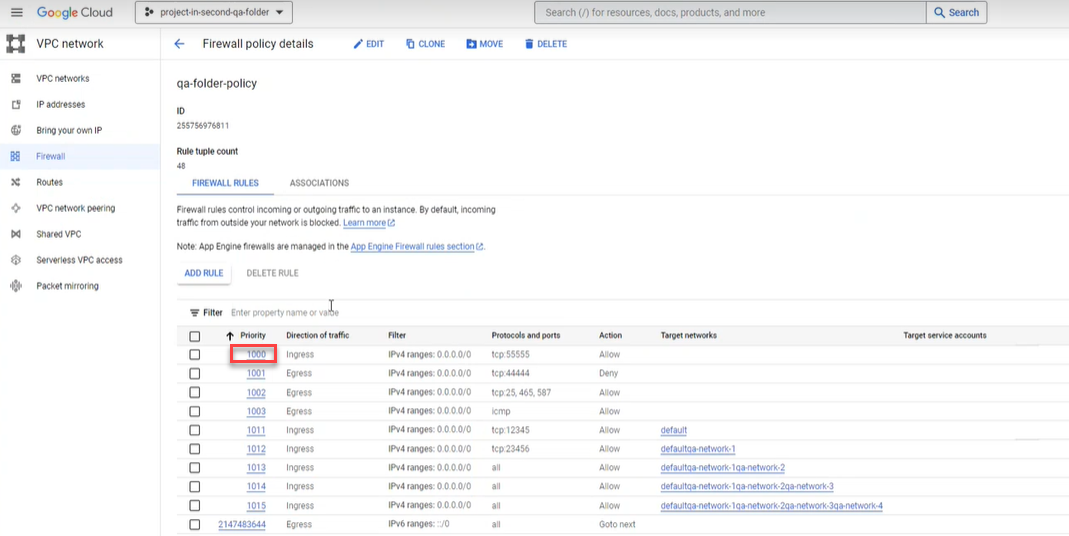
Enable Google Cloud logs for rules in a hierarchical policy
Note: Traffic logs for rules in hierarchical policies are only collected for projects that have been onboarded to ACE.
Note: Each rule in a hierarchical policy must be edited separately.
-
Click the Priority number of the rule
-
Click EDIT.
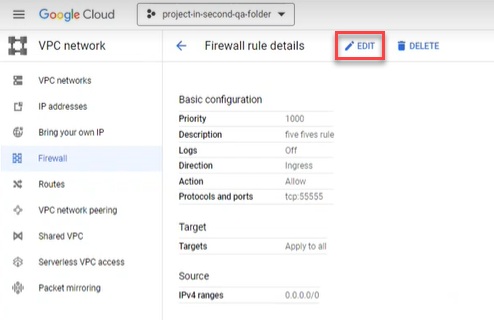
-
Under Logs, select On. Scroll to the bottom and click SAVE.

-
â See also:
