Manage workflows
This topic describes how to manage workflows created in VisualFlow.
Add workflows
Adding new workflows is done by creating a copy of an existing workflow and then modifying the copy.
Do the following:
-
In the VisualFlow main menu, click Workflows.
The List of Workflows page is displayed.
-
Next to an existing workflow on which you would like to base the new workflow, click Duplicate.
-
Click OK.
A new workflow appears at the bottom of the workflows list. Its name is OriginalWorkflow-Copy-Number, where:
- OriginalWorkflow is the name of the workflow you copied.
- Number is a number used to differentiate between copies of the duplicated workflow.
A confirmation message appears.
 Example
For example, if you duplicated the Standard workflow, and there is already a workflow called Standard-Copy-1, then the new workflow will be called Standard-Copy-2.
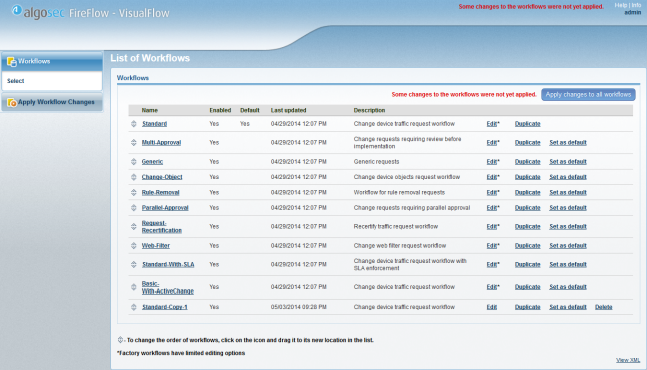
A message at the top of the screen informs you that changes have been made to the workflows.
-
Do one of the following:
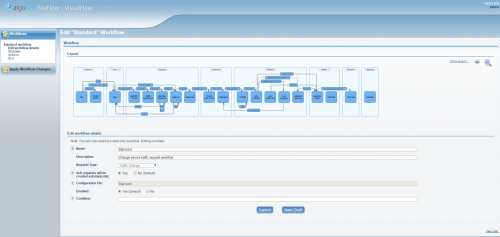
- Next to the new workflow, click Edit.
- Click on the workflow's name.
The Edit Workflow page opens with the workflow's details.
-
In the Edit workflow details area, complete the fields using the information in Workflow Details Fields (see Workflow Details Fields).
-
Click Save Draft.
-
Add, edit, and delete workflow statuses as desired.
Continue with any of the following:

|
In this field... |
Do this... |
|---|---|
|
Name |
Type a name for the workflow. |
|
Description |
Type a description of the workflow. |
|
Request Type |
Select the request type for the workflow. The workflow can only be used with request templates with the same request type. Note: After upgrading to version 6.6, define request types for all custom workflows. While upgrading to versions 6.7 and higher, if there are workflows without specified request types, a warning appears. |
|
Sub requests will be created automatically |
Select this to create sub-requests automatically. This is relevant for Request type: Traffic change. This enables you to automatically create per-devices requests, after the Initial Plan stage, without having to wait for the results to be displayed. |
|
Configuration File |
Type a prefix for the workflow file name associated with this workflow. The workflow file is named Prefix_Config.xml, where Prefix is the string you enter in this field. By default, the prefix is the workflow's name. |
|
Enabled |
Specify whether this workflow should be enabled, by choosing one of the following:
The default value is Yes. |
|
Condition |
Type the condition under which a workflow should be assigned to change requests, when the change request's template does not specify a workflow. For more details, see Workflow condition syntax. |
Edit workflows
Note: You can edit the workflow details of built-in workflows; however, you cannot change their statuses and actions.
Do the following:
-
In the VisualFlow main menu, click Workflows.
The List of Workflows page is displayed.
-
Do one of the following:
- Next to the new workflow, click Edit.
- Click on the workflow's name.
The Edit Workflow page opens with the workflow's details.
-
To edit the workflow's details, do the following:
-
In the Edit workflow details area, complete the fields as needed. For details, see Workflow Details Fields.
-
Click Save Draft.
A message at the top of the screen informs you that changes have been made to the workflows.
-
Continue with any of the following:
Workflow condition syntax
A workflow's Condition field contains a query that specifies the condition under which the workflow should be assigned to change requests when the change request's template does not specify a workflow. The query is composed of pairs in the following format:
field = 'value'
Priority = '1'
You can use != to indicate "not". For example, the following query specifies that the change request must not have a priority of "1":
Priority != '1'
It is possible to use Boolean operators between field-value pairs.
For example, the following query specifies that the change request priority must be "1", and the owner must be John Smith:
Priority = '1' AND Owner = 'John Smith'
For more intricate queries, you can use parentheses to group field-value pairs and operators. For example, the following query specifies that the change request priority must be "1" or "2", and the owner must be John Smith or Sue Michaels.
(Priority = '1' OR Priority = '2') AND (Owner = 'John Smith' OR Owner = 'Sue Michaels')
There are two types of supported fields:
-
Standard fields. These fields should be written as they appear in Standard Fields (see Standard Fields ). For example:
Subject = 'Allow Web Access'
-
Custom fields. These fields include those listed in Custom Fields (see Custom Fields ), as well as any fields added by users. They should be used in the following format:
'CF.{field}'
Where field is the name of the custom field.
For example:
'CF.{Firewall Brand}' = 'Check Point'
|
Field |
Description |
|---|---|
|
Id |
The change request ID number. |
|
Subject |
The change request subject. |
|
Content |
Text that appears in the original change request description or in a comment or reply added to the change request. |
|
Content-Type |
The file type of an attachment attached to the change request. |
|
Filename |
The filename of an attachment for the change request. |
|
Status |
The change request status. |
|
Owner |
The user who is the current change request owner. |
|
Creator |
The user who is the change request creator. |
|
LastUpdatedBy |
The user who last updated the change request. |
|
Requestor.EmailAddress |
The requestor's email address. |
|
Requestor.Name |
The requestor's username. |
|
Requestor.RealName |
The requestor's full name. |
|
Requestor.Nickname |
The requestor's nickname. |
|
Requestor.Organization |
The requestor's organization. |
|
Requestor.Address1 |
The requestor's primary mailing address. |
|
Requestor.Address2 |
The requestor's secondary mailing address. |
|
Requestor.WorkPhone |
The requestor's office telephone number. |
|
Requestor.HomePhone |
The requestor's home telephone number. |
|
Requestor.MobilePhone |
The requestor's mobile telephone number. |
|
Requestor.PagerPhone |
The requestor's pager telephone number. |
|
Requestor.id |
The requestor's ID. |
|
Cc.EmailAddress |
The email address of a user who receives copies of email messages for the change request. |
|
Cc.Name |
The username of a user who receives copies of email messages for the change request. |
|
Cc.RealName |
The full name of a user who receives copies of email messages for the change request. |
|
Cc.Nickname |
The nickname of a user who receives copies of email messages for the change request. |
|
Cc.Organization |
The organization of a user who receives copies of email messages for the change request. |
|
Cc.Address1 |
The primary mailing address of a user who receives copies of email messages for the change request. |
|
Cc.Address2 |
The secondary mailing address of a user who receives copies of email messages for the change request. |
|
Cc.WorkPhone |
The office telephone number of a user who receives copies of email messages for the change request. |
|
Cc.HomePhone |
The home telephone number of a user who receives copies of email messages for the change request. |
|
Cc.MobilePhone |
The mobile telephone number of a user who receives copies of email messages for the change request. |
|
Cc.PagerPhone |
The pager telephone number of a user who receives copies of email messages for the change request. |
|
Cc.id |
The ID of a user who receives copies of email messages for the change request. |
|
Owner.EmailAddress |
The owner's email address. |
|
Owner.Name |
The owner's username. |
|
Owner.RealName |
The owner's full name. |
|
Owner.Nickname |
The owner's nickname. |
|
Owner.Organization |
The owner's organization. |
|
Owner.Address1 |
The owner's primary mailing address. |
|
Owner.Address2 |
The owner's secondary mailing address. |
|
Owner.WorkPhone |
The owner's office telephone number. |
|
Owner.HomePhone |
The owner's home telephone number. |
|
Owner.MobilePhone |
The owner's mobile telephone number. |
|
Owner.PagerPhone |
The owner's pager telephone number. |
|
Owner.id |
The owner's ID. |
|
Created |
The date on which the change request was created. |
|
Resolved |
The date on which the change request was resolved. |
|
Last.Updated |
The date on which the change request was last updated. |
|
Due |
The change request's due date. |
|
Priority |
The change request's priority. |
|
RefersTo |
The ID numbers of change requests to which this change request refers, separated by spaces. |
|
ReferredToBy |
The ID numbers of change requests that refer to this change request, separated by spaces. |
|
Field |
Description |
|---|---|
|
Expires |
The date on which this change request will expire. |
|
Requested Source |
The IP address, IP range, network, or device object, as specified in the original request. |
|
Requested Destination |
The IP address, IP range, network, device object, as specified in the original request. |
|
Requested Service |
The device service or port for the connection, as specified in the original request. |
|
Requested Action |
The device action to perform for the connection, as specified in the original request. |
|
Requested Source NAT |
The source NAT value to which the connection's source should be translated, as specified in the original request. |
|
Ticket Template Name |
The name of the change request's template. |
|
Requested Destination NAT |
The destination NAT value to which the connection's destination should be translated, as specified in the original request. |
|
Requested Port Translation |
The port value to which the connection's port should be translated, as specified in the original request. |
|
Workflow |
The workflow assigned to the change request. |
|
Owning Role |
The user role that currently owns the change request. |
|
Requested NAT Type |
The type of NAT (Static or Dynamic), as specified in the original request. |
|
CMS ticket id |
The ID number of a related change request in an external change management system that is integrated with FireFlow. |
|
Firewall Name |
The name of the device. |
|
Firewall IP Address |
The IP address of the device. |
|
Firewall Brand |
The device vendor. |
|
Firewall Management Server |
The device management server name. |
|
Firewall Policy |
The device security policy. |
|
Firewall Last Report |
The last report generated for the device. |
|
Firewall Last Report Date |
The date and time at which the last report for this device was generated. |
|
Change Description |
The change description. |
|
Change Source |
The IP address, IP range, network, or device object, as planned during the Plan stage. |
|
Change Destination |
The IP address, IP range, network, or device object, as planned during the Plan stage. |
|
Change Service |
The device service or port for the connection, as planned during the Plan stage. |
|
Change Action |
The device action to perform for the connection, as planned during the Plan stage. |
|
Change Source NAT |
The source NAT value to which the connection's source should be translated, as planned during the Plan stage. |
|
Change Destination NAT |
The destination NAT value to which the connection's destination should be translated, as planned during the Plan stage. |
|
Change Port Translation |
The port value to which the connection's port should be translated, as planned during the Plan stage. |
|
Change NAT Type |
The type of NAT (Static or Dynamic), as planned during the Plan stage. |
|
Change Implementation Notes |
The words that appear in the change request's implementation notes, if the change request has completed the Implement stage. |
|
Request Risk Check Result |
The number and/or and severity of risks that implementation of the planned change would entail. |
|
Initial Plan Result |
The results of initial planning. |
|
Form Type |
The type of form used for the change request (Traffic Change, Object Change, or Generic Change). |
|
Change Validation Result |
The results of change validation. |
|
Risks Number |
The number of risks detected for the planned change, if the change request has completed the risk check in the Approve stage. |
|
Risks Details |
Details about the risks detected for the planned change, if the change request has completed the risk check in the Approve stage. |
|
Translated Source |
The change request's source, as translated to IP addresses. |
|
Requested Object Action |
The requested action in an object change request.
|
|
Translated Destination |
The change request's destination, as translated to IP addresses. |
|
Change Object Action |
The action for an object change request, as specified during the Plan stage.
|
|
Translated Service |
The change request's service, as translated to ports. |
|
Requested Object Name |
An object's name, as specified in the original object change request. |
|
Automatically Implemented |
An indication of whether the requested change should be automatically implemented. |
|
Change Object Name |
An object's name, as specified for an object change request in the Plan stage. |
|
Already Works Firewalls |
The devices on which the requested change already works. |
|
Requested IPs To Add |
The IP addresses or protocols to add to an object, as specified in the original object change request. |
|
Change IPs To Add |
The IP addresses or protocols to add to an object, as specified for an object change request in the Plan stage. |
|
Requested IPs To Remove |
The IP addresses or protocols to remove from an object, as specified in the original object change request. |
|
Change IPs To Remove |
The IP addresses or protocols to remove from an object, as specified for an object change request in the Plan stage. |
|
Requested Object Scope |
The object scope, as specified in the original object change request. |
|
Change Object Scope |
The object scope, as specified for an object change request in the Plan stage. |
|
Is Work Order Editable |
An indication of whether the work order is editable. |
|
Is Active Change Applicable |
An indication of whether ActiveChange can be used to implement the requested change. |
|
Object Change Validation Result |
The results of object change validation. |
|
Create tickets from attachment |
An indication of whether the change request was created from a file. |
|
Affected Rules Result |
The device rules that are affected by a suggested object change request. |
|
Firewall Provider-1 |
The name or IP address of the MDSM managing the device. This field is relevant for Check Point devices only. |
Supported boolean operators include the following:
|
Operator |
Description |
|---|---|
|
AND |
Both of the field-value pairs joined by this operator must be true. In the following example, the condition is only met for new change requests owned by John Smith: Status = 'new' AND Owner = 'John Smith' |
|
OR |
One or both of the field-value pairs joined by this operator must be true. In the following example, the condition is met for change requests that are new, change requests that are owned by John Smith, and new change requests owned by John Smith: Status = 'new' OR Owner = 'John Smith' |
In the following example, the workflow will be assigned when the change request's template does not specify a workflow, and one of the following conditions are met:
- The change request's priority is greater than 7.
- The requestor's email address includes the string "company.com".
- The value of the custom field called "Project" is "Infrastructure".
(Priority > 7) OR (Requestor.EmailAddress LIKE 'company.com') OR ('CF.{Project}' = 'Infrastructure')
Reorder workflows
You can control the order in which workflows appear in VisualFlow.
Do the following:
-
In the VisualFlow main menu, click Workflows.
The List of Workflows page is displayed.
-
In the list of workflows, click
 next to a workflow you want to move, and drag it to the desired location in the list.
Setting a default workflow
When FireFlow fails to assign a workflow based on a change request’s template or workflow conditions, it automatically uses the default workflow.
Only one workflow can be the set as the default workflow. By default, the Basic workflow is the default workflow.
Note: For FireFlow installations v6.4 and older, the default workflow is the Standard workflow. Upgrading from v6.4 or below will not set the Basic workflow as the default.
Do the following:
-
In the VisualFlow main menu, click Workflows.
The List of Workflows page is displayed.
-
Next to the desired workflow, click Set as default.
-
Click on the workflow's name.
The workflow is marked as the default workflow in the Default column.
Delete workflows
Note: You cannot delete built-in workflows. For more details, see Built-in workflows.
Note: If you delete a workflow, then any change requests that are assigned to that workflow will be re-assigned to the default workflow the next time they are accessed. Furthermore, if their current status does not exist in the default workflow, the change requests will transition to the "new" status.
Do the following:
-
In the VisualFlow main menu, click Workflows.
The List of Workflows page is displayed.
-
Next to the desired workflow, click Delete.
A confirmation message appears.
-
Click OK.
The workflow is deleted.
A message at the top of the screen informs you that changes have been made to the workflows.
