IaC Connectivity Risk Analysis
This topic describes how to set up and use AlgoSec’s IaC (Infrastructure-as-Code) Connectivity Risk Analysis.
The IaC Connectivity Risk Analysis is an extensible security plug in platform that checks code for potential vulnerabilities before being implemented on the cloud infrastructure. It accelerates application delivery by taking a proactive, preventive, and collaborative approach within your CI/CD pipeline.
Developers get a clear view of risks and receive clear remediation steps while working in the source control applications. This way they don’t need to move to different applications or wait for security admin to manually review and approve that the code is risk free to progress in their work.
The analysis runs each time a Pull Request (in GitHub) or Merge Request (in GitLab) is created. The analysis result appears in the comments. For example, one critical risk was found in the code in GitHub:
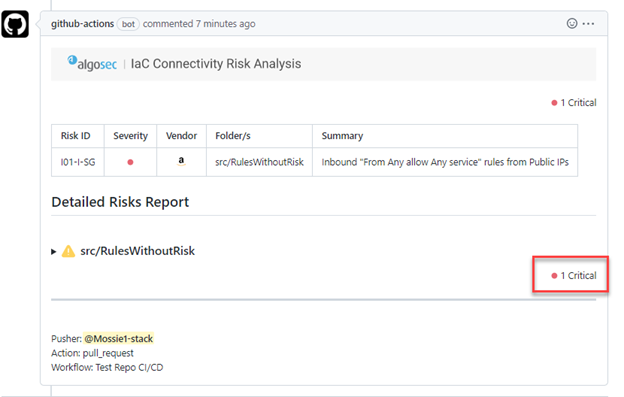
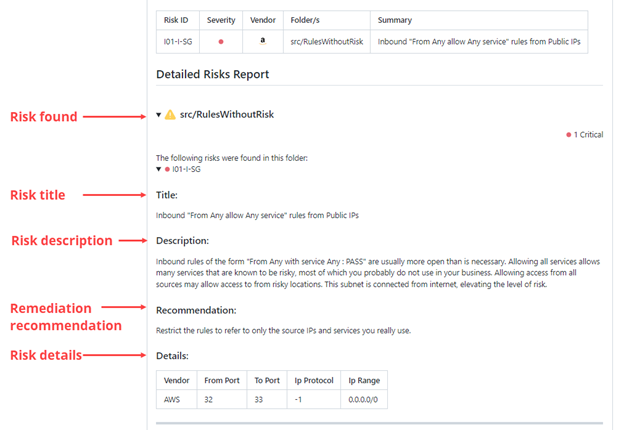
Expand the risk in the Detailed Risk report section to see information and remediation steps:
Integrations
The IaC Connectivity Risk Analysis integrates with the following:
| Supported Code repositories | GitHub, GitLab |
| Supported CI/CD systems | GitHub Workflow, GitLab CI/CD |
| Supported IaC providers | Terraform |
| Supported Cloud providers | AWS, Azure, Google Cloud |
Set up the IaC Connectivity Risk Analysis
For admin and advanced users
Do the following:
-
If you don’t have a GitHub account, create one now.
-
Log in to AppViz as user admin. Make sure to write down the tenant ID you are using for later on in this procedure.
-
Add a new API Access Key. See Add a new API Access Key.
-
Click on the vertical ellipsis (
 ) to the right of the newly created access key.
 -
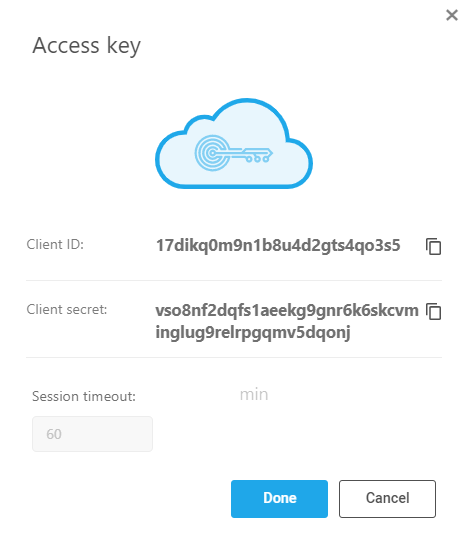
On the options pop-up menu that is displayed, click View. Save the Client ID and Client Secret for later on in this procedure.
-
Log in to GitHub.
-
In your GitHub Repository, create a new main.yml workflow in the following path:
<Repo Name>/.github/workflows/main.yml
-
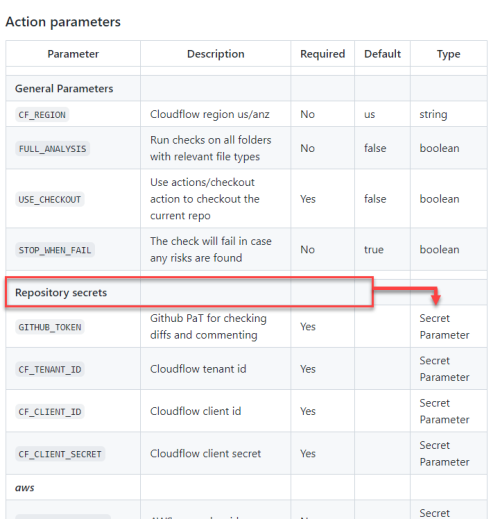
Edit the yaml file specifying the the cloud platforms that you want to work with (AWS/Azure/Google Cloud) and entering the Tenant ID, Client ID, Client Secret and API Access Key that you saved previously. For instructions for editing the yaml file, see IAC connectivity risk analysis in the GitHub Marketplace.
-
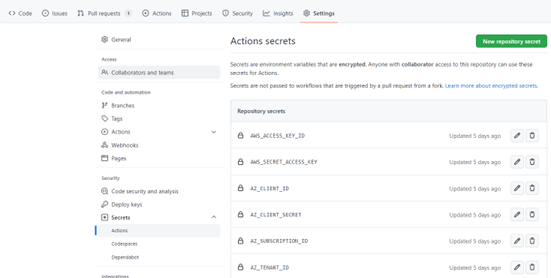
In GitHub Settings, select Secrets > Actions. GitHub Action Secrets appears.
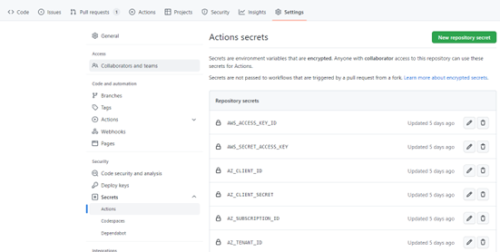
-
In GitHub Action Secrets, add the Repository Secrets. Get the Repository Secrets to add from IAC connectivity risk analysis in the GitHub Marketplace.


Do the following:
-
If you don’t have a GitLab account, create one now.
-
Log in to AppViz as user admin. Make sure to write down the tenant ID you are using for later on in this procedure.
-
Add a new API Access Key. See Add a new API Access Key.
-
Click on the vertical ellipsis (
) to the right of the newly created access key. -
On the options pop-up menu that is displayed, click View. Save the Client ID and Client Secret for later on in this procedure.
-
Log in to GitLab.
-
Create a GitLab personal access token:
-
In GitLab, select your avatar in the upper right-hand corner.
-
Select Edit profile.
-
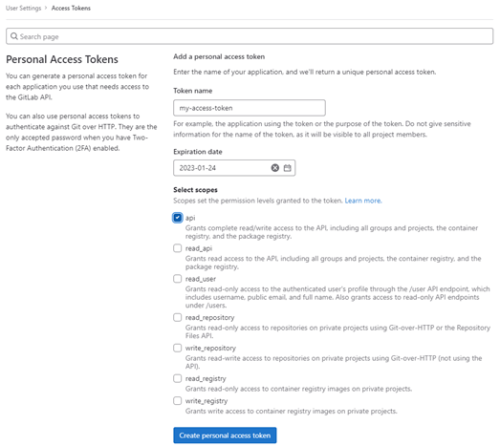
On the left sidebar, Select Access Tokens. The Personal Access Tokens screen appears.
-
Add a Token name and optional Expiry date for the token.
-
Select the API checkbox.
-
Click Create personal access token. Your access token appears.
-
Copy your new personal access token and save it for later.
To create a Project Access Token
-
-
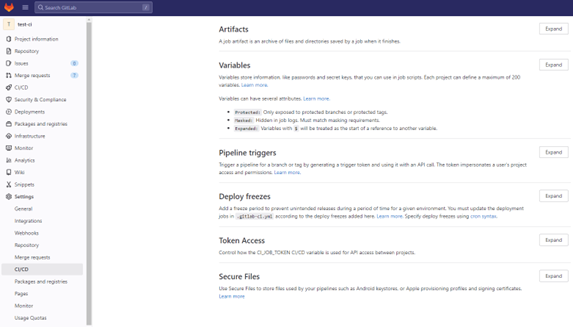
In the GitLab left sidebar, select Settings > CI/CD. The CI/CD Settings appear.

-
Expand the Variables section. Click Add variable and add the following keys and their values:
Repository Secrets:
Key
Description
Required
GITLAB_TOKEN
GitLab PaT for checking diffs and adding comments to Merge Requests
Yes
CF_TENANT_ID
AppViz Tenant ID
Yes
CF_CLIENT_ID
AppViz Client ID
Yes
CF_CLIENT_SECRET
AppViz Client Secret
Yes
Add from the following list, the keys associated with the vendor you are using:
Cloud Provider Secrets:
Key
Description
Required
Type
AWS
AWS_ACCESS_KEY_ID
AWS Access Key ID
Yes (for AWS)
String
AWS_SECRET_ACCESS_KEY
AWS Secret Access Key
Yes (for AWS)
String
Azure
ARM_SUBSCRIPTION_ID
Azure Subscription ID
Yes (for Azure)
String
ARM_TENANT_ID
Azure Tenant ID
Yes (for Azure)
String
ARM_CLIENT_ID
Azure Access Client ID
Yes (for Azure)
String
ARM_CLIENT_SECRET
Azure Client Secret
Yes (for Azure)
String
Google Cloud
GOOGLE_APPLICATION_CREDENTIALS
Google's Cloud Credentials
Yes (for Google Cloud)
JSON
-
In your GitLab Repository, add the iac-connectivity-risk-analysis job in the .gitlab-ci.yml file. You can add it to the stage you choose. In this example the IaC connectivity risk analysis is added to the test stage:
stages: - test iac-connectivity-risk-analysis: stage: test image: public.ecr.aws/algosec/connectivity-risk-analysis:latest rules: - if: $CI_PIPELINE_SOURCE == 'merge_request_event' && $CI_MERGE_REQUEST_TARGET_BRANCH_NAME == $CI_DEFAULT_BRANCH script: - iac-risk-analysis -
Additional Parameters (Optional)
There are a few additional parameters that can customize the IaC Connectivity Risk Analysis job. These can be specified in the .gitlab-ci.yml file as job variables (example below):
Additional Parameters
Key
Description
Required
Default Value
CF_REGION
AppViz Region us/anz/eu
No
us
FULL_ANALYSIS
Run checks on all folders with relevant file types
No
false
STOP_WHEN_FAIL
The check will fail in case any risks are found
No
true
TF_VERSION Specify the Terraform version to use (e.g. 1.4.5) No latest The following example shows how to add these variables to the job definition: In this case, the AppViz tenant is in the ANZ region, and you want to run a full analysis (instead of analyzing only changed files in your Merge Request):
stages:
  - test
iac-connectivity-risk-analysis:
  stage: test
  image: public.ecr.aws/algosec/connectivity-risk-analysis:latest
  rules:
    - if: $CI_PIPELINE_SOURCE == 'merge_request_event' && $CI_MERGE_REQUEST_TARGET_BRANCH_NAME == $CI_DEFAULT_BRANCH
  variables:
    CF_REGION: "anz"
    FULL_ANALYSIS: "true"
  script:
    - iac-risk-analysis

Work with the IaC Connectivity Risk Analysis action
For code developers
Once the IaC Connectivity Risk Analysis action is set up, it’s ready for use.
The following instructions explain how to use the IaC Connectivity Risk Analysis in your CI/CD workflow.
Do the following:
-
In your dev environment, upload changes to your developer branch in GitHub.
-
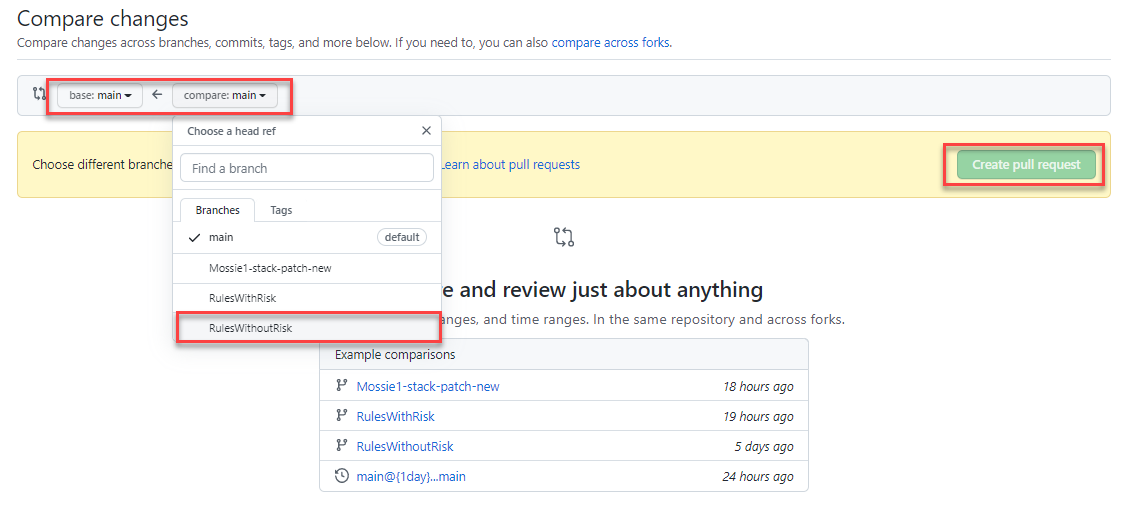
Click the Pull request tab.


-
Click New pull request.

-
Set to compare your working branch to your main (protected) branch. Click Create pull request..

-
Click View pull request
-
The IaC Risk analysis check runs and the analysis results are displayed in the comment opens.

Do the following:
-
In your dev environment, upload changes to your developer branch in GitLab.
-
Click the Merge requests option in the left sidebar.
-
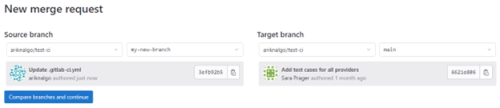
Click New merge request.

-
Select your working branch as the source branch and your main branch as the target. Click Compare changes and continue
-
Click Create merge request
-
A pipeline starts for the merge request and can be viewed from the Merge Request page, or by selecting to CI/CD > Pipelines from the left sidebar.

-
The IaC Risk analysis check runs and the analysis results are displayed in the comment opens.


