This topic describes ObjectFlow analysis capabilities. ObjectFlow uses advanced analysis tools to identify misalignments in object naming and content that could potentially result in security breaches or connectivity outage.
Duplicate objects analysis
Duplicate objects are objects with the same definition but different names. They were created for the same purpose, but were given different names, which could potentially lead to misuse in a policy rule and result in a security breach or connectivity outage. It is important to carefully manage objects to avoid creating duplicates and to ensure that they are used correctly in policy rules.
ObjectFlow Duplicate Object analysis identifies duplicate objects and offers remediation recommendations.
To view duplicate object analysis results:
-
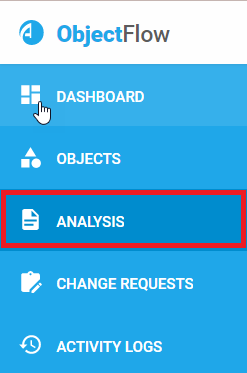
In ObjectFlow, from the main menu on the left, click ANALYSIS.
-
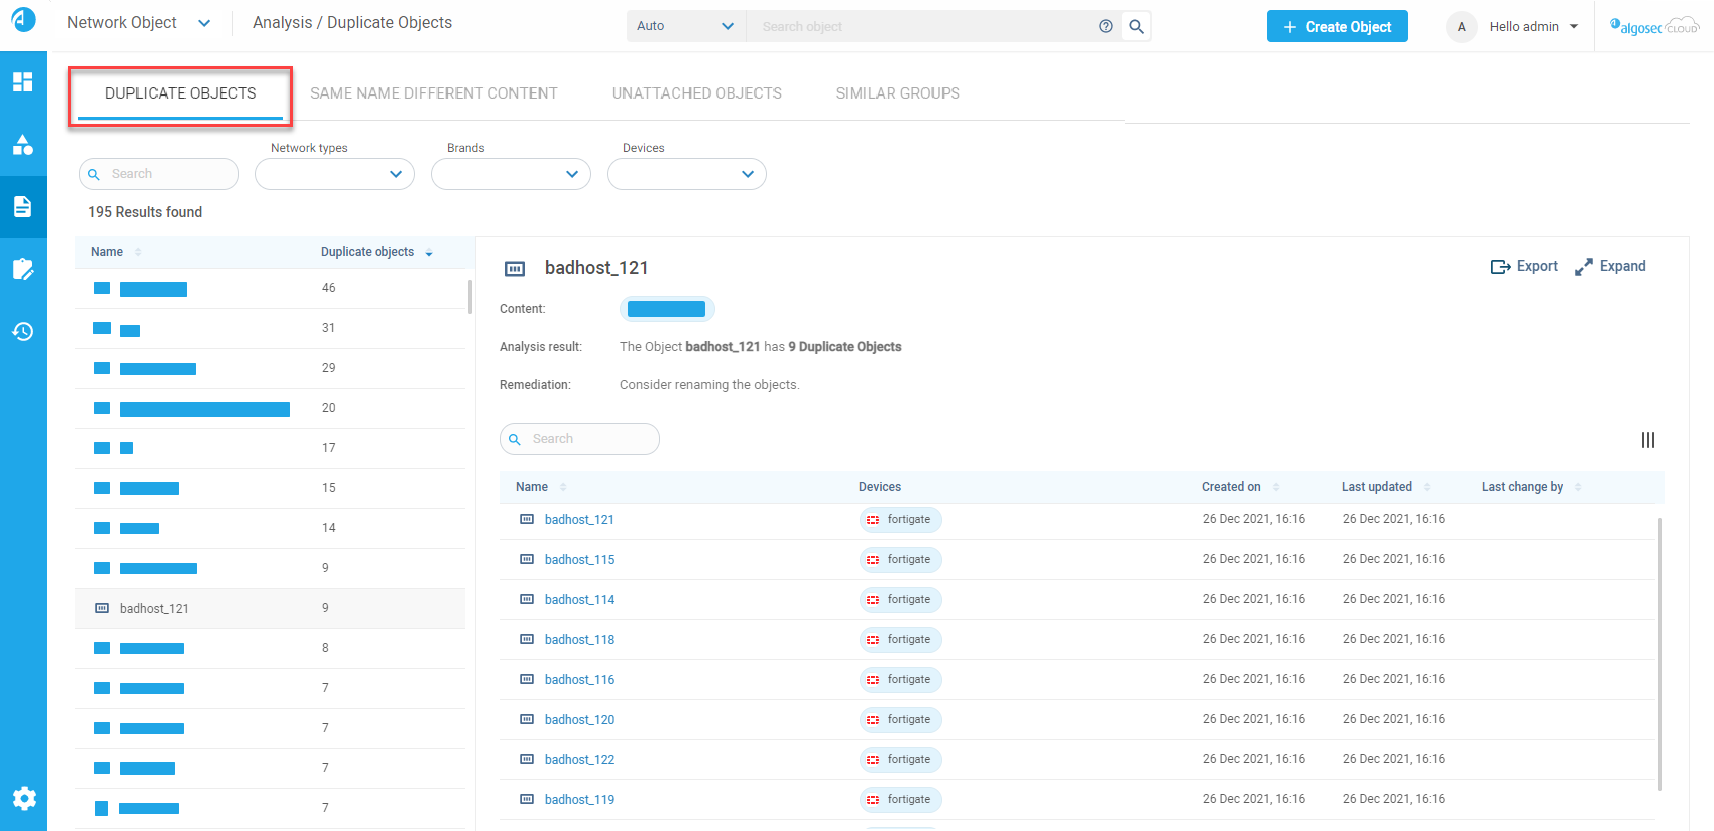
On the Analysis page that opens, click the DUPLICATE OBJECTS tab.
-
Select an object in the results list whose duplicates you wish to view. Duplicate objects data for it is displayed.
Note: Clicking on any of the duplicates will reveal that the content for each one is the same.
Tip: If you enter text in the search box, the entered string is highlighted both in the results list and in the duplicate objects data of the selected object. You can also enter an IP or a range/subnet, to search for content within the objects themselves.
Use the filters to narrow your search.
Customize columns in the results list
You can show, hide, or move columns based on your preference.
Show or hide columns
You can choose from a variety of built-in and custom fields to display in the columns, giving you more flexibility in managing your objects.
Note: Name, Content, and Devices columns are always displayed and cannot be hidden. These columns are greyed out to indicate that they are fixed and cannot be modified
Do the following:
-
Click Columns icon
 at top right of the list to open the column configuration dialog.
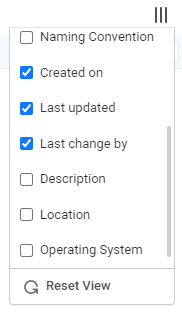
-
In the dialog, select the columns you want to show by checking their corresponding boxes or deselect the columns you want to hide by unchecking their boxes. Alternatively, you can reset the view to the default columns by clicking Reset View. Your new column settings are displayed in the list.
Move a column
-
Hover over the heading of a column, then drag the column left or right to its new position.
Same name different content analysis
Objects with the same name but different definitions are known as "same name different content" objects. They were created for different purposes, but were given the same name, which could potentially lead to misuse in a policy rule and result in a security breach or connectivity outage. It is important to carefully manage objects to avoid creating objects with the same name but different definitions and to ensure that they are used correctly in policy rules.
ObjectFlow Same Name Different Content analysis identifies objects with the same name but with different content and offers remediation recommendations.
Note: If two device objects with the same name have different content, the device on which the objects were defined will be indicated throughout the Web Interface.
To view Same name different content analysis results:
Do the following:
-
In ObjectFlow, from the main menu on the left, click ANALYSIS.
-
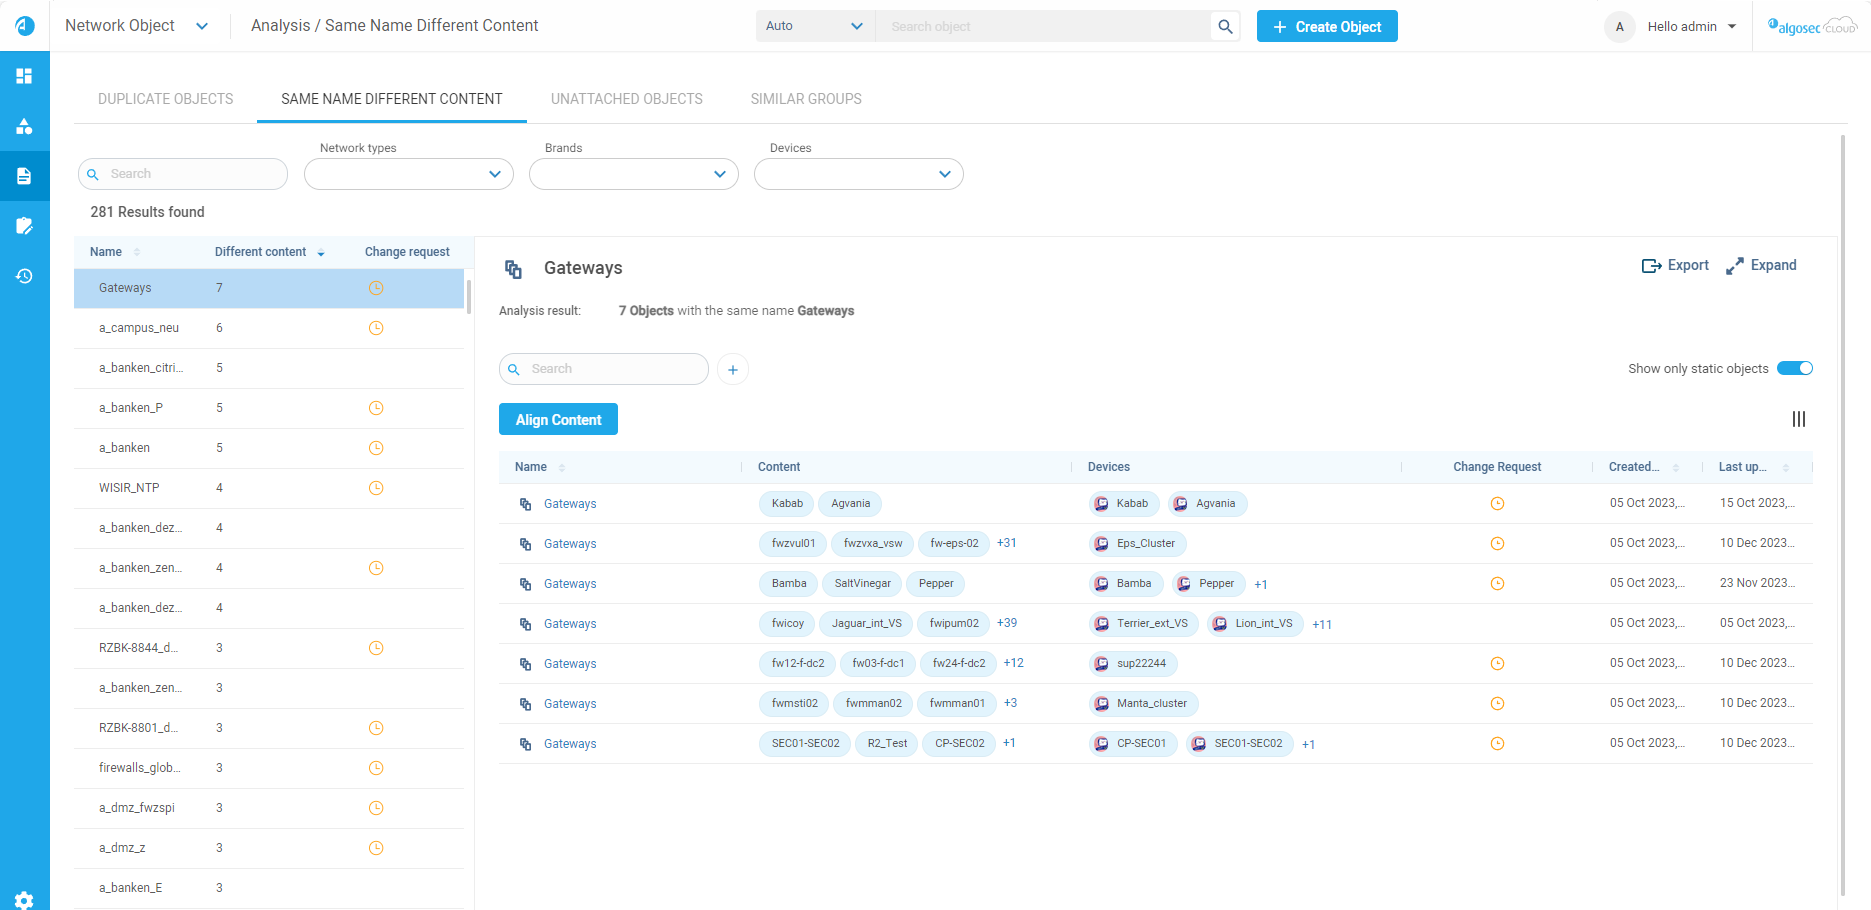
On the Analysis page that opens, click the SAME NAME DIFFERENT CONTENT tab.
-
Select an object whose duplicates you wish to view:
-
Use the filters or search to locate the object
-
Click the object name in the Objects list
-
Activate the Show only static objects toggle to display only static objects
The duplicate objects data is displayed.
-
Filter displayed analysis results
The Objects list includes default and customizable filter selection boxes:
-
Default filters
Default filters include:
-
Network types
-
Brands
-
Devices
-
Object status: Not in a change process / In a change process
-
You can select one or more items from the dropdown of the filter box. At the bottom of each filter box, select from these options:
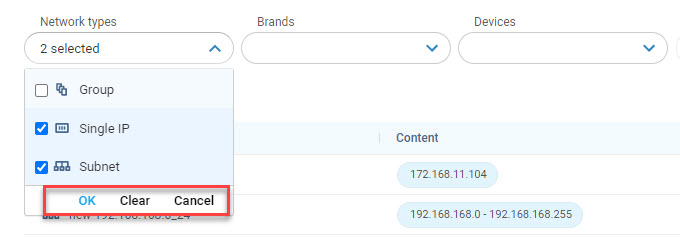
| Option | Description |
|---|---|
| OK | Accepts the current selection, refreshes the list and closes the dropdown |
| Clear / Reset | Reverts to the previous selection of the filter / The date picker is reset to initial state and closed |
| Cancel | Clear the current selection of the filter |
Tip: Date of last update filter: to set start and end date as the same day, click the Calendar icon and select same day in the calendar twice.
Customize columns in the results list
You can show, hide, or move columns based on your preference.
Show or hide columns
You can choose from a variety of built-in and custom fields to display in the columns, giving you more flexibility in managing your objects.
Note: Name, Content, and Devices columns are always displayed and cannot be hidden. These columns are greyed out to indicate that they are fixed and cannot be modified
Do the following:
-
Click Columns icon
at top right of the list to open the column configuration dialog.
-
In the dialog, select the columns you want to show by checking their corresponding boxes or deselect the columns you want to hide by unchecking their boxes. Alternatively, you can reset the view to the default columns by clicking Reset View. Your new column settings are displayed in the list.
Move a column
-
Hover over the heading of a column, then drag the column left or right to its new position.
Remediation: Align objects that have the same name but different content
You can align objects with same name but different content right from the analysis results.
Note: Only static objects can be aligned.
Do the following:
-
Filter or search the Same Name Different Content analysis found results, as required. Select an object Name from the results list. Results details appears to the right.
-
Select the Show only static objects toggle.

-
Click
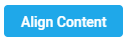 . The Align Content wizard appears.
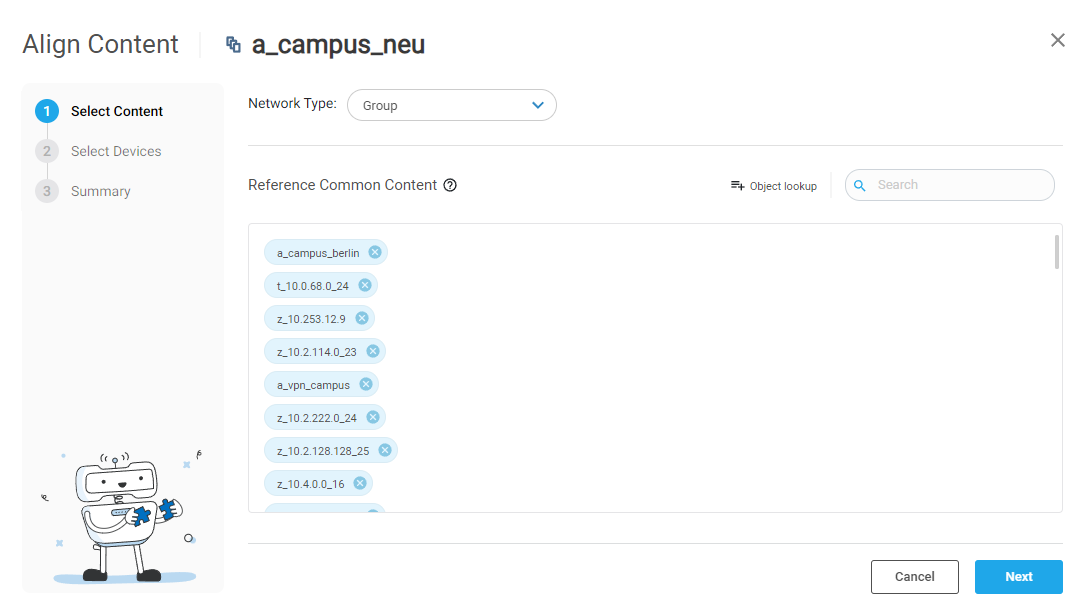
-
Select the Network type of objects that interest you. The Reference Common Content list shows content that is found in the largest number of devices.
-
Click Next. The list of devices to be affected appears.

Devices The name of the device Unchanged Content The remediated object will have this number of members unchanged Added Content The remediated object will have this number of members added Removed Content The remediated object will have this number of members removed -
Select Devices whose content you want to align.
-
Click Next. The summary of the alignment appears.
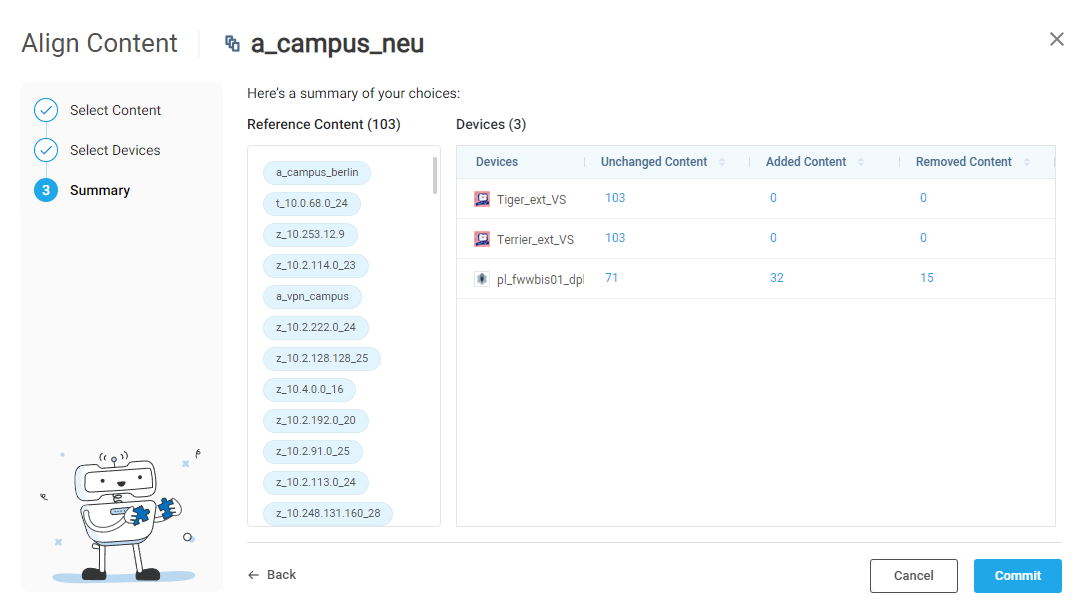
-
Click Commit. The open Change Request window appears.
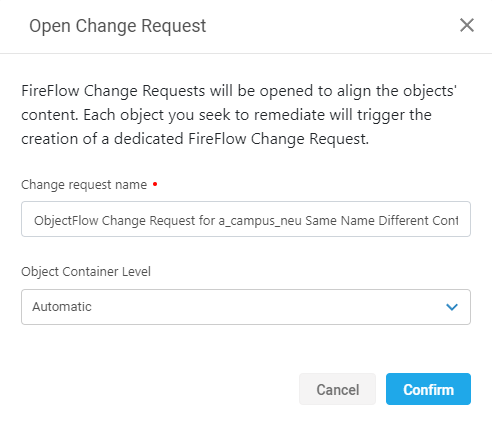
-
Edite the ObjectFlow Change Request Name, if required. The ObjectFlow Change Request Name is the name of Change request in ObjectFlow.
-
Set Object Container Level:
The Object Container Level is the device/management level on which to change the object.
Set it as follows:
Object container level Description Automatic (Default) The level on which to change the object is determined based on an algorithm. Lowest To change the object on the lowest level/individual device. Highest To change the object at the highest level/management.
Note: For Check Point devices, choosing highest will change the object on the CMA, not on the PV1 level (global).
-
Click Confirm. The Change request is opened in ObjectFlow. You can check in FireFlow to see the change request's progress. See To view Change Requests.
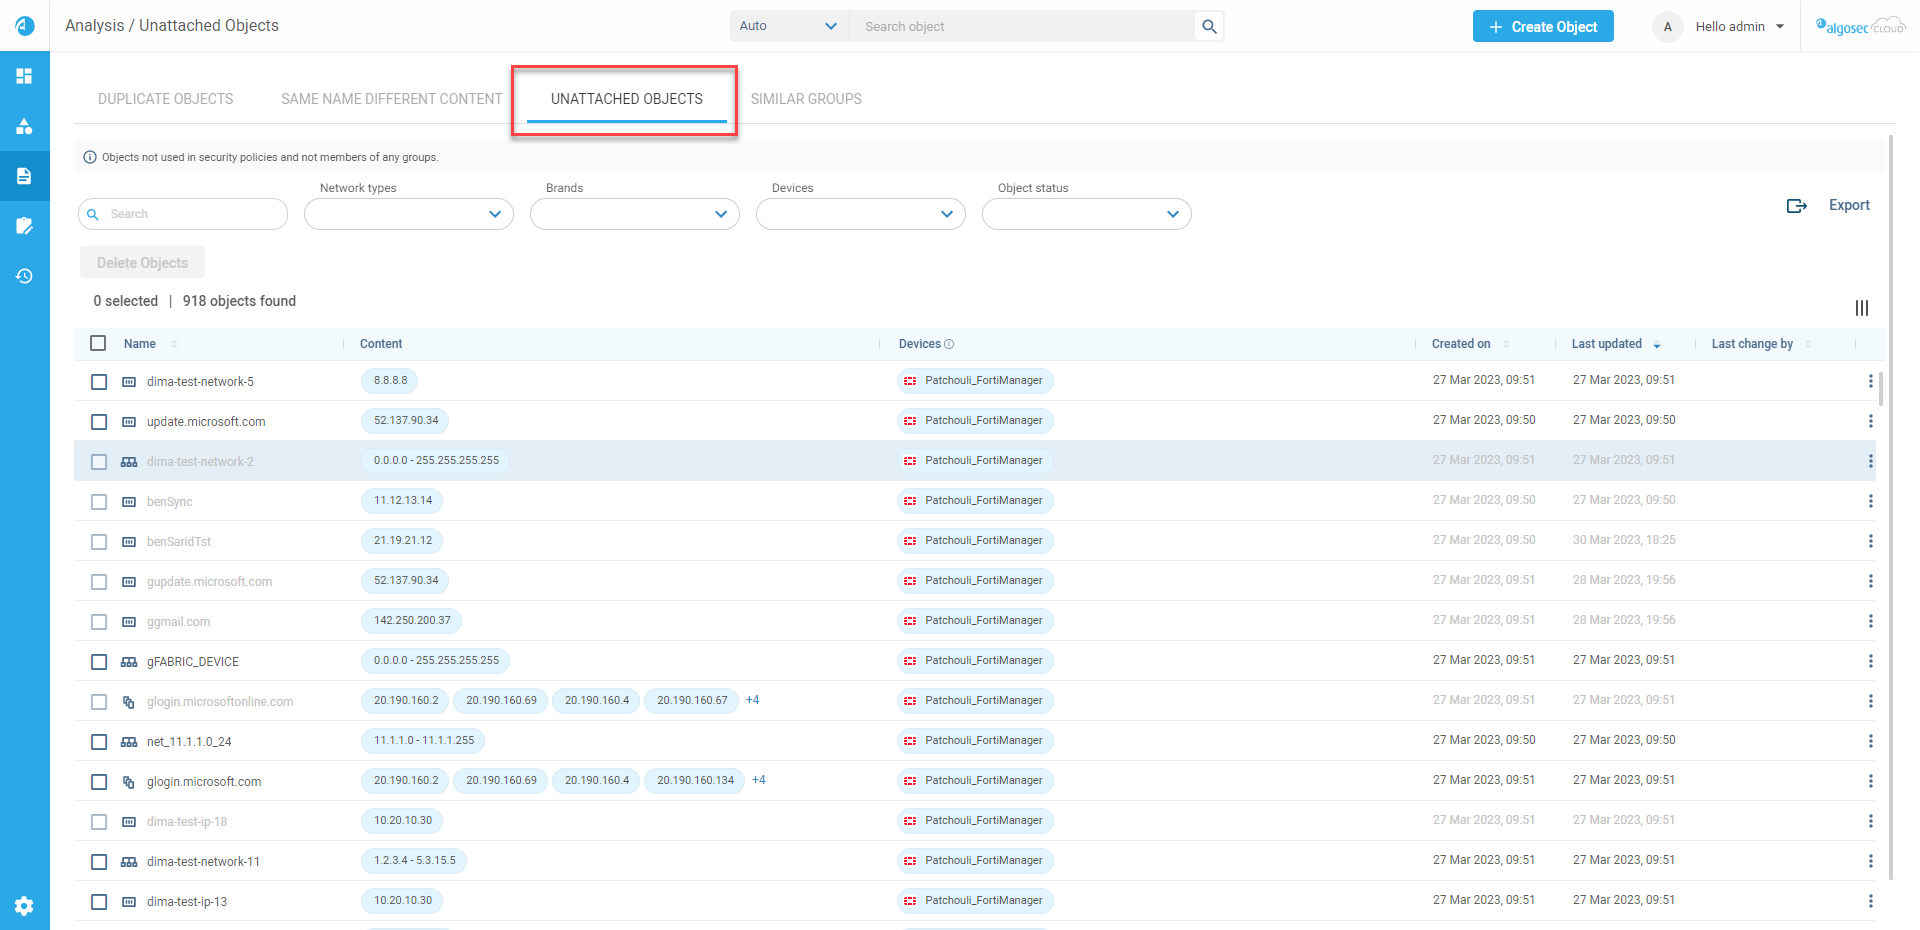
Unattached objects analysis
For network objects only
Unattached network objects are objects that are defined in the firewall's configuration but are not being used by any rules or policies. These objects can create security vulnerabilities because they may be accidentally used by a network operator for a different purpose than intended or exploited by an attacker to bypass the firewall's controls. In addition, unattached network objects are often not properly maintained and may include outdated or incorrect IP addresses that do not match the object's name or purpose. It is important to regularly review and clean up unused or unattached network objects to reduce the risk of security vulnerabilities.
ObjectFlow Unattached Objects analysis identifies unattached objects, for each device. You can remove found unattached objects directly on the Unattached Objects tab (see Remediation: Delete Unattached Objects).
Note: In the results list, grayed-out rows indicate:
-
Objects are on devices that do not support Delete Device in the FireFlow - Multi Device Object Request category. (See the Support Matrix on the Portal for this information)
-
Objects are currently in an open Change Request
To clean your policies, you can delete unattached objects in bulk straight from the Unattached Objects analysis results list.
View Unattached Objects analysis results:
Do the following:
-
On the ObjectFlow main menu, click ANALYSIS.
-
On the Analysis page that opens, click the UNATTACHED OBJECTS tab.
Note: Grayed-out rows indicate, either or both:
-
Objects are on devices that do not support ActiveChange
-
Objects are currently in an open Change Request
-
Unattached Objects analysis search bar
In the Search box above the list of Unattached Objects analysis results, you can filter the displayed results based on search entries.
Search using partial or whole names of any of the following:
-
how to use the search
Filter displayed Unattached Objects analysis results
The Objects list includes default and customizable filter selection boxes:
-
Default filters
Default filters include:
-
Network types
-
Brands
-
Devices
-
Object status: Not in a change process / In a change process
-
-
Customizable filters
You can add filter selection boxes as required:
-
Click the
 button.
 -
Select a filter type from the list. The filter box is added.
-
Add additional filters.
-
To clear a non-default filter selection box, click the x at the right side of the box.
-
To clear all additional filters, click Clear all.
-
-
You can select one or more items from the dropdown of the filter box. At the bottom of each filter box, select from these options:
| Option | Description |
|---|---|
| OK | Accepts the current selection, refreshes the list and closes the dropdown |
| Clear / Reset | Reverts to the previous selection of the filter / The date picker is reset to initial state and closed |
| Cancel | Clear the current selection of the filter |
For the Last updated filter,
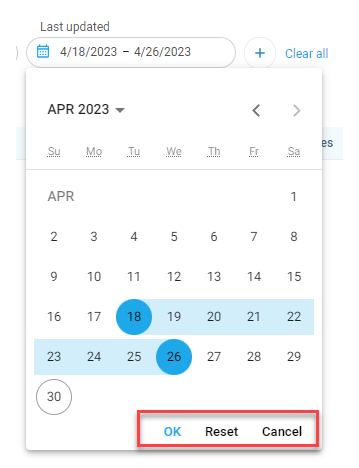
Tip: Date of last update filter: to set start and end date as the same day, click the Calendar icon and select same day in the calendar twice.
Customize columns in the results list
You can show, hide, or move columns based on your preference.
Show or hide columns
You can choose from a variety of built-in and custom fields to display in the columns, giving you more flexibility in managing your objects.
Note: Name, Content, and Devices columns are always displayed and cannot be hidden. These columns are greyed out to indicate that they are fixed and cannot be modified
Do the following:
-
Click Columns icon
at top right of the list to open the column configuration dialog.
-
In the dialog, select the columns you want to show by checking their corresponding boxes or deselect the columns you want to hide by unchecking their boxes. Alternatively, you can reset the view to the default columns by clicking Reset View. Your new column settings are displayed in the list.
Move a column
-
Hover over the heading of a column, then drag the column left or right to its new position.
Remediation: Delete Unattached Objects
You can delete unattached objects in bulk right from the analysis results.
Note: Only objects on device brands that support ActiveChange can be deleted in bulk.
You cannot delete in bulk:
-
Objects on devices that do not support Delete Device in the FireFlow - Multi Device Object Request category. (See the Support Matrix on the Portal for this information)
-
Objects that are currently in an open Change Request
Do the following:
-
Filter or search the Unattached Objects analysis results, as required.
-
Select the checkbox on the header row of the Unattached Objects analysis results to the right of the name to select all objects in the list that are in the available state or check the check box of the specific rows to be deleted.
-
Click Delete Objects. A confirmation dialog appears.
-
Click Yes, open change requests. Change Requests are opened in FireFlow to delete the objects.
Similar groups analysis
For network objects only
Groups that are similar in content may indicate a potential human error, where a new group was created for the same purpose as an existing group with similar content. This can cause issues such as a connectivity outage as a results of missing IPs in objects or a potential security breach due to an unnecessary open path.
ObjectFlow Similar Groups analysis identifies network object groups with high level of similarity of their content.
Similar Groups have high number of members with the same name & content, with the following levels:
| Level | Calculation | Description |
|---|---|---|
| Low | Having 75-80% identical groups | It’s highly likely these were created by mistake |
| Medium | Having 80-87.5% identical groups | Having 80-87.5% identical groups. There’s a good chance these were created by mistake |
| High | Having over 87.5% identical groups | Having 75-80% identical groups. These groups are suspiciously similar. You should investigate further |
To view Similar Groups analysis results:
Do the following:
-
In ObjectFlow, from the main menu on the left, click ANALYSIS.
-
On the Analysis page that opens, click the SIMILAR GROUPS tab.
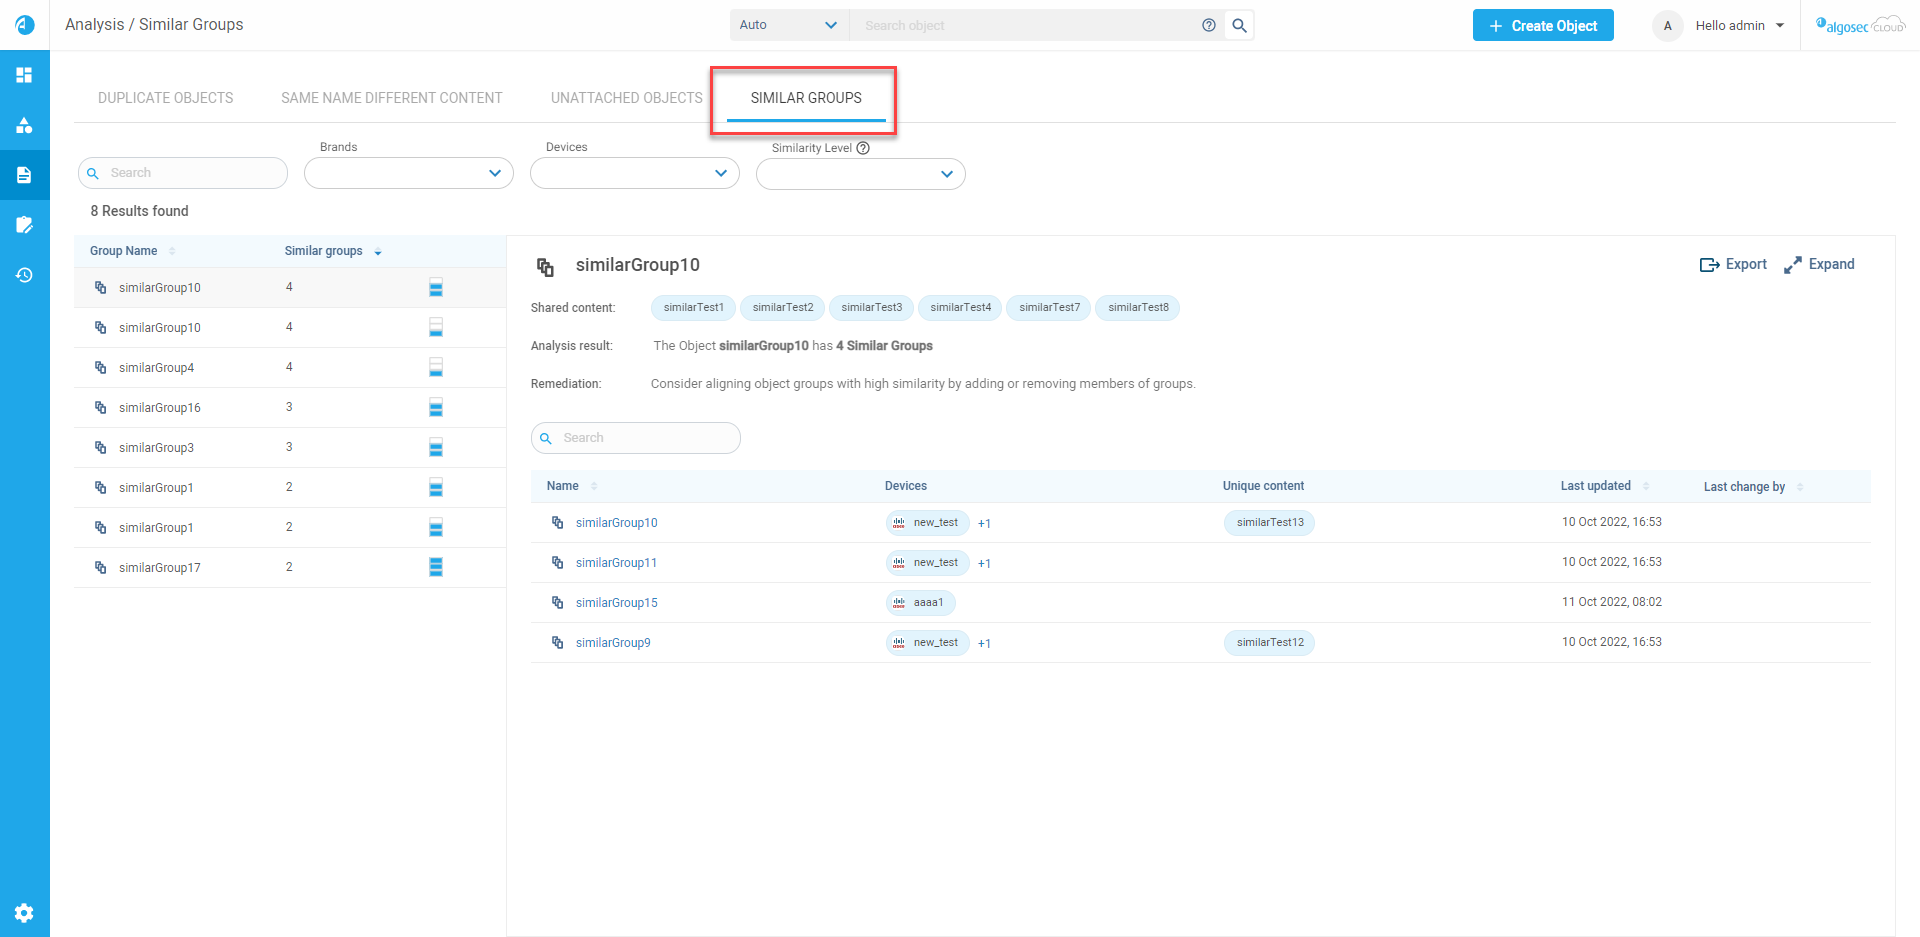
-
Select a Group you want to view:
-
Use the filters or search to locate the object
-
Click the Group Name in the Results Found list
The Similar Groups data is displayed. The results include the following columns:
Column Description Name Group name Devices Devices that contain members of the group Unique content Content unique to the selected group Last updated Latest update date Last change by Name of person who last changed the group -
Export analysis results
You can export the results of an analysis by clicking Export List.

