The application's FLOWS tab enables you to manage an application's traffic flows.
Flows describe traffic to and from servers, represented by network objects, via a specific service. Flows may also specify a user or network application, and include other fields, such as comments.
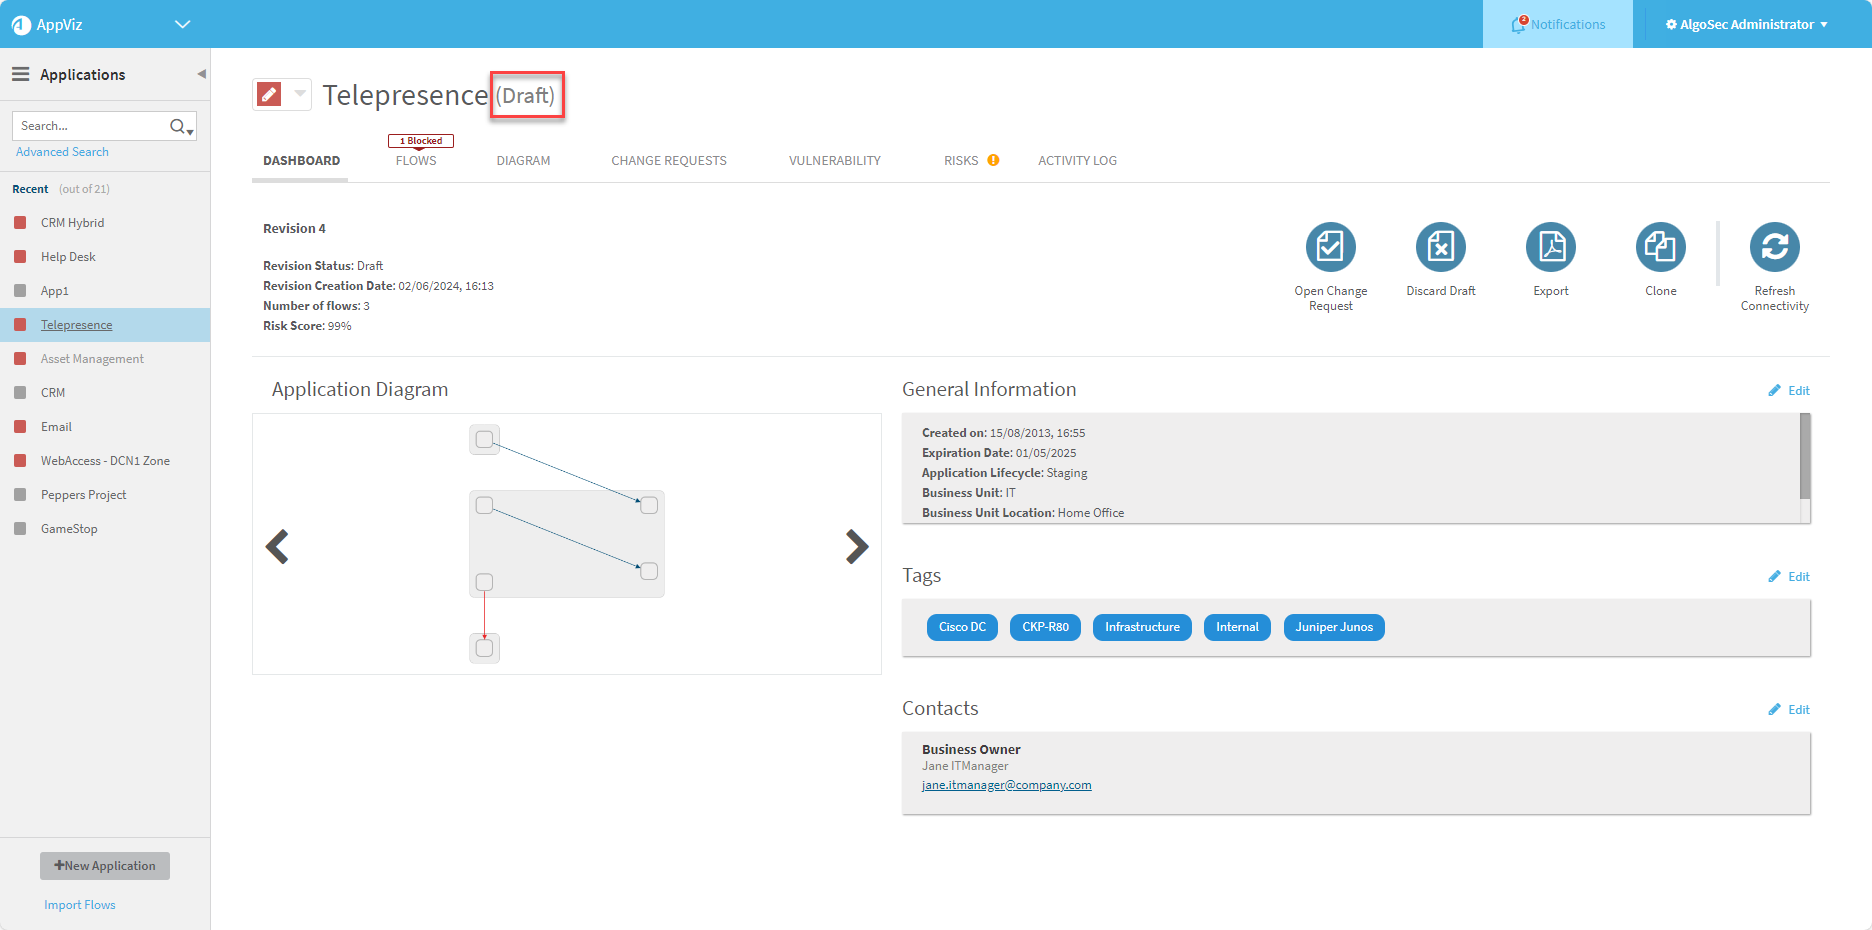
Note: Adding, removing, or editing an application's flows changes the application's revision to draft. After making a change to the application flows, you’ll see the draft status on the Dashboard tab of the application:
|
|
|

The flow is not updated in the related network security policy until the draft revision is returned to active. For more details, see Activate application drafts.
Tip: AppViz also enables you to import flows from a discovery server or a CSV file. Importing flows also matches, or updates matching details, with AppViz applications. For more details, see Discover applications.
Accessing application flows
-
From the AppViz home screen, click Applications in the left navigation.

The Applications page opens listing the applications.

The applications are listed in the left navigation.
-
Click on the required application.
The application's dashboard is displayed.

-
Click on the FLOWS tab.
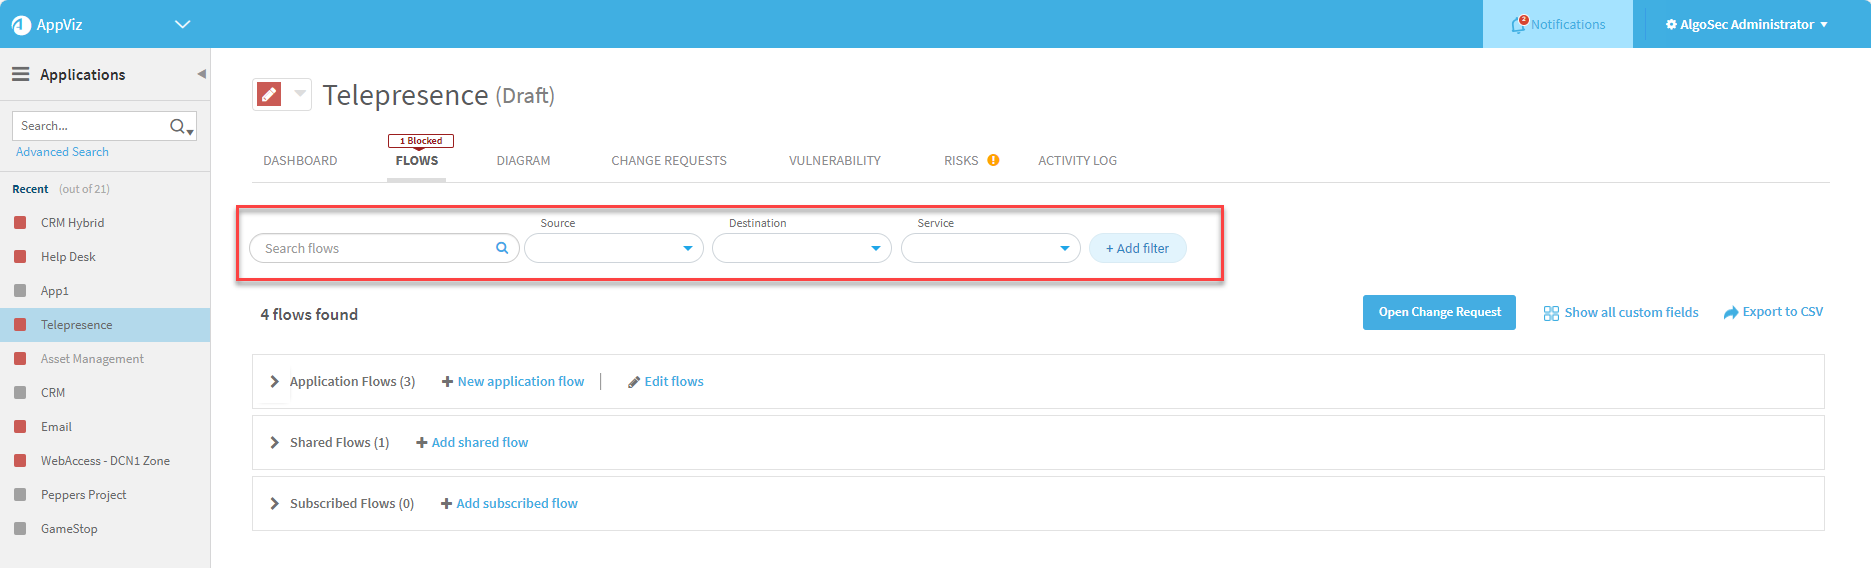
Three groupings of Application Flows (Application flows, Shared Flows, Subscribed Flows) for the application in focus are displayed with an indication of the number of flows of each type. -
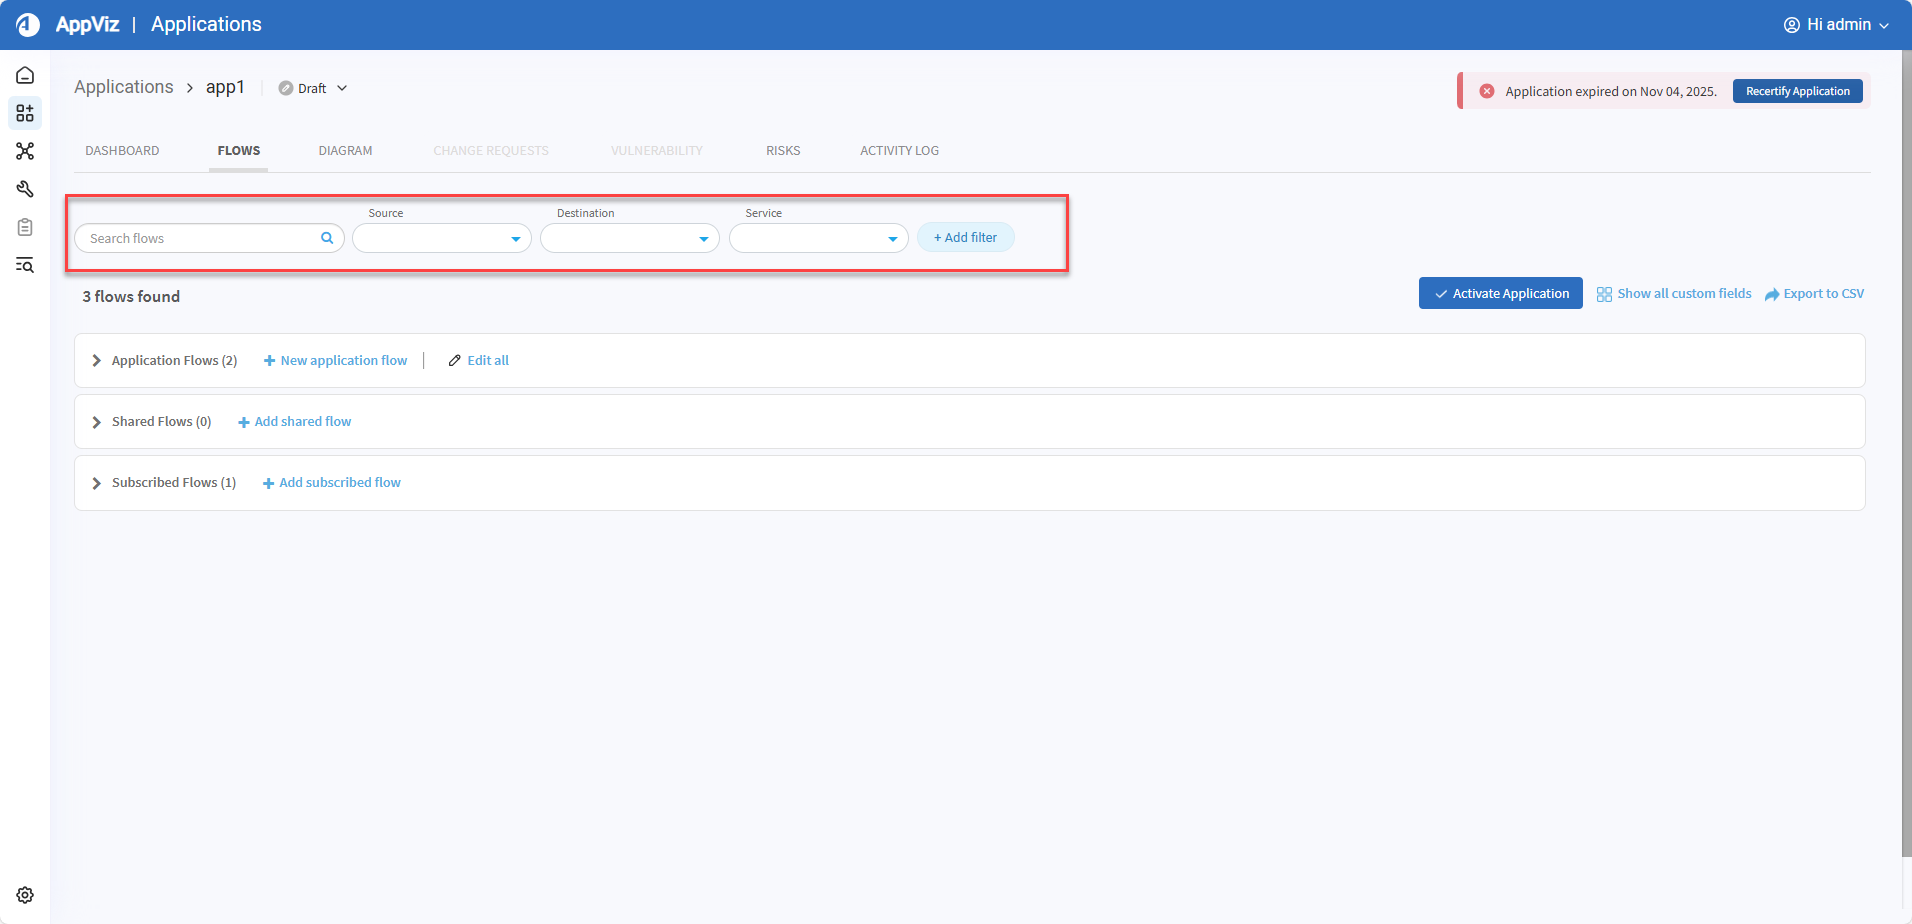
(Optional) Use the filters above the Application Flows to display specific flows of interest. For more details, see Filtering Flows.
-
Expand or collapse each table section to expose or hide the contained flows.


Flow types
AppViz application flows include the following types:
| Application flows | Flows that are custom-built for a specific application. |
| Shared flows |
A semi-custom flow that can be relevant for many applications. Shared flows are templates with empty source or destination values, which are provided by a subscribing application. |
| Subscribed flows |
An instance of a shared flow that's customized for a specific application, with its source or destination fields provided by the current application. |
Flows tab interface
The FLOWS tab displays application flows and details in three sections (Application Flows, Shared Flows, Subscribed Flows) which you can expand to view or collapse by clicking the expand arrows on the left of each type.
Note: For applications created in FireFlow, flows follow a standardized naming convention indicating their FireFlow source in the following format: <incremental flow number>_<Change Request ID>_From_FireFlow
|
|
|
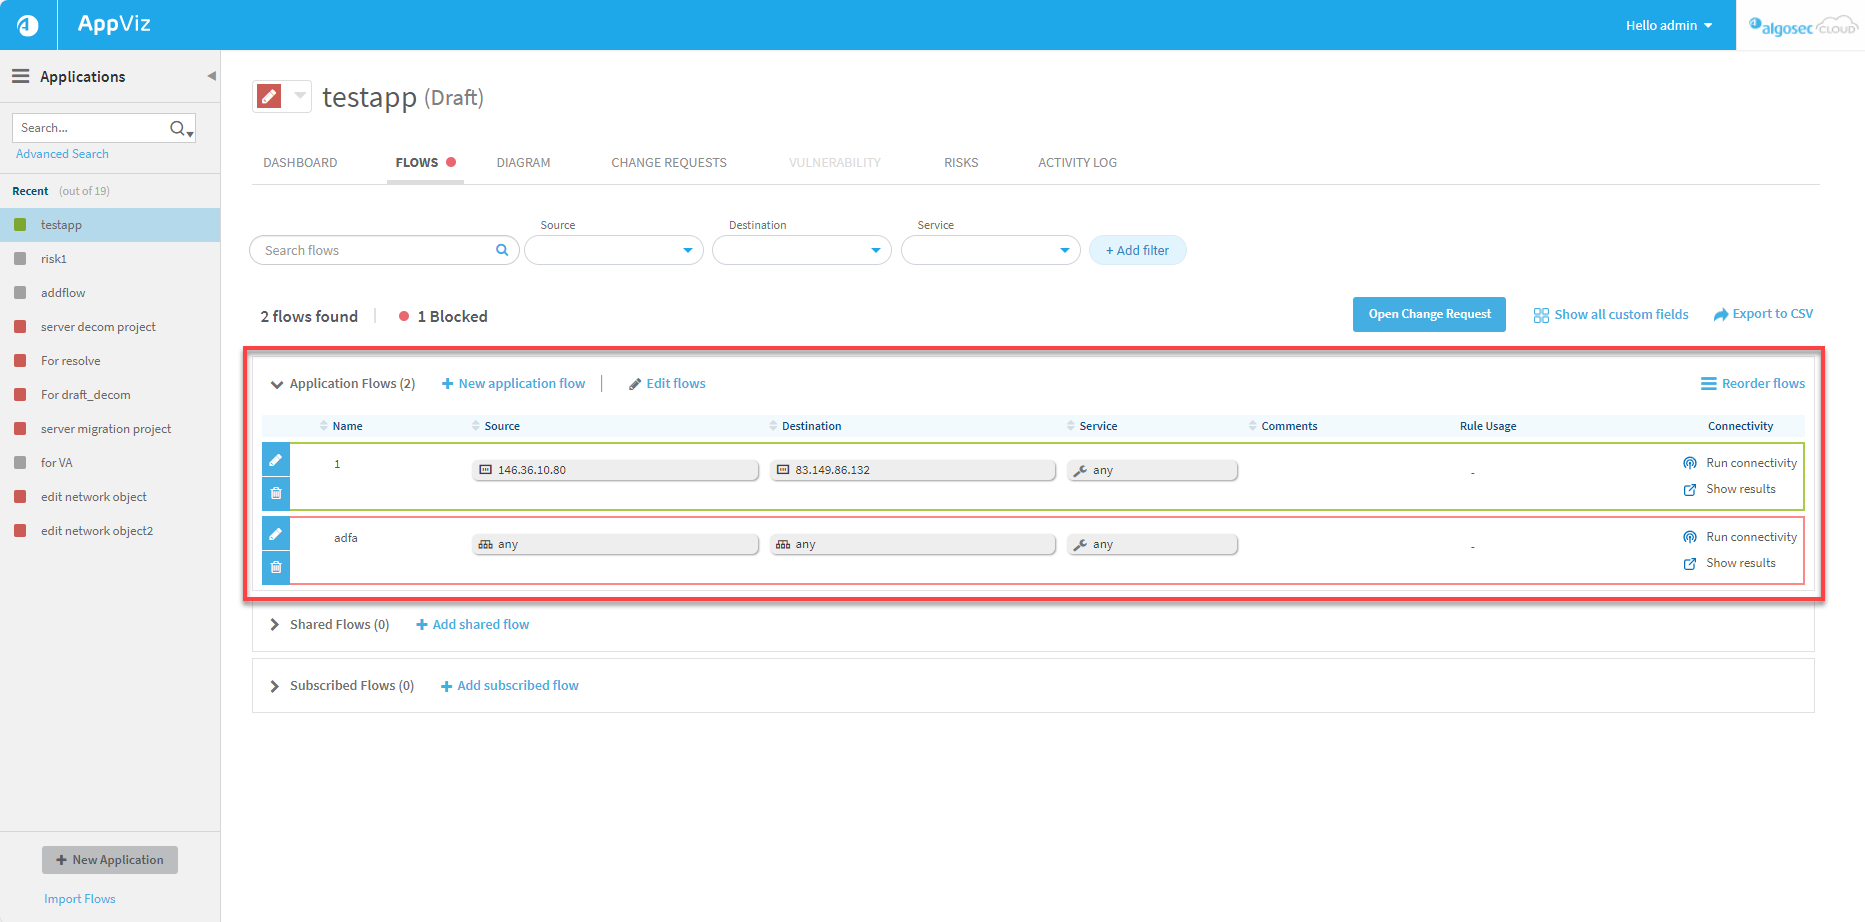
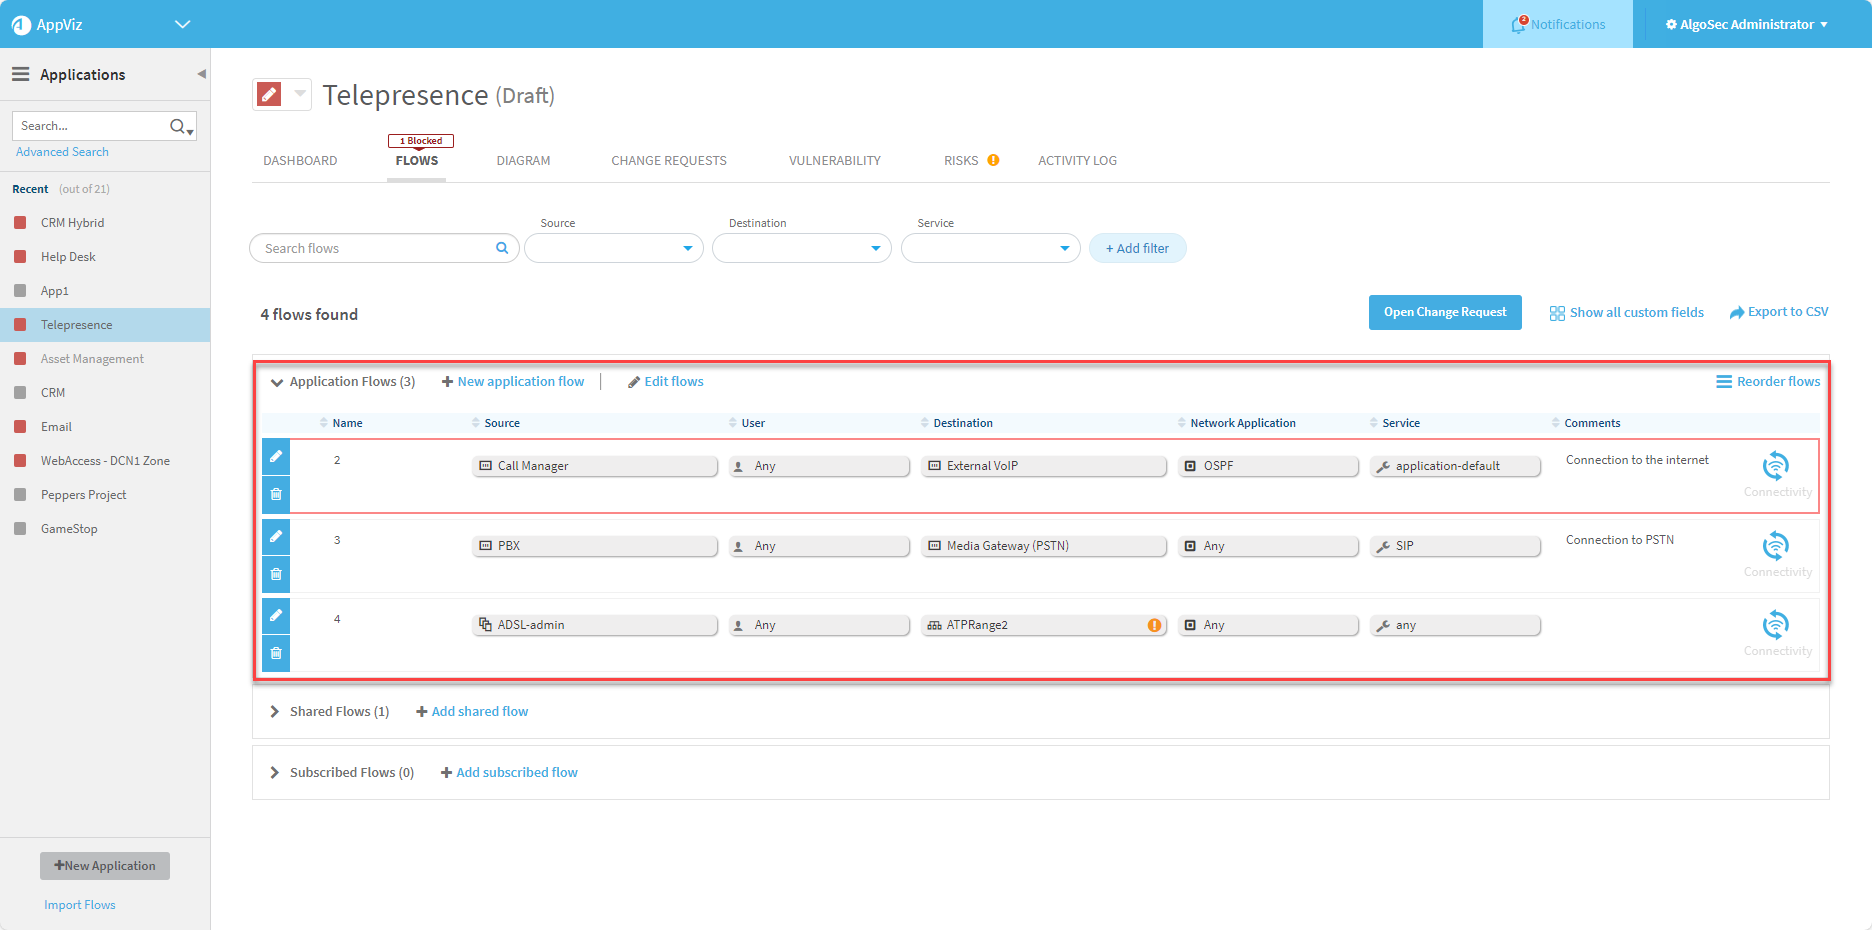
Expanded flows tables include the following columns:
Note: Click a column heading to sort the table by that column, and click it again to reverse the sort order.
| Name |
The name of the flow.
Note: Rule usage in the top bar indicates the overall status of the individual rules contained in the flow. |
||||
|
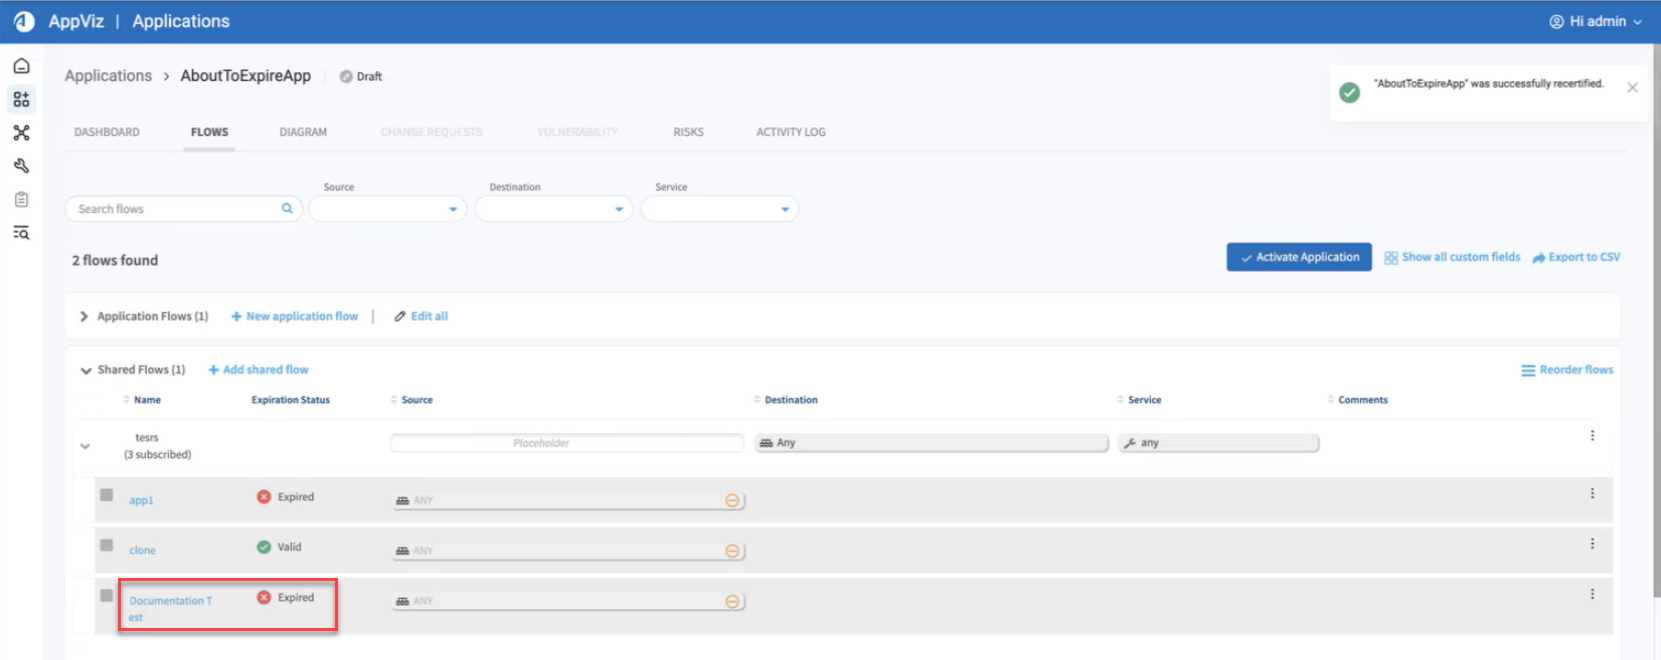
Expiration Status |
Indicates the expiration status of the flow:
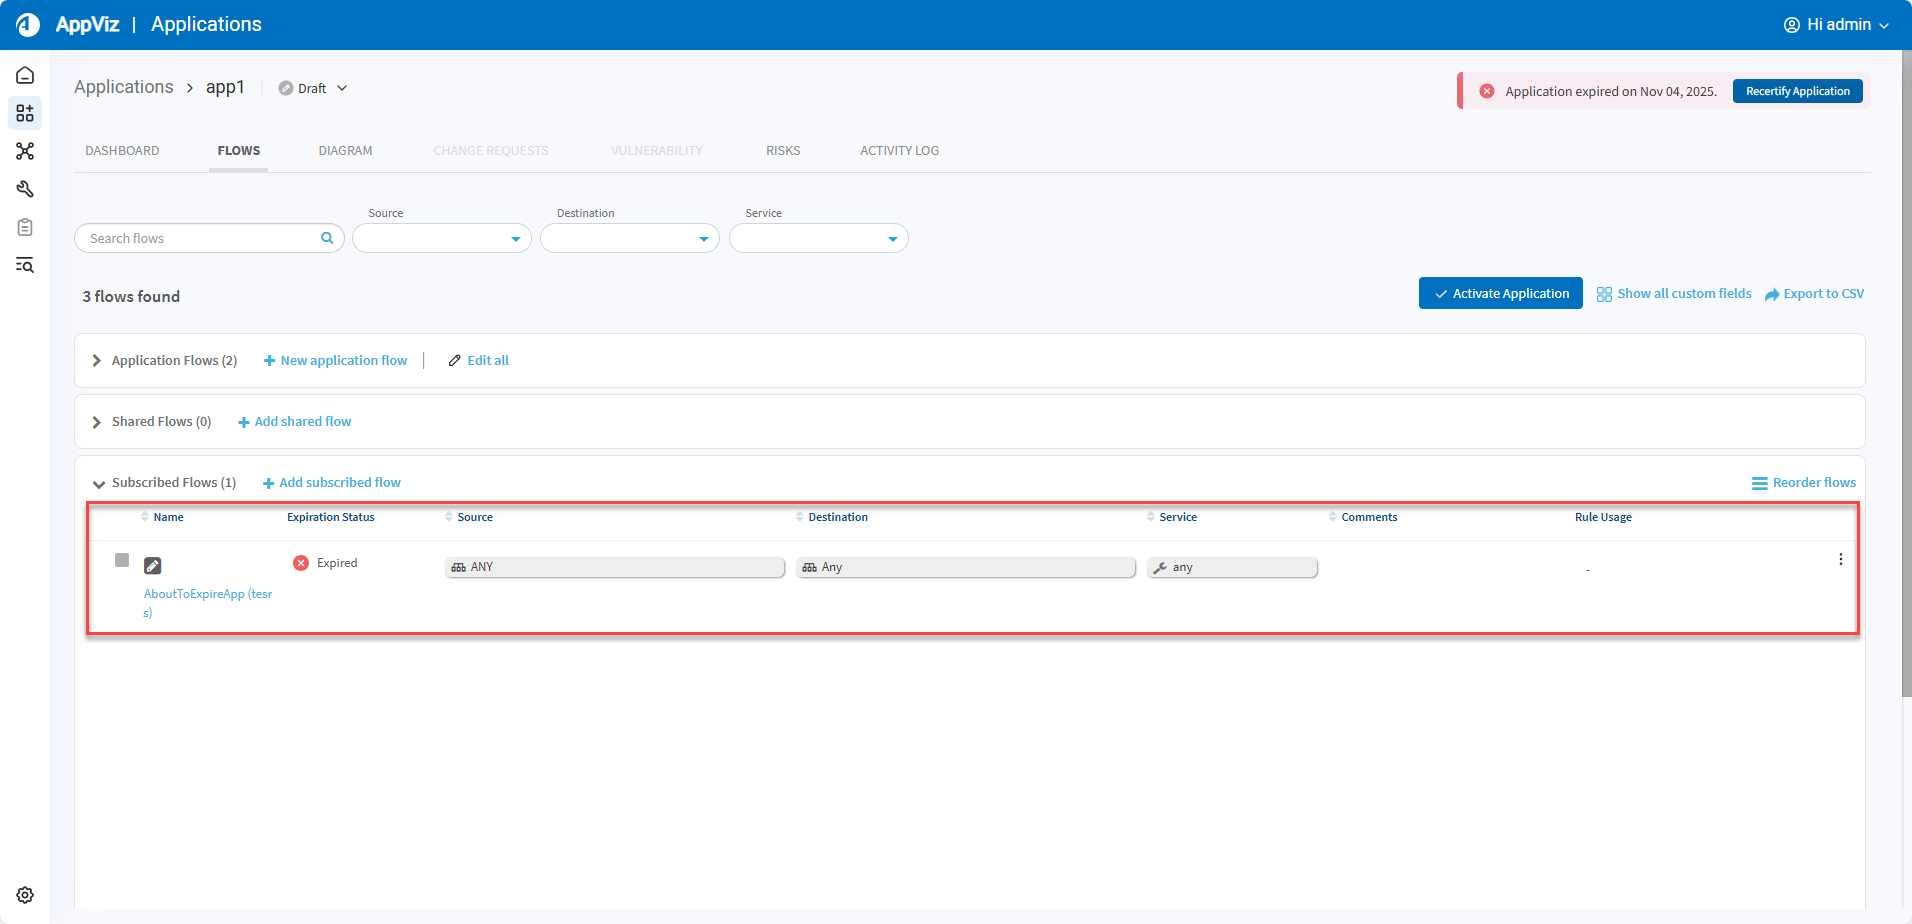
Note: Expiration Status in a shared flow or subscribed flow only indicates that the given flow was not recertified following the expiration date of the subscribed application. "Documentation Test" is a flow that has subscribed to the application "AboutToExpireApp". The status Expired indicates that the recertification date of the flow "Documentation Test" has passed.
"Documentation Test" has subscribed to the flow "tesrs" contained in the application "AboutToExpireApp". The status Expired indicates the recertification date of the flow "Documentation Test" has passed.
|
||||
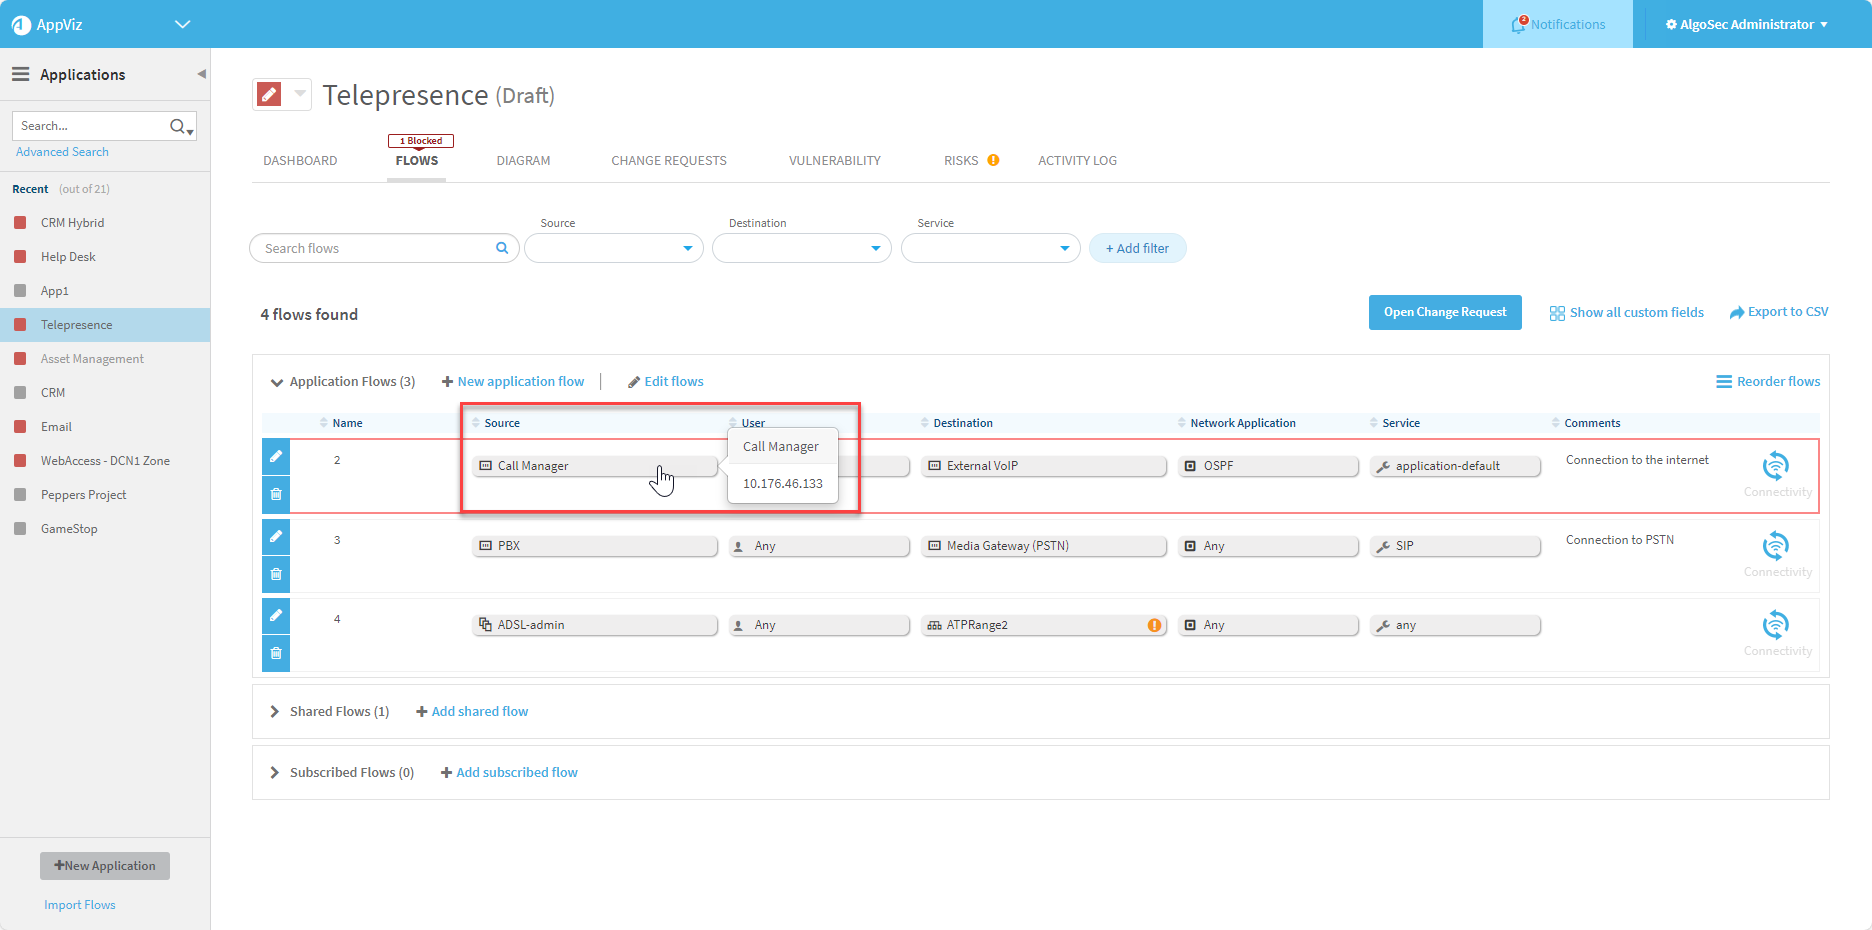
| Source, Destination |
Displays the source and destination of the flow.
|
||||
| Service | The name and TCP/UDP/IP protocol(s) handled by the flow. Hover over the service to display expanded information. |
||||
| Comments | Optional user-defined comments about the flow. | ||||
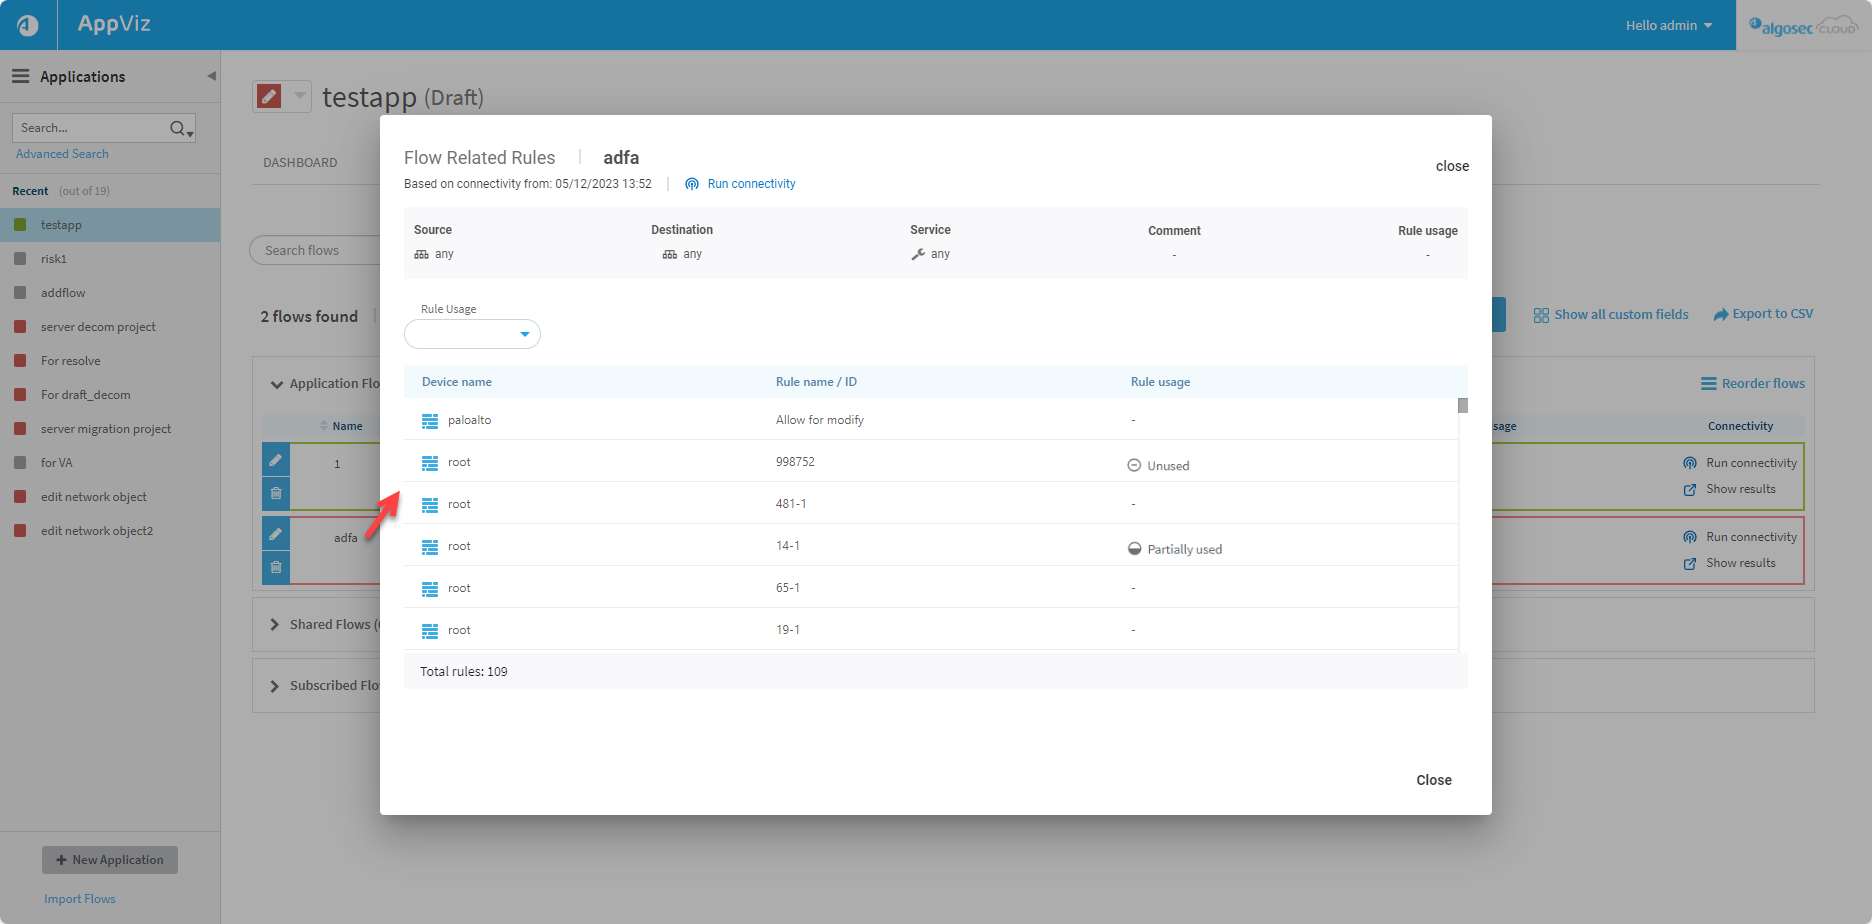
| Rule Usage |
Indicates the rule usage status of the flow:
Tip: To set the number of days before which rules are considered as unused, use the Days_To_Consider_Rules_As_New parameter. |


Working with the Flows tab
Use the following buttons from the Flows tab:
|
Click
Additional buttons on the Flows tab:
|
|

 to keep the changes or
 to discard the changes.


 to keep the changes or
 to discard the changes.


For more details, see:
- Filtering Flows
- Flow connectivity status
- Add flows to your application
- Edit application flows
- Remove flows from your application
- Export application flows to CSV
- Subscribe to another application's shared flows
- Verify flow connectivity
- Recertify a flow
Filtering Flows
Use Filters to isolate the flow or flows of interest:
-
Use the Search Flow filter to search for a flow by flow name, source, destination, service or comment.
Tip: Start typing text into the Search field. Click in the checkbox of the required value when it appears. Then start typing another search topic, for searching multiple items.
-
Use the Source, Destination and Service filters to locate the required flow quickly.
-
Start typing a name the required value and check the required value from a presented list
or -
Click the Lookup icon and choose a value from the values presented in the list that opens.
Note: Each filter accepts multiple values.
-
-
Use the Custom Fields filters. For details on defining custom fields, see Custom fields.
-
Use the Network Application and Network User filters. (To enable these, see Enable / disable user and network application awareness
-
Use the +Add Filter button to enable/disable additional filters.
Note: +Add Filter only appears when custom fields have been defined. For details on defining custom fields, see Custom fields.


-
Click Clear All to start a fresh search/filtering process.
Note:
-
Saved filters apply across all applications for the user that enabled them.
-
Filters added using the +Add filter button can only be enabled/disabled individually.
-
Date filtering is by range only. To filter for a single date, enter same date in the to and from fields.
Flow connectivity status
Every flow has a connectivity status. The traffic each flow represents may be allowed or blocked by the current network security policy.
|
|
|
||||||||||||
|
For each flow for which the connectivity status is available, the flow has a colored square indicating the connectivity status as per the following table:
|
For each flow for which the connectivity status is available, the flow is encircled with a with a red or green outline as per the following table:
|


Note: Abstract objects in flows are indicated with pale blue stripes , but this is not a connectivity status for the flow. An abstract flow is a flow that does not represent any real traffic. Therefore, connectivity information is not relevant. For details, see View a network object.
|
|
|


Note: The connectivity status of each flow contributes to the connectivity status of the application. For more details, see Business applications.
Add flows to your application
This procedure describes how to add an application or shared flow to your application.
Tip: Alternately, subscribe to another application's shared flows. For more details, see Subscribe to another application's shared flows.
Do the following:
-
Open the FLOWS tab for the application to which you want to add a flow (see Accessing application flows).
-
In the Application Flows section, click +New application flow.
-
If a draft is already created for the flow you want to edit, AppViz allows you to decide whether to discard the existing draft and start over or to continue working it. This gives you flexibility and control over how you want to manage your flow edits.
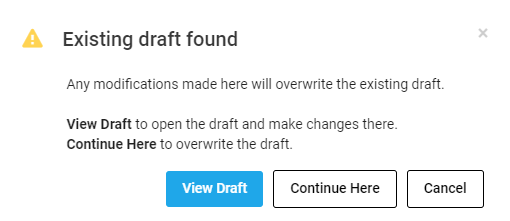
Click View Draft. AppViz will open the draft for you to work on it.
Click Continue Here to continue where you are. Changes you make will overwrite the existing draft.
-
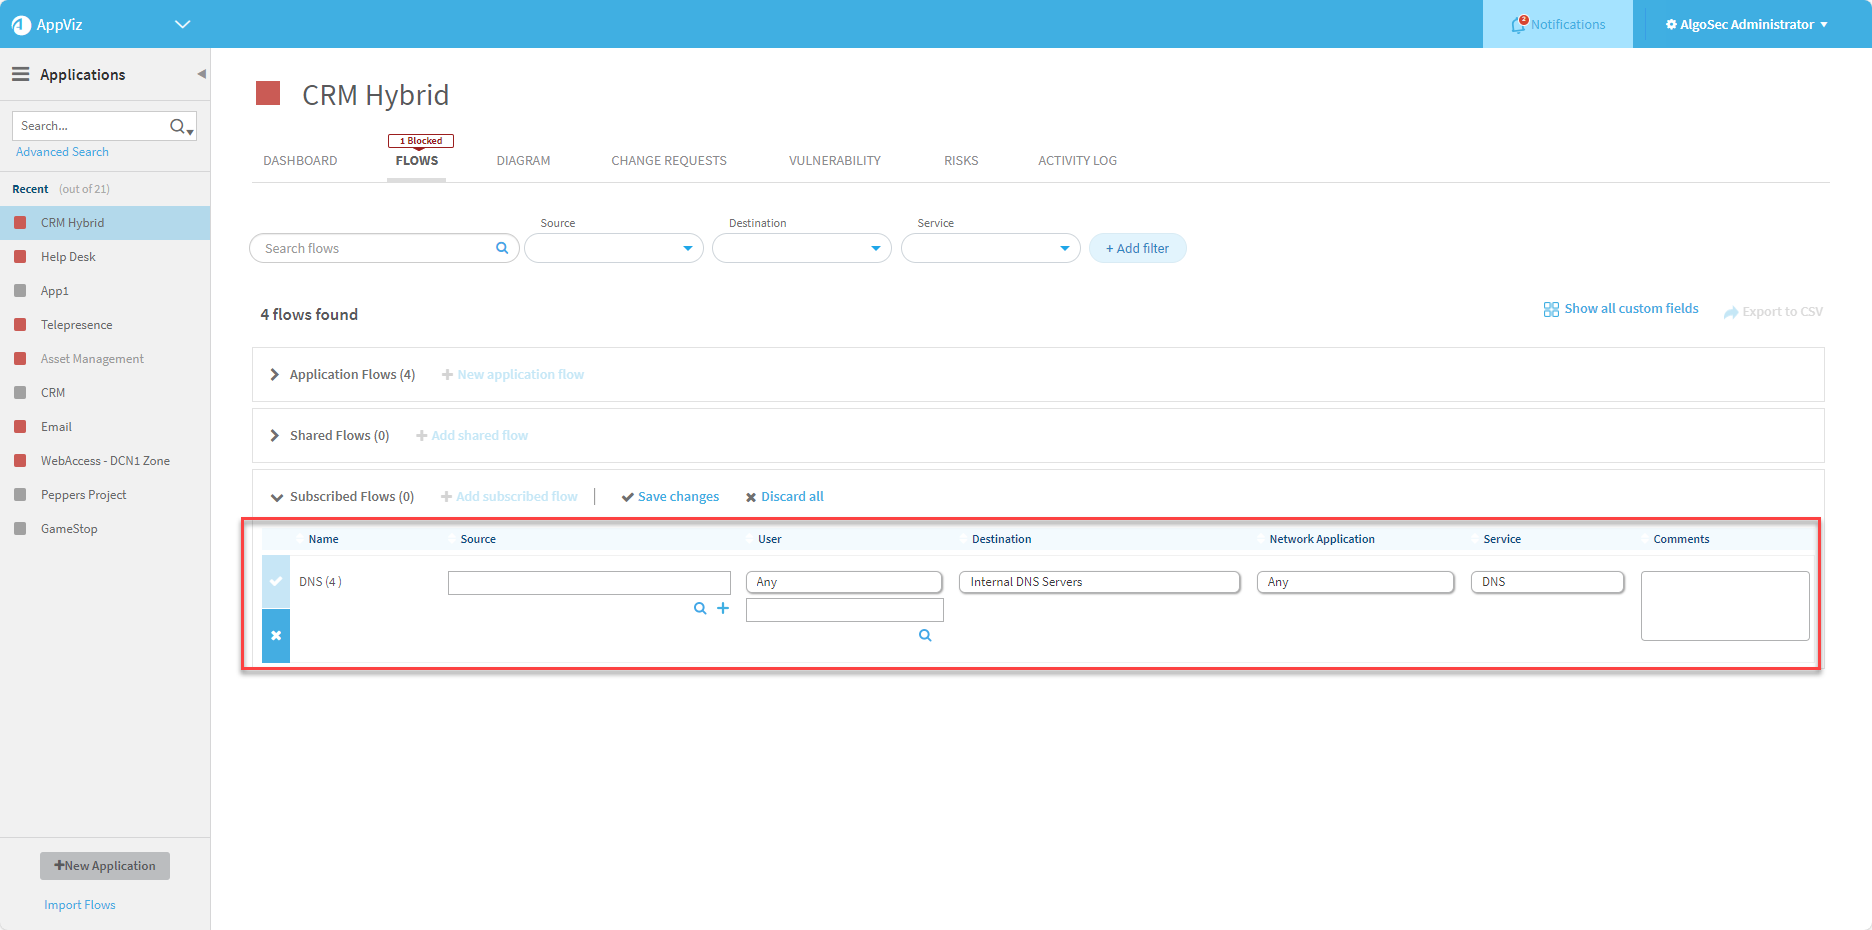
A blank editable flow form is displayed above the other flows (if existing) of the relevant section. The other flows for the section are displayed as disabled for editing.


Complete the fields as needed. For details, see Flow fields.
-
Click Save changes to save the flow.
-
(Optional) After editing and accepting the new flow, you can re-order the flows:
-
Click
 .
. -
In the window that opens, drag-drop objects into their new display order.
-
Click Done.
-
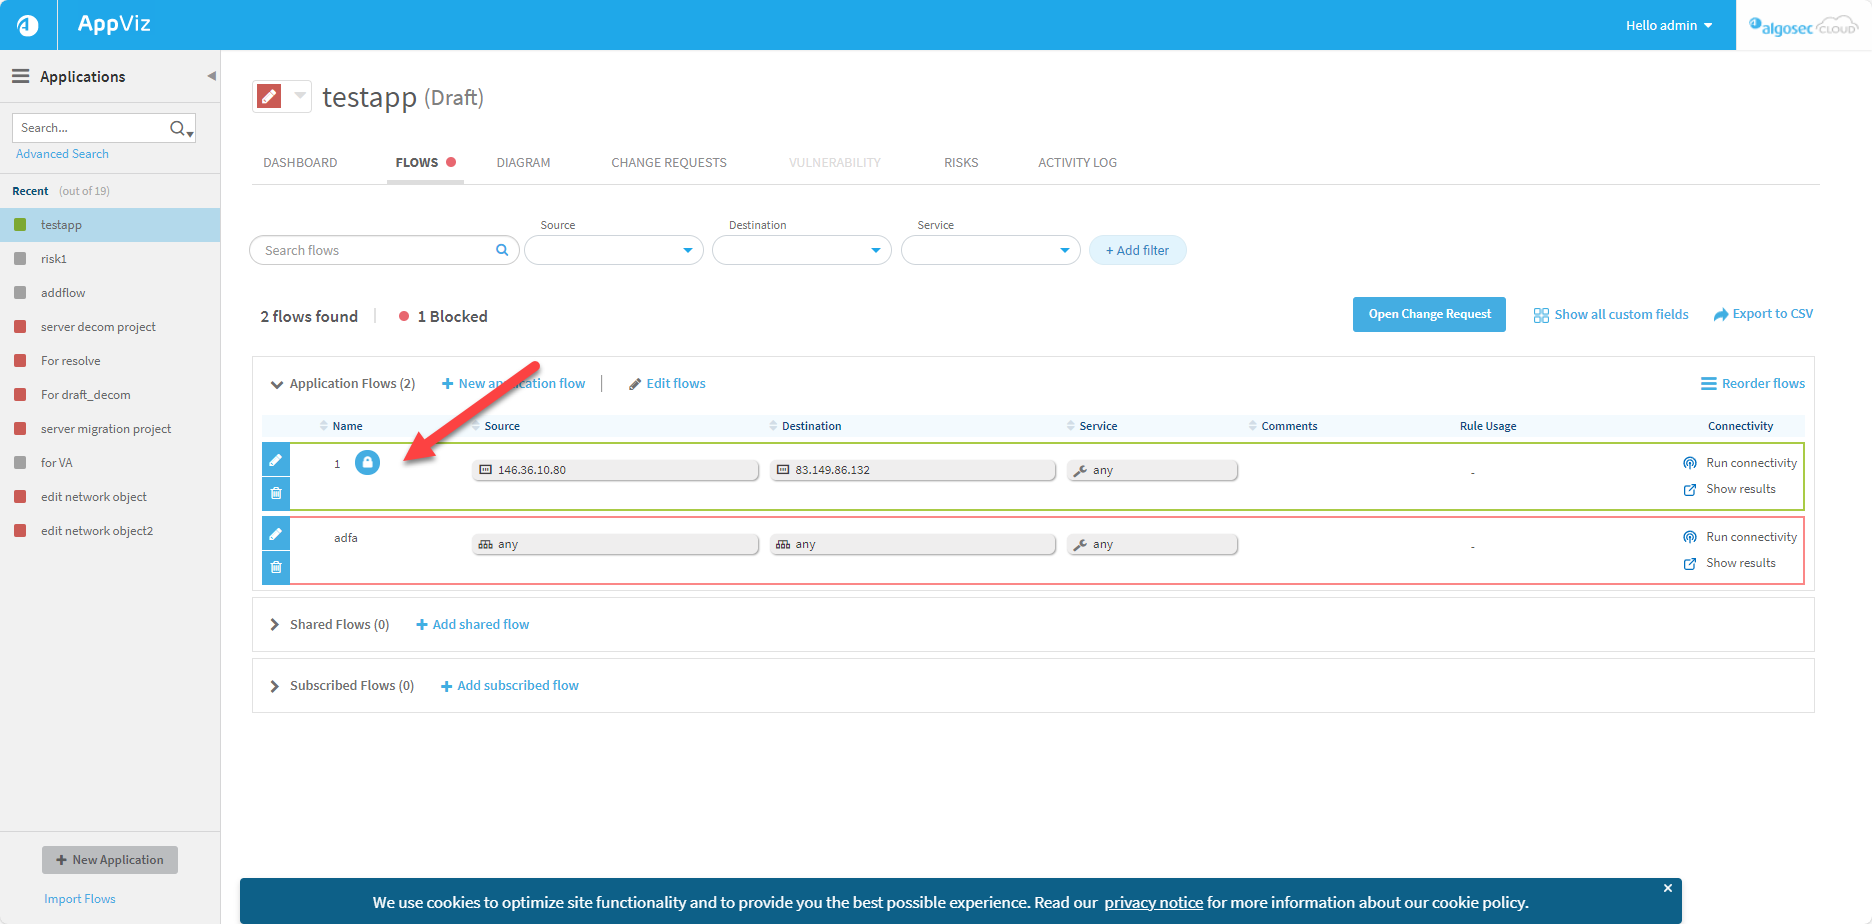
Note: Flows that include an object (source, destination, service) that the viewer has no permission to see are represented by the lock-icon ![]() and the object does not appear in the flow. Hover over the icon to see a tool-tip informing that the viewer does not have sufficient permissions to view all objects present in the specific flow. For more about object permissions see Managing Object Permissions Using Tags.
and the object does not appear in the flow. Hover over the icon to see a tool-tip informing that the viewer does not have sufficient permissions to view all objects present in the specific flow. For more about object permissions see Managing Object Permissions Using Tags.
|
|
|

Do the following:
-
Open the FLOWS tab for the application to which you want to add a flow (see Accessing application flows).
-
In the Shared Flows section, click on +Add shared flow.
The Shared Flow section expands.


-
Click on the Source or Destination placeholder. The placeholder allows the shared flow to work as a reusable template where either the Source or Destination field is intentionally left empty so that any subscribing application can fill in its own context-specific values to the field.
Note: When user awareness is enabled, the User field will be treated the same way as the Source field. When the source is the placeholder, the user will also be a placeholder.
The available editable fields appear.
-
Complete the fields as needed. For details, see Flow fields.
-
Click Save Changes.
The flow is updated, and this version of the application is saved as a draft revision.
Note: Whenever a flow is added or updated, the application is saved as a draft revision and (Draft) is indicated next to the application's name in the application's dashboard.
The Save and Apply Draft option is disabled when the application has a revision pending implementation.
-
To appy the draft:
-
Click
 . For details see Activate application drafts.
 -
Click
 . For more details, see Apply application drafts.
-
|
Name |
Type the name of the flow. |
|
Source |
Type the flow's source, or utilize the following features to aid you in selecting a source:
|
|
User |
Note: This field only appears when user awareness is enabled. For more details, see Configure applications. Type the flow's user, or utilize the following features to aid you in selecting a user:
Note: "Any" is the default value in the User field. |
|
Destination |
Type the flow's destination, or utilize the following features to aid you in selecting a destination:
|
|
Service |
Type the flow's service, or utilize the following features to aid you in selecting a service:
|
|
Network Application |
Note: This field only appears when application awareness is enabled. For more details, see Configure applications. Type the flow's network application, or utilize the following features to aid you in selecting a network application:
Note: "Any" is the default value in the Network Application field. |
|
Comments |
Type a comment for the flow. This field is optional. |
|
Any custom field |
There may be other flow fields if custom fields have been added. For more details, see Custom fields. |
|
|
To re-order the flows in the application, drag and drop a flow by this icon. The icon appears to the left of a flow when you hover over it. |

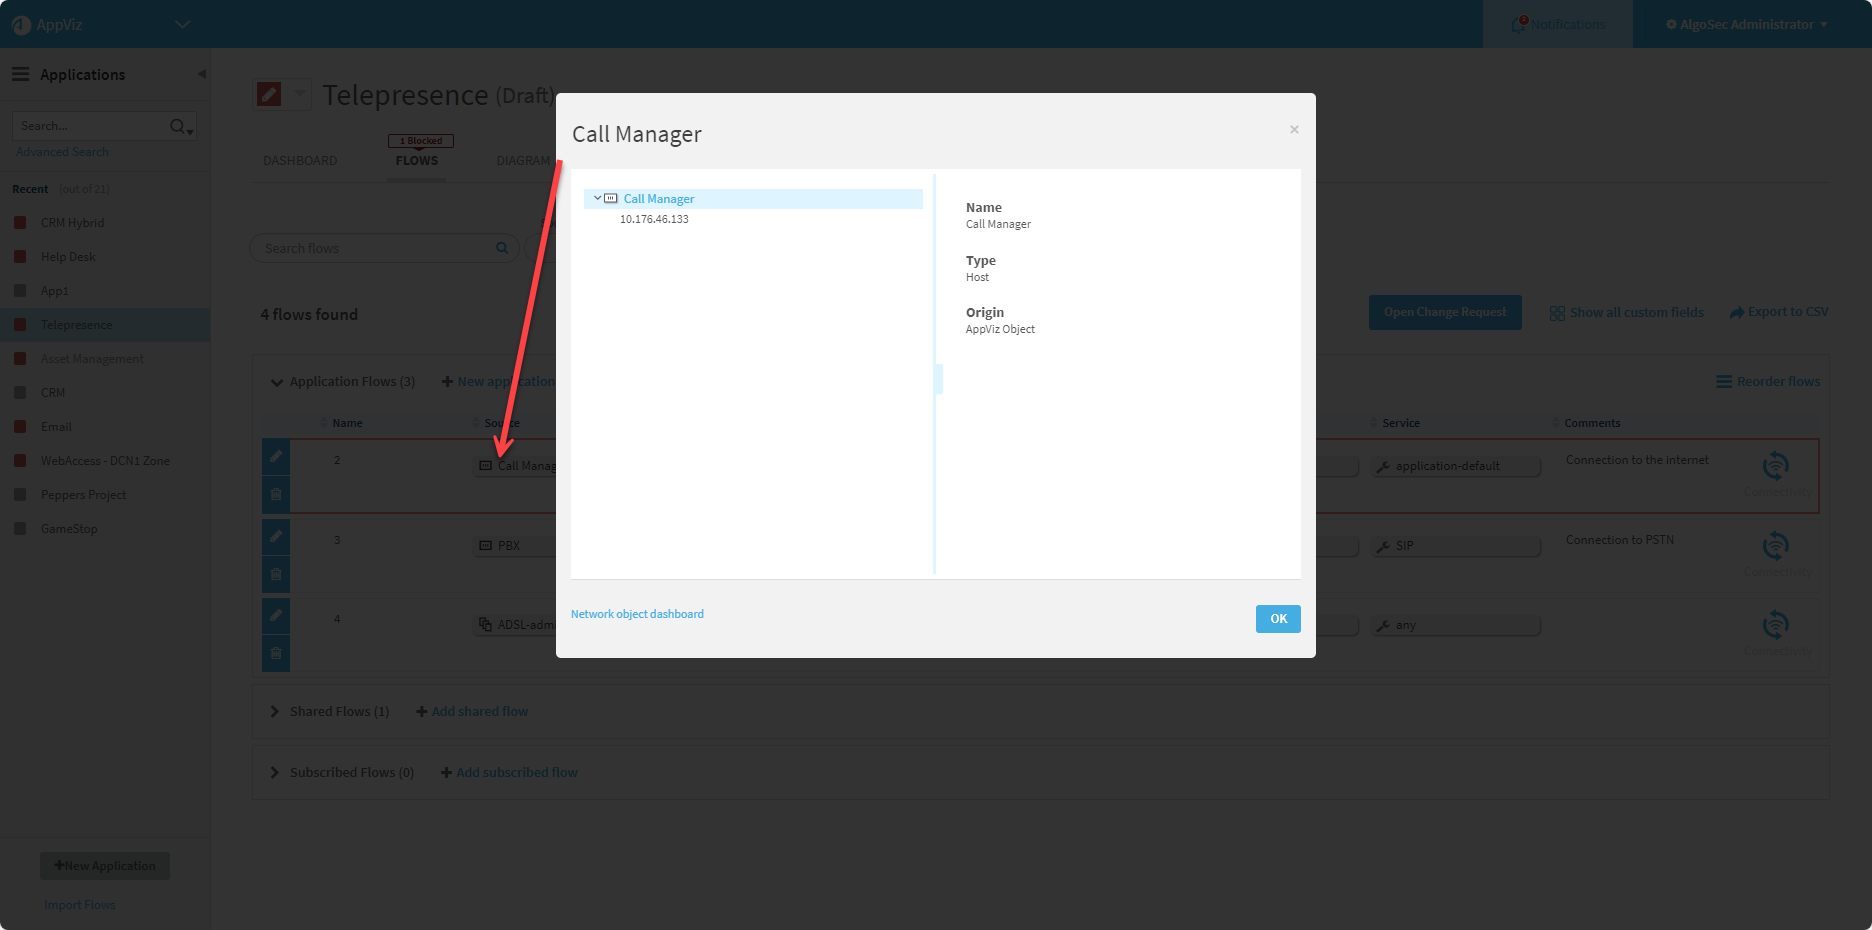
To add a new network object:
-
Click
 .
.


The Add New Network Object window appears.
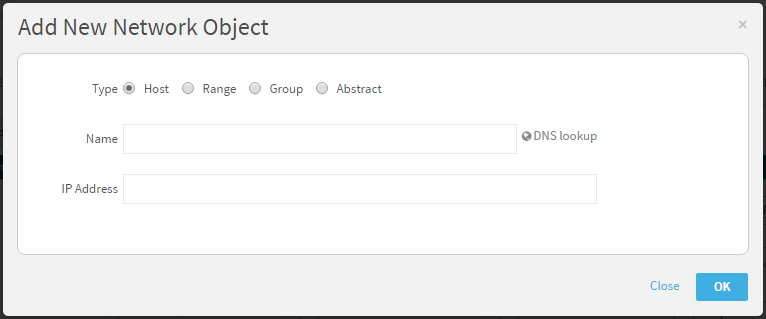
-
Select the Type of network object: Host, Range, Group, Domain, or Abstract. For more details, see Network objects.
- In the designated fields, type the following information for the new network object:
- Name
- IP Address, IP Addresses, Members, or Domain Name. Abstract objects do not have an address until conversion.)
-
Click OK.
The new network object is added to the field.
To add a service to a flow:
-
Click
.


The Add New Service window appears.
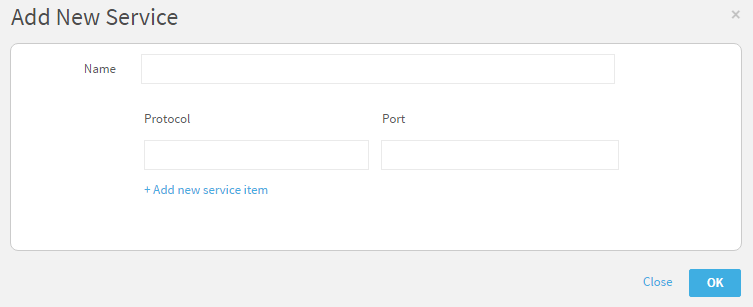
-
In the designated fields, type the following information for the new service:
- Name
- Protocol
- Port
Note: If you've defined the Protocol as ICMP, use the Port field to define the ICMP type.
- To add additional services to the service object, do the following:
Click Add new service.
Additional Protocol and Port fields appear.
- Complete the fields.
- To remove a service, click
 .
.
- Click OK.
The new service object is added to the field.
Edit application flows
Only for application flows (not for shared or subscribed flows)
To edit one or more flows at a time:
- View the application for which you want to edit a flow. For more details, see Business applications.
-
Click the Flows tab.
The Flows tab appears.
-
To edit application flows:
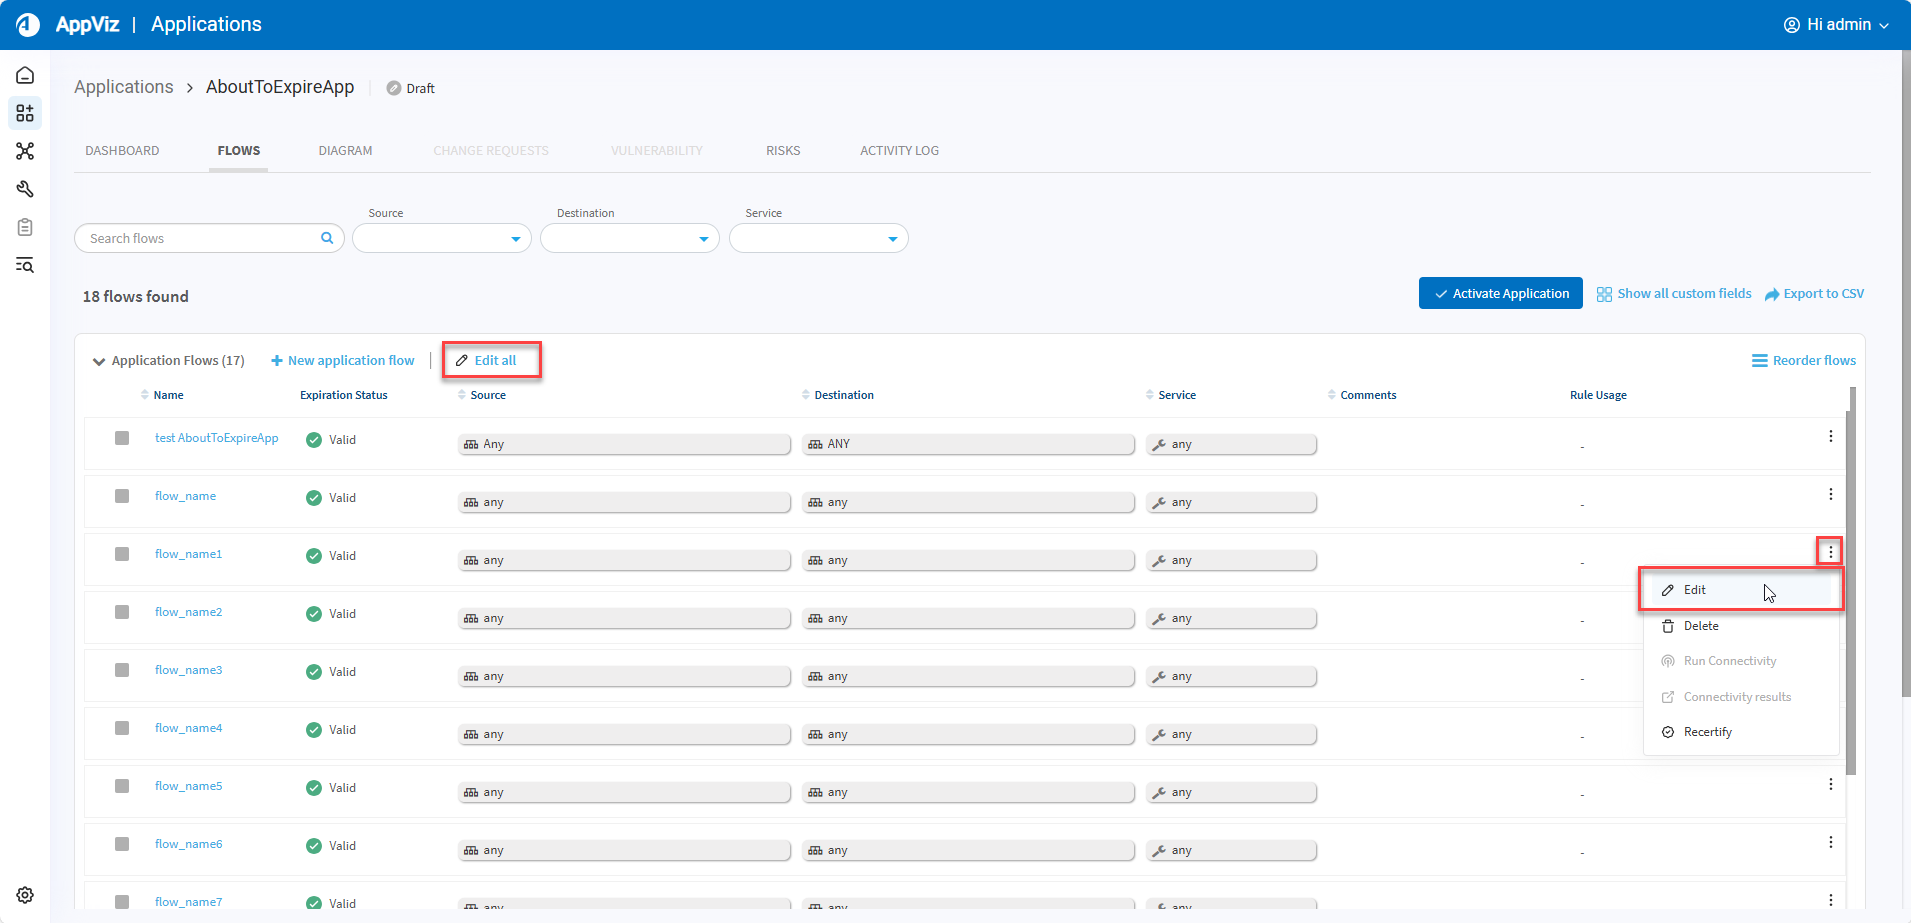
-
To edit a single flow:
-
Click
 to the right of the flow you want to edit.
 -
From the menu that appears, click
 .
.
Note: Automatic connectivity check is not performed when a non-TSQ field (like Comment or any custom field) is changed.
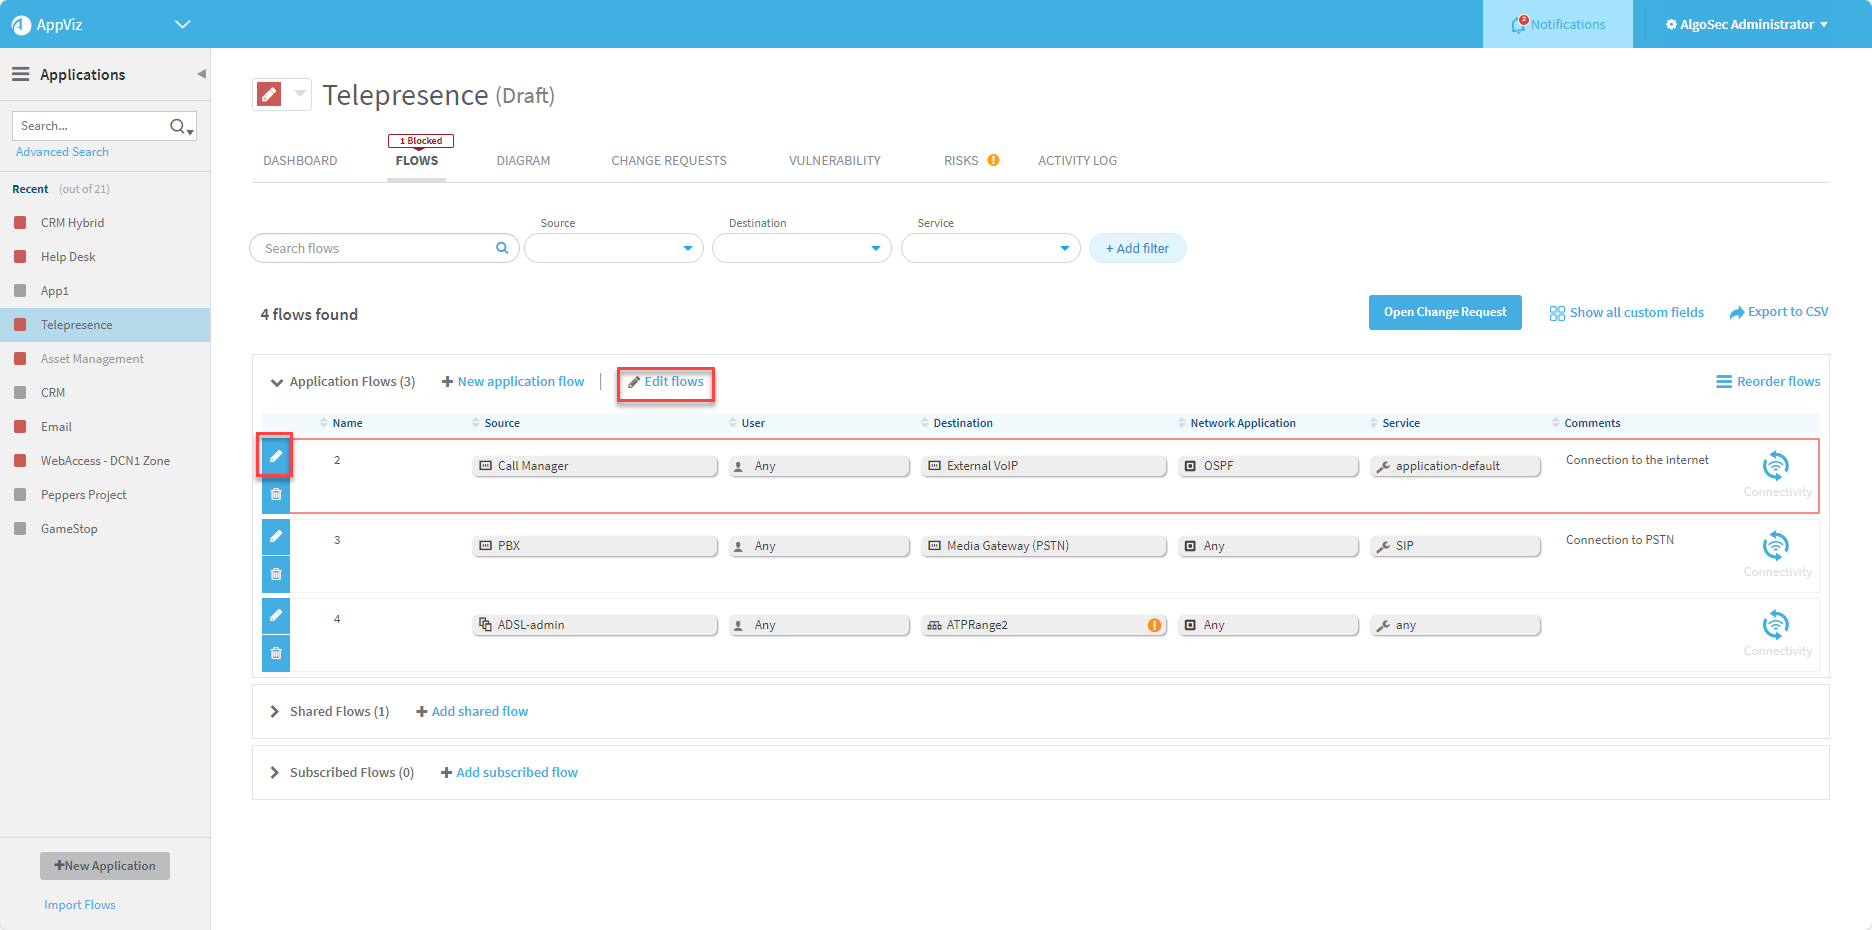
-
-
To edit multiple flows: click
 .
.Note: After clicking the Edit Flows button, automatic connectivity check is not performed when saving the changes. You can run connectivity check manually if you want to.
-
To edit a single flow: click the pencil
 button at the left of the flow.
 Note: Automatic connectivity check is not performed when a non-TSQ field (like Comment or any custom field) is changed.
-
To edit multiple flows: click
 .
.Note: After clicking the Edit Flows button, automatic connectivity check is not performed when saving the changes. You can run connectivity check manually if you want to.
-
-
If a draft is already created for the flow you want to edit, AppViz allows you to decide whether to discard the existing draft and start over or to continue working it. This gives you flexibility and control over how you want to manage your flow edits.
Click View Draft. AppViz will open the draft for you to work on it.
Click Continue Here to continue where you are. Changes you make will overwrite the existing draft.
-
The flow(s) for the application appears in an editable format.
Complete the fields as needed. For details, see Flow fields.
-
To save the flow changes, click Save Changes.
Reordering flows
To reorder flows of any type:
- Select the flow type (Application flows, Shared Flows, Subscribed Flows) you want to reorder.
- Click
 .
. - In the Reorder application flows window, drag and drop the desired flows up or down and then click Done.
-
Click Save Changes.
Save Flow Changes
-
To save the flow changes, click Save Changes.
The flow is updated, and this version of the application is saved as a draft revision.
- To save changes and apply the draft, do the following:
Click Save and Apply Draft.
Note: The Save and Apply Draft option is disabled when the application has a revision pending implementation.
The Apply Draft dialog is displayed, describing the FireFlow change request that will be created to add or remove traffic flows for the application in the network security policy. If traffic flows have been removed from the application, but the traffic intersects the needs of another application, a FireFlow change request will not be created to remove the traffic.
For more details, see Business applications.
Click OK.
The flows are updated and the draft is applied. This may take a few minutes.
Remove flows from your application
To remove a flow:
- View the application for which you want to remove a flow. For more details, see Business applications.
-
Click the Flows tab to view the flows.
-
Click
to the right of the flow you want to remove, and then click  from the menu that appears.
Click
on the row of the flow you want to remove.Note:AppViz detects flows being utilized in other applications. If you attempt to remove a flow from the current application, AppViz will notify you if the flow is being used elsewhere. This prevents accidental removal of critical components and ensures the integrity of your workflows.
If a draft is not already created for the flow, this confirmation message is displayed.

If a draft is already created for the flow, you want to remove, this confirmation message appears letting you know that the draft will be overwritten.
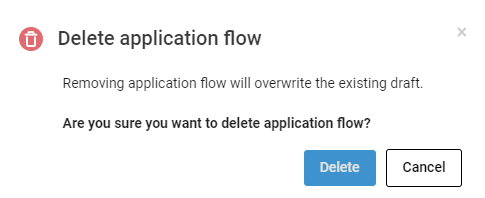
- Click OK or Delete if you are sure you want to remove the application flow from the specified application.
- Follow the steps in Save Flow Changes.
Subscribe to another application's shared flows
Applications can subscribe to another application's shared flows. The subscribing application specifies a custom value for the shared flow's placeholder/missing field. For more details, see Add flows to your application.
By default, the application containing the shared flow is responsible for all of the shared flow's subscriptions. If desired, you can configure AppViz to treat the applications subscribed to the shared flow as responsible for the traffic. For more details, see Configure advanced AppViz properties
To subscribe to an application:
-
View the application for which you want to add subscribed flows (the "subscriber" application). For more details, see Business applications.
-
Click the Flows tab.
The Flows tab appears.
-
Click Edit Flows.
All the flows for the application appear in an editable format.
-
In the Subscribed flows section, click +Add subscription flow.
The Add Subscribed Flows window is displayed.

-
Next to the desired application, click
 to expand the list of its flows.
The application's flows appear.
- Click to select one or more flows.
-
Click Add Subscriptions.
The subscribed flows appear in the application's Flows tab.
Note:
Expiration Status in a subscribed flow only indicates the that the given flow was not recertified following the expiration date of the subscribed application.For example, "Documentation Test" has subscribed to the flow "tesrs" contained in the application "AboutToExpireApp". The status Expired indicates the recertification date of the flow "Documentation Test" has passed.

-
Complete the required fields as needed. For details, see Add a new network object.
-
Click Save Changes.
A confirmation message appears.
- Click Save.
Verify flow connectivity
Verifying flow connectivity checks whether the network security policy allows the traffic that the flow specifies. Additionally, it creates and updates the business application field of the flow (a.k.a. rule) visible throughout ASMS systems with AppViz.
See Business application visibility.
To verify flow connectivity:
- View the application which contains the flow for which you want to verify flow connectivity. For more details, see Business applications.
-
Click the Flows tab.
The Flows tab appears.
-
Click
to the right of the flow you want to verify its connectivity, and then click  from the menu that appears.
Click
 Refresh Connectivity next to the flow.
AppViz checks whether the network security policy allows the traffic flow. This may take a few minutes, depending on the complexity of the flow and network policy.
The flow connectivity status is updated. For details, see Flow connectivity status .
Note: Clicking the refresh connectivity icon also sets or updates Business Application Visibility throughout ASMS. See Business application visibility.
-
To view details regarding the flow's connectivity, click
 .
.A new window opens with details of the traffic simulation query from AlgoSec Firewall Analyzer.
Note: If
is not enabled for a flow, the last connectivity check failed or has expired. If you run a new check, the link will be re-enabled.
Export application flows to CSV
You can export an application's flows to a CSV file.
Note: You can configure all flow exports to include connectivity information. For more details, see Configure advanced AppViz properties
To export an application's flows:
- View the application for which you want to add a flow. For more details, see Business applications.
-
Click the Flows tab.
The Flows tab is displayed.
-
Click
 .
.The CSV file is exported.
Your browser will prompt you to open or save the file.
Recertify a flow
You can recertify individual flows within an application, or recertify the entire application at once if needed. This procedure describes how to recertify a flow in your application. For details on recertifying an entire application see Recertify an Application .
Note: You can recertify an application's component flows individually. If an application is set to expire within 30 days, its status changes to About to expire. Once all flows are recertified, the application is marked as valid and its expiration date is extended to match the most recently recertified flow.
Note: Flow certification data is automatically synced to AFA. For details how to display flow data in the AFA Policy tab, follow steps in View Policy Data.
Do the following:
-
Open the FLOWS tab for the application whose flow you want to recertify (see Accessing application flows).
-
Click
to the right of the flow you want to recertify. -
From the menu that appears, click
 Recertify.
The Recertification Comments dialog appears
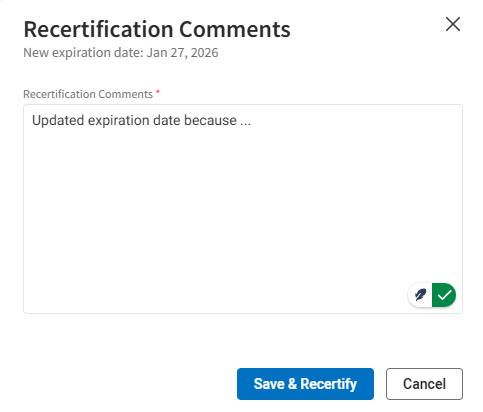
-
In Recertification Comments area, type in the necessary details (mandatory).
-
Click Save & Recertify. The application flow is recertified. A confirmation notification appears in the upper right hand of the application's Flows tab, for example:

