Work with policy sets
AppViz automatically gathers policy set information related to the security controls in your cloud accounts, subscriptions, and projects. This topic describes how you can review and manage your policy sets to ensure network security.
Policy set details
You can review detailed information on policy sets detected in your cloud accounts. For more information on policy set details based on the security control:

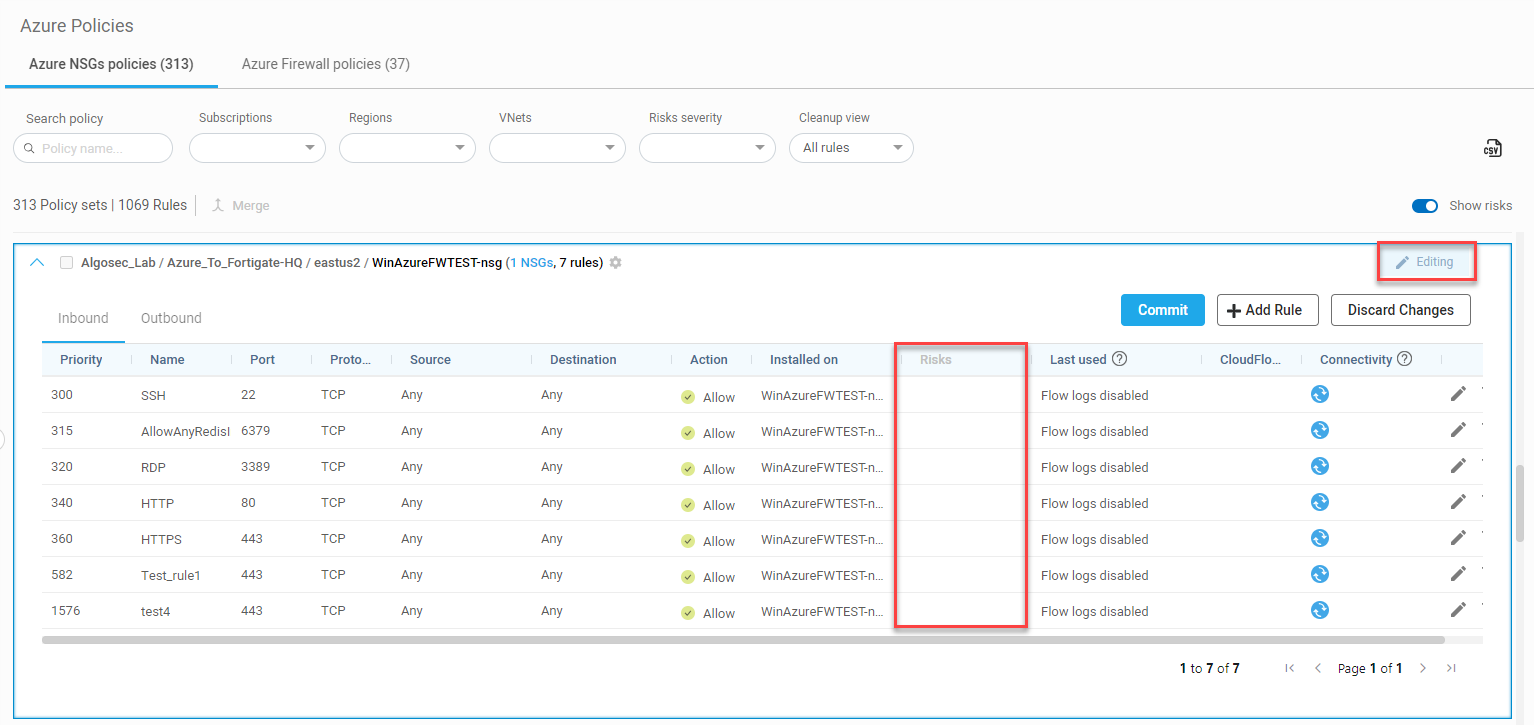
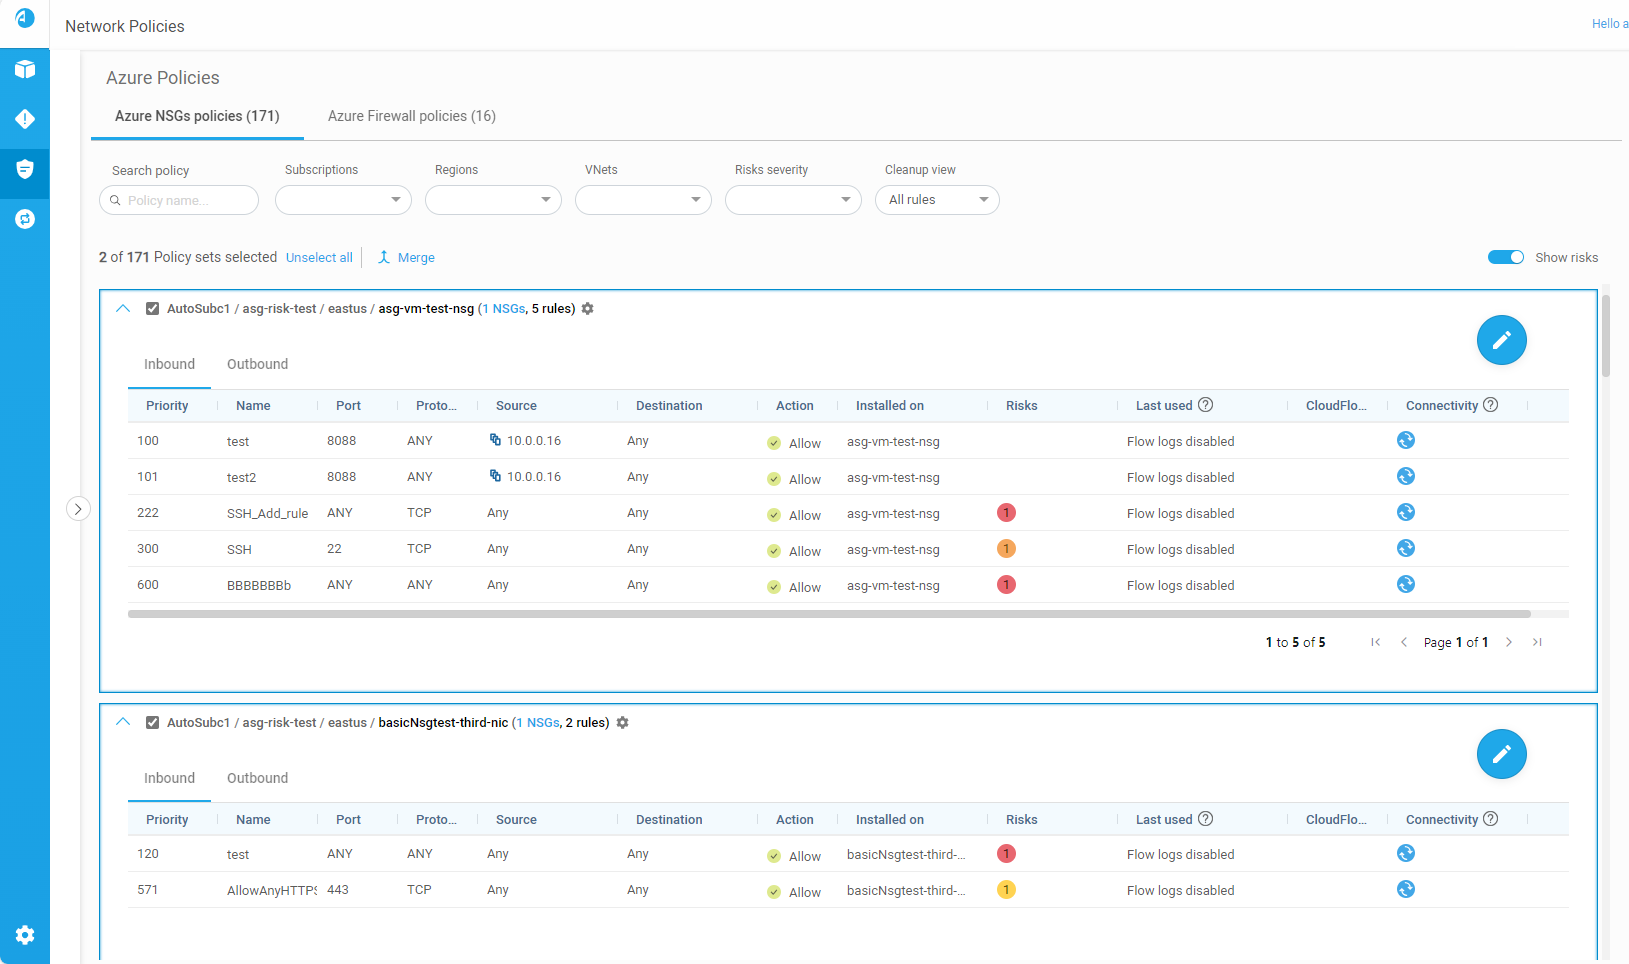
Click the  arrow to the left of each policy set to expand the policy set and see additional details.
The policy set location path lists the collection of elements configured in the policy.

Next to the policy set name, AppViz displays the number of security controls associated with the policy set. Click the security control link to display the name of the security control or the list of multiple security controls. For example:

Inbound and Outbound rules are displayed on separate tabs in each expanded policy set. For more details, see Field reference per rule type.
The total number of risk triggers detected at each severity level appear to the right of the policy set name inside circles color-coded by severity level. These totals include risks on both the outbound and inbound tabs.
Click on the risk severity circles to see details of all the risk triggers detected in the policy. For more details, see Work with policy sets.
Note: Merged policy sets and policy sets in Edit Mode do not display the total number of risk triggers detected.
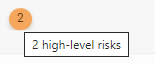
You can hover over Risks on policy indicators to see a tool-tip reminder of what their color represents. For example, the color ORANGE represents "High-level risks".
Click on the Risks on policy indicator to see details about rule risks and affected assets. See View rule risks & affected assets.
Note:
-
Severity circles are not displayed in merged policies or when a policy set is in Edit mode. In these cases the Risks column is greyed out (not active).
-
Activating the COMMIT button after making changes (i.e. being in edit mode), displays the risk severity circles again; however, for both displayed risk severity and total risk severity summary, changes made in the risks associated with a policy will not be seen until the next data collection/analysis cycle has occurred. (Since this cycle occurs every hour, the maximum wait time for update should be ~1 hour.)
Note: Risks are not calculated for rules with Action Go to Next.
The Last used column displays one of the following:
| Date / Message | Description |
|---|---|
| (Date) |
The date that the rule was last used if the rule had at least one hit during the configured inactivity period. |
|
Flow logs disabled |
Flow logs are not enabled and as a result logs reporting about the rule usage is not arriving to AppViz. |
| New / modified rule |
This message appears when the rule meets both of the following conditions:
|
|
No traffic logged |
This message appears when the rule meets both of the following conditions:
Example: Traffic did not hit the rule since it was modified 40 days ago and the inactivity period is set for 30 days (i.e., AppViz considers it an unused rule). Tip: Delete unused rules to keep your policy clean and avoid risk. For details, see Clean up policies. |
| Log collection failure | Contact AlgoSec support for assistance. |
Note: For more details about unused rules, see About AppViz unused rules.
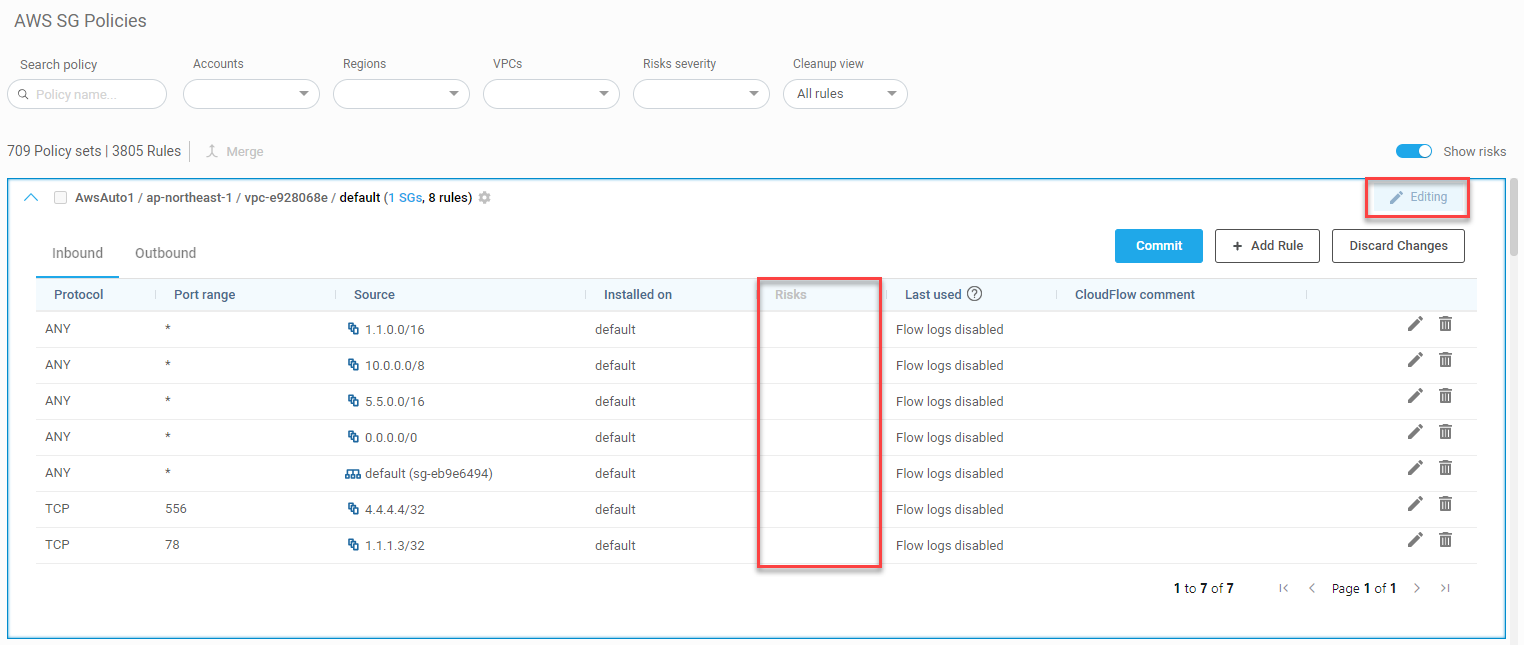
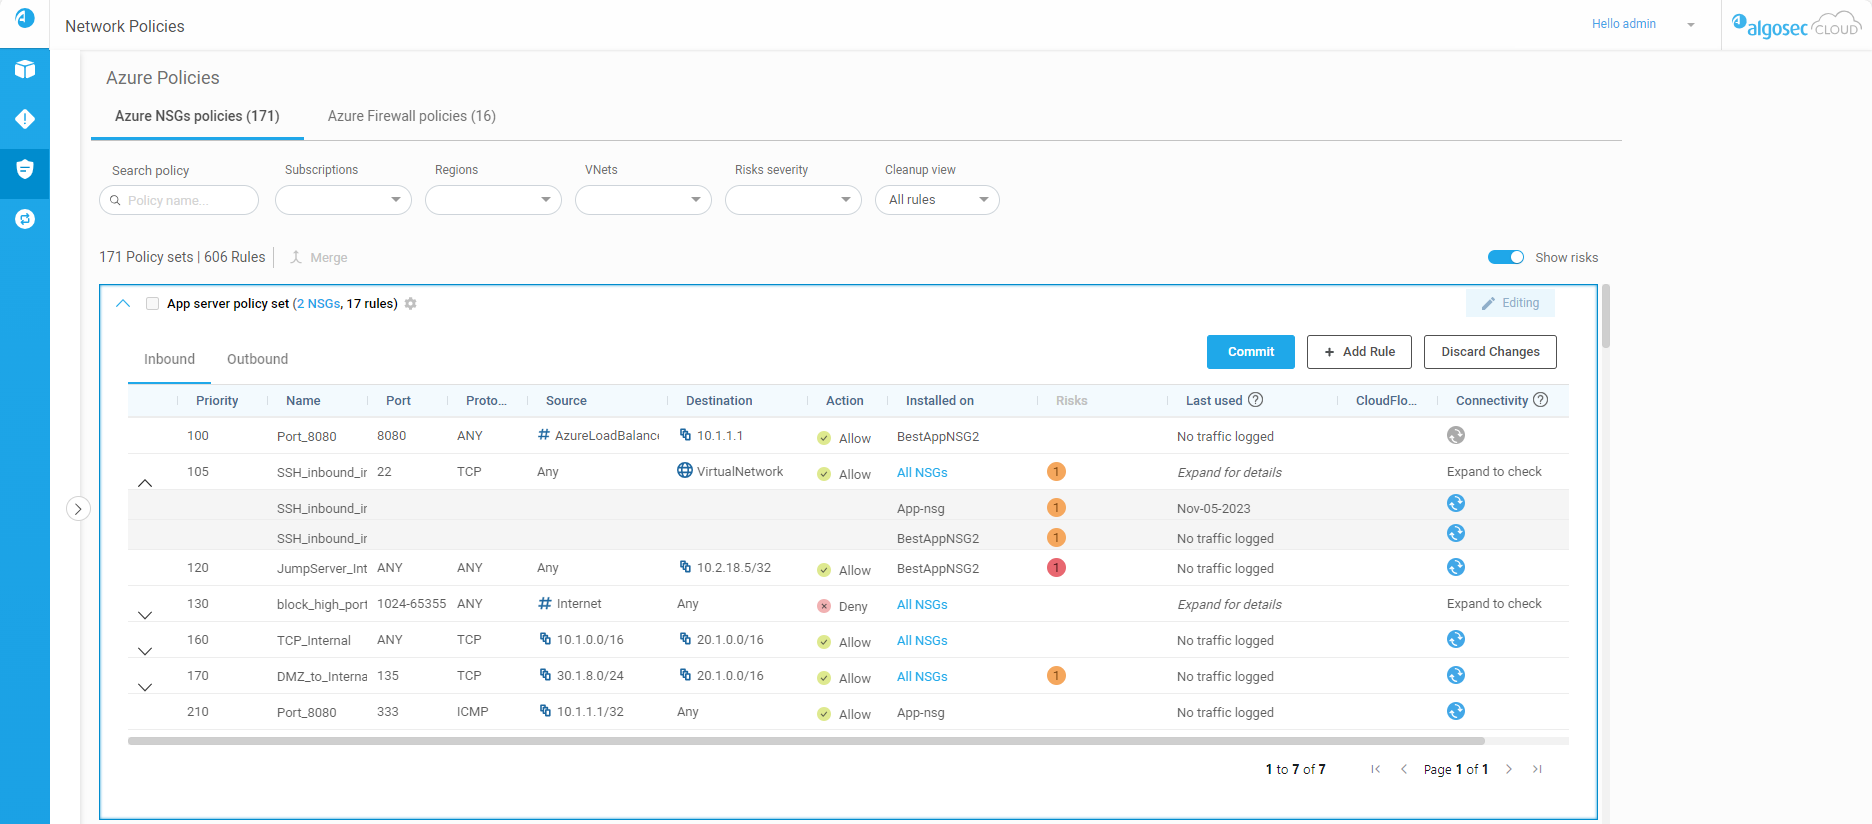
Click the Edit button to enter edit mode. The policy set remains in edit mode until clicking Commit or Discard Changes. While in edit mode:
-
The Editing label is displayed at the top of the policy set display
-
The risks column is inactive and risk severity circles are not displayed
-
Available action buttons:
-
Commit
-
+ Add Rule
-
Discard Changes

-
See below Edit network policy rules.

Click the arrow to the left of each policy set to expand the policy set and see additional details.
The policy set location path lists the collection of elements configured in the policy.

Next to the policy set name, AppViz displays the number of security controls associated with the policy set. Click the security control link to display the name of the security control or the list of multiple security controls. For example:

Inbound and Outbound rules are displayed on separate tabs in each expanded policy set. For more details, see Field reference per rule type.
The total number of risk triggers detected at each severity level appear to the right of the policy set name inside circles color-coded by severity level. These totals include risks on both the outbound and inbound tabs.
Click on the risk severity circles to see details of all the risk triggers detected in the policy. For more details, see Work with policy sets.
Note: Merged policy sets and policy sets in Edit Mode do not display the total number of risk triggers detected.
You can hover over Risks on policy indicators to see a tool-tip reminder of what their color represents. For example, the color ORANGE represents "High-level risks".
Click on the Risks on policy indicator to see details about rule risks and affected assets. See View rule risks & affected assets.
Note:
-
Severity circles are not displayed in merged policies or when a policy set is in Edit mode. In these cases the Risks column is greyed out (not active).
-
Activating the COMMIT button after making changes (i.e. being in edit mode), displays the risk severity circles again; however, for both displayed risk severity and total risk severity summary, changes made in the risks associated with a policy will not be seen until the next data collection/analysis cycle has occurred. (Since this cycle occurs every hour, the maximum wait time for update should be ~1 hour.)
Note: Risks are not calculated for rules with Action Go to Next.
The Last used column displays one of the following:
| Date / Message | Description |
|---|---|
| (Date) |
The date that the rule was last used if the rule had at least one hit during the configured inactivity period. |
|
Flow logs disabled |
Flow logs are not enabled and as a result logs reporting about the rule usage is not arriving to AppViz. |
| New / modified rule |
This message appears when the rule meets both of the following conditions:
|
|
No traffic logged |
This message appears when the rule meets both of the following conditions:
Example: Traffic did not hit the rule since it was modified 40 days ago and the inactivity period is set for 30 days (i.e., AppViz considers it an unused rule). Tip: Delete unused rules to keep your policy clean and avoid risk. For details, see Clean up policies. |
| Log collection failure | Contact AlgoSec support for assistance. |
Note: For more details about unused rules, see About AppViz unused rules.
Click the Edit button to enter edit mode. The policy set remains in edit mode until clicking Commit or Discard Changes. While in edit mode:
-
The Editing label is displayed at the top of the policy set display
-
The risks column is inactive and risk severity circles are not displayed
-
Available action buttons:
-
Commit
-
+ Add Rule
-
Discard Changes

-
See below Edit network policy rules.

A list of the Azure Firewalls protecting the selected entity in the tree appears above the list of policy sets.
Note: If the Azure Firewall selected in the Network Policies tree has no policies assigned to it then this row of information does not appear.
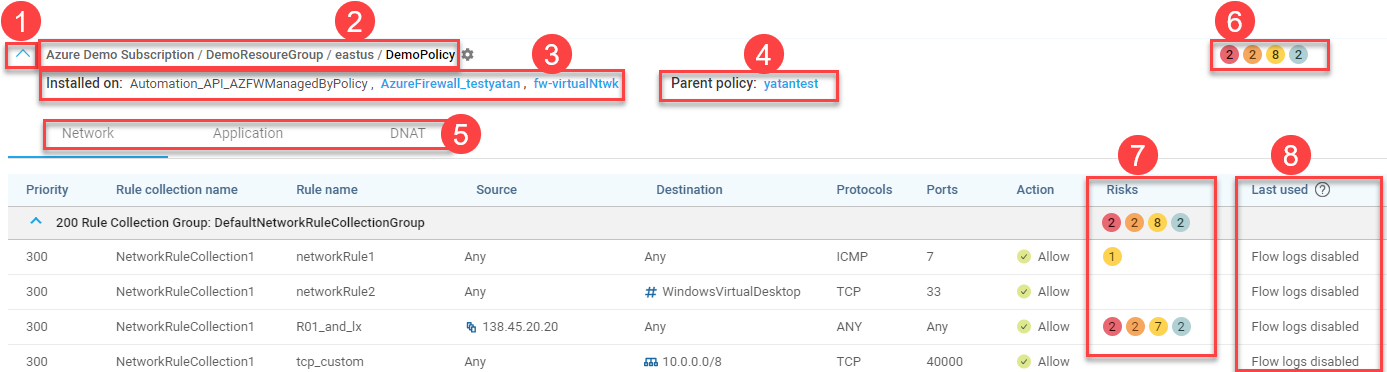
Click the arrow to the left of each policy set to expand the policy set and see additional details.
The policy set location path lists the collection of elements configured in the policy.

The list of firewalls using this policy.
-
Blue Link: The firewall name appears as a clickable blue link when it is active and onboarded, and you are not currently on its details page. Click the link to access more information.
-
Black (No Link): The firewall name displays in black without a link in the following situations:
-
You are viewing the firewall's details page.
-
The firewall is defined under the subscription but does not protect any VNet or VHub.
-
The subscription on which the firewall is configured is not onboarded to AppViz.
Note: Hover over the firewall name to see a tooltip with the name of the subscription where this firewall is located.
-
Child policies inherit the rules of the parent policies. For child policies, click the link of the parent policy to see the parent policy rules.
Network, Application, and DNAT rules are displayed on separate tabs in each expanded policy set. For more details, see Field reference per rule type.
The total number of risk triggers detected at each severity level appear to the right of the policy set name inside circles color-coded by severity level. These totals include risks on both the outbound and inbound tabs.
Click on the risk severity circles to see details of all the risk triggers detected in the policy. For more details, see Work with policy sets.
You can hover over Risks on policy indicators to see a tool-tip reminder of what their color represents. For example, the color ORANGE represents "High-level risks".
Click on the Risks on policy indicator to see details about rule risks and affected assets. See View rule risks & affected assets.
Note: Risks are not calculated for rules with Action Go to Next.
The Last used column displays one of the following:
| Date / Message | Description |
|---|---|
| (Date) |
The date that the rule was last used if the rule had at least one hit during the configured inactivity period. Note: Required logs for calculating Last Used information include Network, Application, and DNAT. If log collection is partially enabled, the Last Used information will be based only on data from those logs that are enabled. |
|
Flow logs disabled |
Flow logs are not enabled and as a result logs reporting about the rule usage is not arriving to AppViz. |
| New / modified rule |
This message appears when the rule meets both of the following conditions:
|
|
No traffic logged |
This message appears when the rule meets both of the following conditions:
Example: Traffic did not hit the rule since it was modified 40 days ago and the inactivity period is set for 30 days (i.e., AppViz considers it an unused rule). Tip: Delete unused rules to keep your policy clean and avoid risk. For details, see Clean up policies. |
| Log collection failure | Contact AlgoSec support for assistance. |
Note: For more details about unused rules, see About AppViz unused rules.

Click the arrow to the left of each policy set to expand the policy set and see additional details.
The policy set location path lists the collection of elements configured in the policy.
Next to the policy set name, AppViz displays the number of security controls associated with the policy set. Click the security control link to display the name of the security control or the list of multiple security controls. For example:

Network and Application rules are displayed on separate tabs in each expanded policy set. For more details, see Field reference per rule type.
Click the Edit button to enter edit mode. The policy set remains in edit mode until clicking Commit or Discard Changes. While in edit mode:
-
The Editing label is displayed at the top of the policy set display
-
The risks column is inactive and risk severity circles are not displayed
-
Available action buttons:
-
Commit
-
+ Add Rule
-
+ Add Collection
-
Discard Changes
-
See below Edit network policy rules.
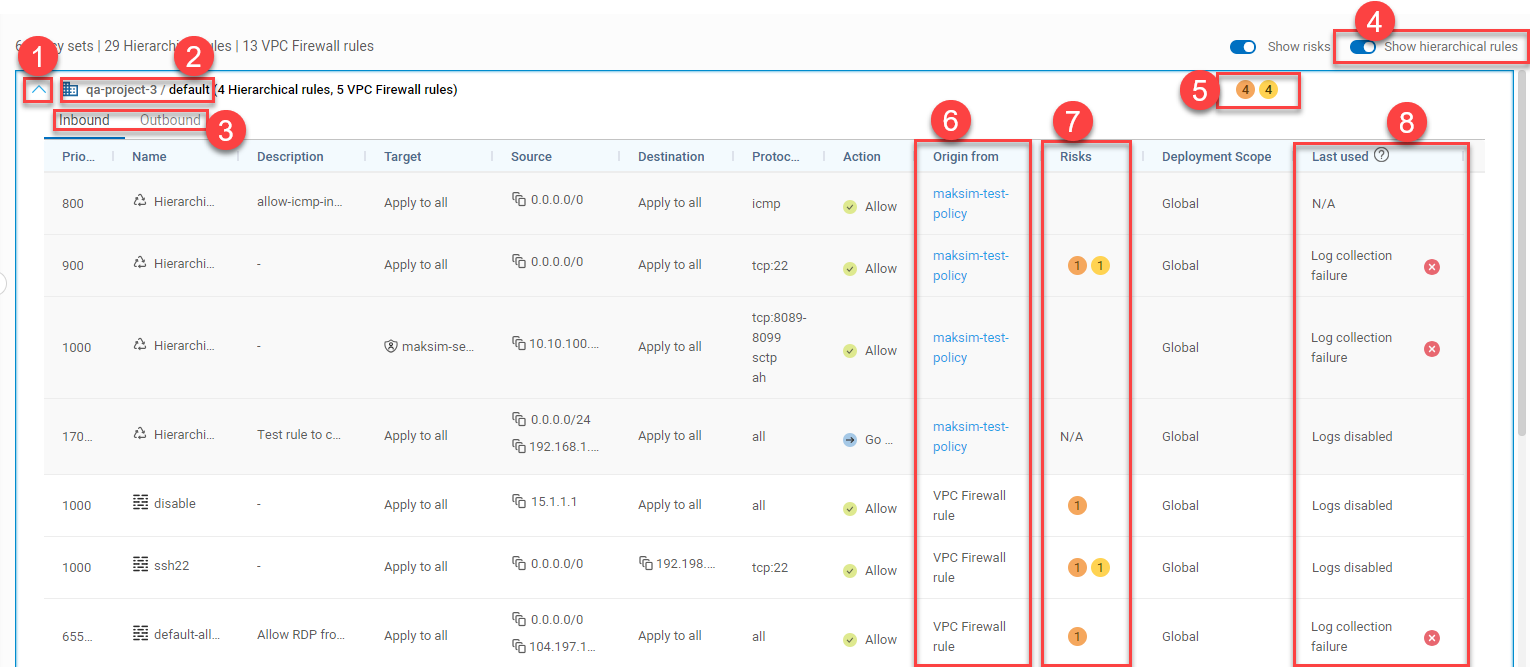
Click the arrow to the left of each policy set to expand the policy set and see additional details.
The policy set location path lists the collection of elements configured in the policy.

Inbound and Outbound rules are displayed on separate tabs in each expanded policy set. For more details, see Field reference per rule type.

When activated (default), hierarchical rules used by the Google Cloud VPC firewall are displayed above the firewall rules in the Firewall Policies tab and appear in the list of policy sets.
When disabled, only the firewall rules are shown in the Firewall Policies tab.
The total number of risk triggers detected at each severity level appear to the right of the policy set name inside circles color-coded by severity level. These totals include risks on both the outbound and inbound tabs.
Click on the risk severity circles to see details of all the risk triggers detected in the policy. For more details, see Work with policy sets.
The policy which the rule is part of.
Note:AppViz displays the policies in the order that traffic encounters the rules.
You can hover over Risks on policy indicators to see a tool-tip reminder of what their color represents. For example, the color ORANGE represents "High-level risks".
Click on the Risks on policy indicator to see details about rule risks and affected assets. See View rule risks & affected assets.
Note:
-
Severity circles are not displayed in merged policies or when a policy set is in Edit mode. In these cases the Risks column is greyed out (not active).
-
Activating the COMMIT button after making changes (i.e. being in edit mode), displays the risk severity circles again; however, for both displayed risk severity and total risk severity summary, changes made in the risks associated with a policy will not be seen until the next data collection/analysis cycle has occurred. (Since this cycle occurs every hour, the maximum wait time for update should be ~1 hour.)
Note: Risks are not calculated for rules with Action Go to Next.
The Last used column displays one of the following:
| Date / Message | Description |
|---|---|
| (Date) |
The date that the rule was last used if the rule had at least one hit during the configured inactivity period. Note:
|
|
Logs disabled |
Logs are not enabled and as a result logs reporting about the rule usage is not arriving to AppViz. See Enable Google Cloud logs. |
| New / modified rule |
This message appears when the rule meets both of the following conditions:
|
|
No traffic logged |
This message appears when the rule meets both of the following conditions:
Example: Traffic did not hit the rule since it was modified 40 days ago and the inactivity period is set for 30 days (i.e., AppViz considers it an unused rule). Tip: Delete unused rules to keep your policy clean and avoid risk. For details, see Clean up policies. *Note
|
|
N/A |
When a rule uses a protocol other than TCP or UDP, AppViz does not receive information about the rule and will display N/A. |
| Log collection failure | Contact AlgoSec support for assistance. |
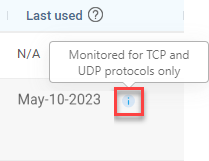
 appears in the column to indicate that this information may not be accurate.
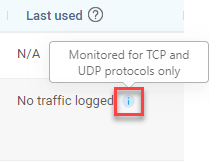
Note: For more details about unused rules, see About AppViz unused rules.
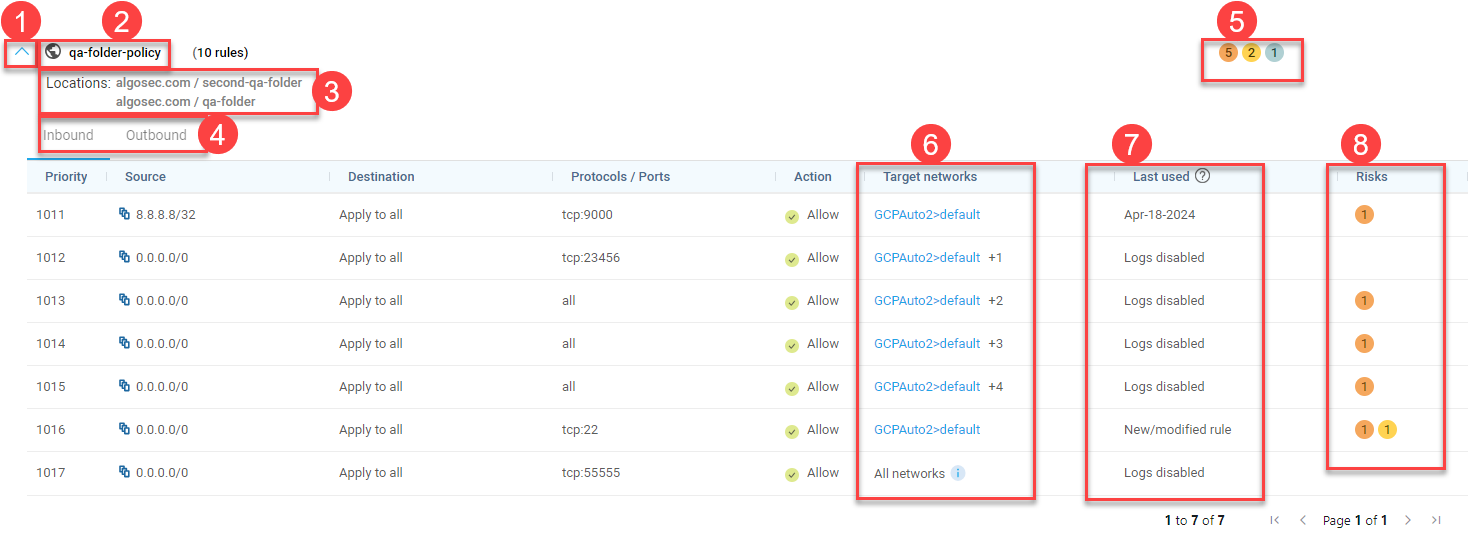
Click the arrow to the left of each policy set to expand the policy set and see additional details.
The policy set location path lists the collection of elements configured in the policy.
The path to the folder where the policy is defined in Google Cloud.
Inbound and Outbound rules are displayed on separate tabs in each expanded policy set. For more details, see Field reference per rule type.
The total number of risk triggers detected at each severity level appear to the right of the policy set name inside circles color-coded by severity level. These totals include risks on both the outbound and inbound tabs.
Click on the risk severity circles to see details of all the risk triggers detected in the policy. For more details, see Work with policy sets.
Target networks are the Google Cloud networks using rules from a hierachical policy. Each target network is listed as a combination of its project name and VPC.
-
If there are multiple networks using a hierachical policy, a number indicates how many additional networks there are. Click on the number to see a list of the additional target networks.
-
Target networks in projects that are onboarded to AlgoSec appear in blue. You can click on them to open the VPC and view the relevant network policy. (Target networks in projects that are not onboarded to AlgoSec will not have a link.)
-
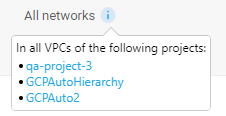
When a rule is applied on all projects that inherit a particular policy, the "Target networks" column for that rule displays "All networks".
-
Hover over the
 information icon to see a list of all projects onboarded to AppViz that are using this rule.
-
Click on a project name to open the project with its first policy expanded and the selected rule highlighted.
-
The Last used column displays one of the following:
| Date / Message | Description |
|---|---|
| (Date) |
The date that the rule was last used if the rule had at least one hit during the configured inactivity period. Note:
|
|
Logs disabled |
Logs are not enabled and as a result logs reporting about the rule usage is not arriving to AppViz. See Enable Google Cloud logs. |
| New / modified rule |
This message appears when the rule meets both of the following conditions:
|
|
No traffic logged |
This message appears when the rule meets both of the following conditions:
Example: Traffic did not hit the rule since it was modified 40 days ago and the inactivity period is set for 30 days (i.e., AppViz considers it an unused rule). Tip: Delete unused rules to keep your policy clean and avoid risk. For details, see Clean up policies. *Note
|
|
N/A |
When a rule uses a protocol other than TCP or UDP, AppViz does not receive information about the rule and will display N/A. |
| Log collection failure | Contact AlgoSec support for assistance. |
Note: For more details about unused rules, see About AppViz unused rules.
You can hover over Risks on policy indicators to see a tool-tip reminder of what their color represents. For example, the color ORANGE represents "High-level risks".
Click on the Risks on policy indicator to see details about rule risks and affected assets. See View rule risks & affected assets.
Note: Risks are not calculated for rules with Action Go to Next.
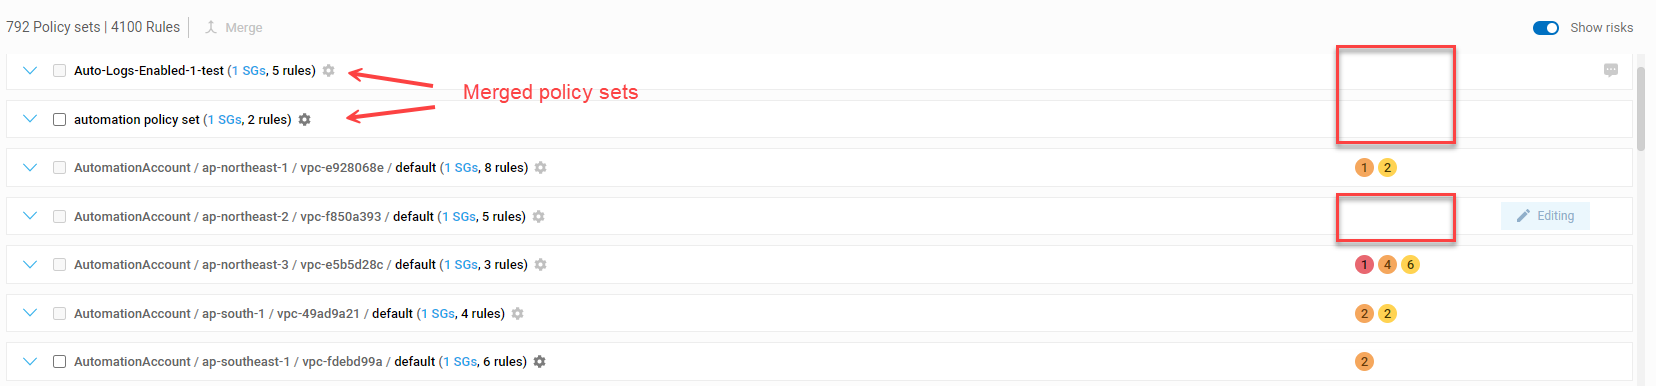
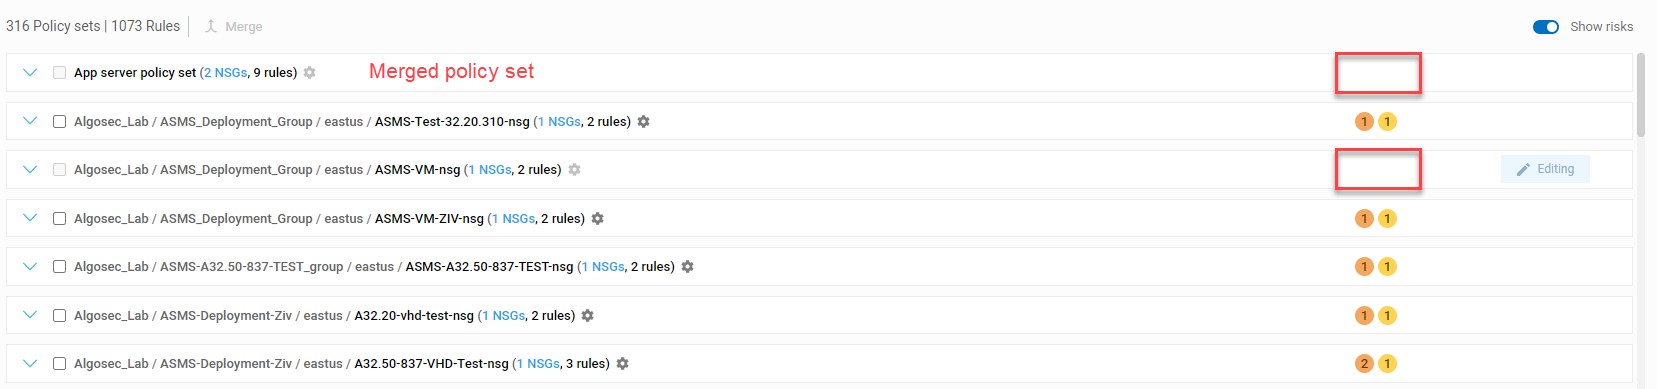
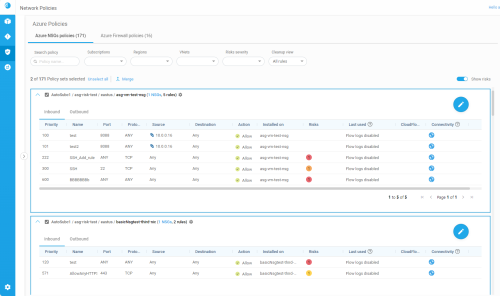
Merge policy sets
For Azure NSG, Azure Firewall (classic), and AWS SG
Since each detected network policy is assigned its own, individual policy set by default, you'll want to merge similar policy sets together to view and manage them together.
Note:
-
Merging policy sets is only supported within the same policy type. AppViz does not support merging policy sets across AWS SG, Azure NSG, and Azure Firewall (classic).
-
For merged policies, risk severity circles are not displayed and the Risks column is greyed out (not active).
Do the following:
-
View the policy sets you want to merge, using the search box to search for similar items. For details, see Search policy sets.
-
Expand each policy set to inspect its details and confirm that you want to merge them.
-
Select the check boxes next to each policy set you want to merge, and then click Merge.

Tip: If you have many policy sets to select, use the Select all or Unselect all links above the grid as needed.
-
In the Merge Policy dialog box that appears, enter a name for your new policy set, and an optional description.
Click Merge to merge the selected policies into a single set.
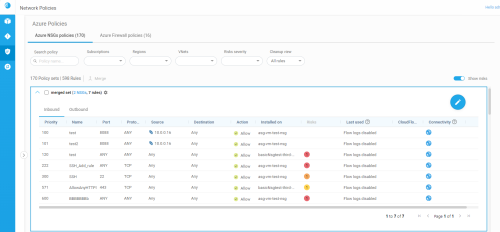
The policy set grid is updated with your new set. For example:


Tip: To dissolve your merged policy set and return each policy to its own individual set, commit or discard any changes made, and then edit the properties for your merged set.
For details see Edit policy set properties.
Rules that are installed on multiple security controls in merged policy sets each have their own downward arrows. Click on these to view details about each target.
When rule displays are expanded by clicking on the downward arrow, the Installed on column indicates the names of each security control on which the rule is installed.
The columns you see may differ, depending on the type of security control or asset you are working with. For more details, see Field reference per rule type.
For example:
Edit policy set properties
For Azure NSG, Azure Firewall (classic), and AWS SG
Edit the properties for each policy set to change the name, description, or member security controls.
Note: If you want to add or modify policy rules, drill down into the policy set itself.
If your policy set is currently in Edit mode, you will not be able to modify the policy set properties. Commit or discard your changes to make these edits.
For more details, see Edit network policy rules.
Do the following:
-
View the policy set whose properties you want to edit.
Tip: You may want to use the search box to find the one you're looking for. For details, see Work with policy sets.
-
Click the
 properties button next to the policy set name.
 -
In the Network Policy Set Properties dialog that appears, do any of the following:
Name Edit the name listed for the policy set in the grid. Description Enter a description for the policy set. This description is shown in the grid when you hover over the  Description icon.
Security Controls This area lists the security controls included in the policy set.
- Click an X to remove a single security control from the set.
- To completely dissolve the set and return each policy to its own individual set, click Clear all controls. In the message that appears, click Yes to confirm.
Tip: To add a new security to control to a policy set, merge the relevant sets together. For details, see Merge policy sets.
Edit network policy rules
For Azure NSG, Azure Firewall (classic), and AWS SG
Edit each of your network policies by adding, deleting, and modifying rules and rule collections in the network policy set.
-
Any changes made in a specific rule affect all security controls where the rule is installed.
-
Only one user can edit each policy set at a given time. Policy sets are locked while editing and are opened in read-only mode by default.
When you're done, click Commit or Discard changes to unlock the policy set for others.
For Azure Firewall (classic) only: Once a rule collection is created, its priority, name, and action are all read only. The rules inside a rule collection, however, can be edited.
Note: If you want to make higher-level changes, such as the policy set name, description, or member controls, view the policy set from its parent level. For more details, see Edit policy set properties and Network Policies page.
Do the following:
-
Browse to and expand a specific network policy set. For details, see Network Policies page.
Rules are displayed in a boxed grid that lists the source, destination, and protocol details for each rule, as well as the security controls each rule is installed on.
If you are in read-only mode, a large
 Edit button is shown at the top right of the policy set box. Click the Edit button to make changes to the expanded policy.
Note: For Azure Firewall (classic), the rules are grouped by rule collection. Expand the collection to drill down to rule details.
- Do any of the following:
-
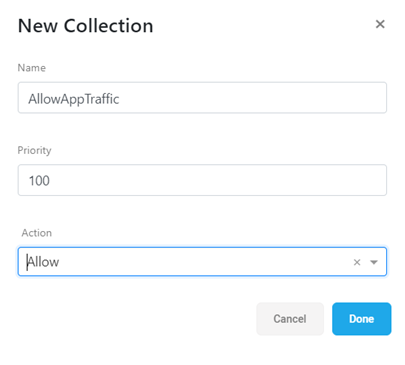
At the top of the boxed grid, click + Add Collection.
-
Enter a unique name and numeric priority, and then define an action for the new collection: either Allow or Deny.
For example:

-
Click Done to add your new collection.
-
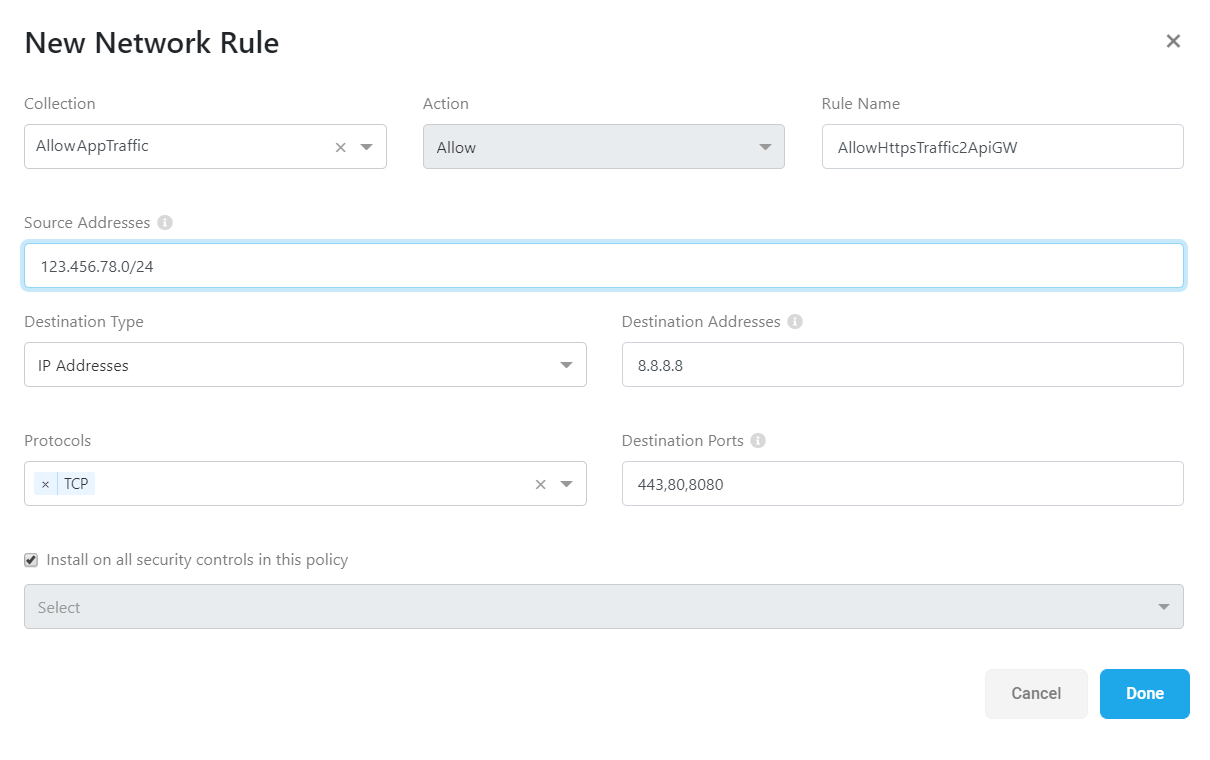
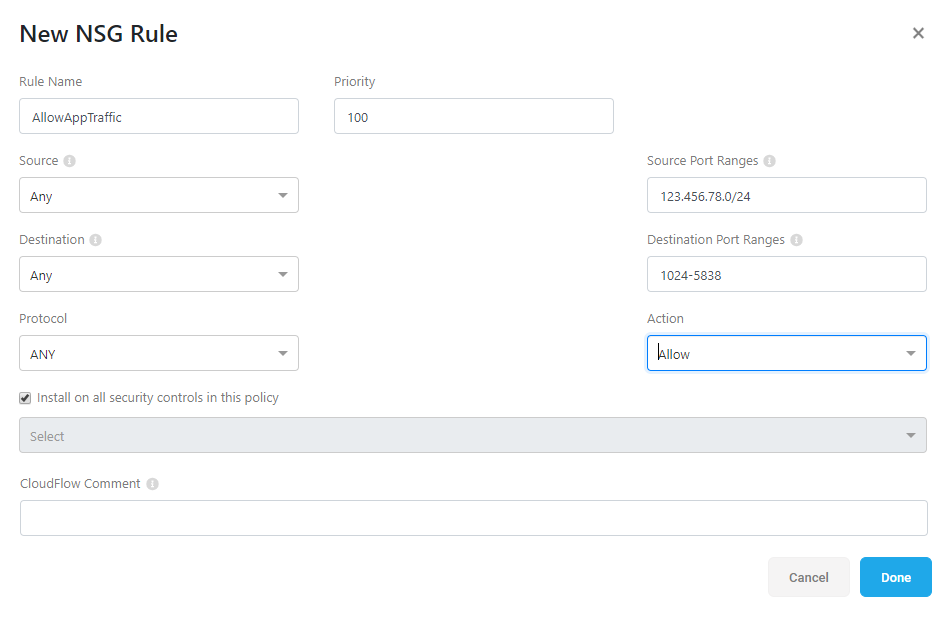
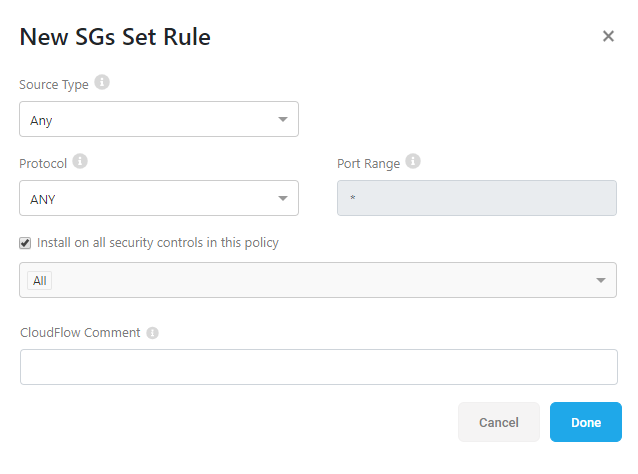
At the top of the boxed grid, click + Add Rule.
-
In the New ... Rule dialog that appears, populate the fields as needed.
-
Click Done to save your rule.
The new rule appears within the dropdown list for the selected collection.
-
For Azure Firewall (classic) only, find your collection in the policy set and click the
 dropdown arrow at the right side of the row.
 - Click on one of the Edit or Delete icons to the right of the target rule.
 Edit
EditAn Edit ... Rule dialog opens for the rule you selected to edit. Make your changes as needed, and click Done  . Delete.
The rule is removed from your policy set. Tip: For Azure NSG and AWS SG with flow logs enabled, AppViz displays the date each rule was last used, if at all.
You may want to delete unused rules to keep your policy clean. For details, see Clean up policies.
The page is refreshed with your changes.
-
Do one of the following:
-
Click Discard changes to revert back to the last saved version of the policy set and unlock it for others.
-
Click Commit at the top of the screen to save your changes.
AppViz displays a list of the changes you made. Accept the changes to complete the commit.
The commit provisions your changes on the security controls and unlocks the policy for others.
-
Azure Firewall (classic) organizes its rules by rule collections. For more details, see Field reference per rule type.
Do the following:
Within your new collection, click + AddRule to create a new rule with the selected collection already defined. For more details, see Add a new rule.
Note: In Azure Firewall (classic), when rules are defined within a rule collection, each rule inherits the priority and actions defined for the parent collection.
Do the following:
To edit or delete an existing rule, do the following:
Note: Your changes are automatically saved, even if you haven't committed them, closed your browser or logged out of AppViz. They will be there for you the next time you browse back to this policy set. However, the policy set remains locked for others until you commit or discard your changes.
